ROBOTIQ E PICK Quick Start Manual
Vacuum gripper
Hide thumbs
Also See for E PICK:
- Original notice (119 pages) ,
- Instruction manual (93 pages) ,
- Manual (2 pages)
Table of Contents
Advertisement
Quick Links
THANK YOU FOR
CHOOSING ROBOTIQ
This step-by-step guide will allow you to install and use
your EPick vacuum gripper on Universal Robots CB
Series robots fitted with a Robotiq I/O coupling.
1.WHAT IS SUPPLIED?
Standard upon delivery of
VAC-CB-UR-EPICK-KITX-W
Vacuum generator
(VAC-GRP-EPICK)
I/O coupling kit
(IO-CPL-UR-CB-KIT)
- Screws kit
- Micro-USB to USB cable
- 16 Gb USB stick
Suction cups
KIT1-W
(1 SUCTION CUP)
KIT2-W
(2 SUCTION CUPS)
KIT4-W
(4 SUCTION CUPS)
Required hardware
2.TOOLS YOU NEED
4mm
hex key
3.GET THE LATEST
support.robotiq.com
Visit:
D
URCAP
OWNLOADING THE
1. Select brand > Universal Robots > Vacuum Grippers
> Software > I/O Coupling Software.
2. Select DOWNLOAD ZIP.
3. Save the ZIP file UCH-X.X.X to a USB stick.
D
OWNLOADING THE INSTRUCTION MANUAL
1. Select brand > Universal Robots > Vacuum
Grippers > Documents > View online or Download
PDF.
B
,
EFORE OPERATING THE EPICK VACUUM GRIPPER
!
.
READ YOUR INSTRUCTION MANUAL
For easier mounting, move the robot tool flange
to make it point upwards.
M
OUNTING THE
1. Insert the provided dowel pin into the tool flange. It
should fit tightly on the flange, and loosely on the
coupling.
2. Mount the I/O Coupling on the tool flange of the
robot. Align with the provided dowel pin.
3. Secure the I/O Coupling on the tool flange with four
M6 screws and toothlock washers, using a 4mm hex key.
M
OUNTING THE
1. Put the EPick on the coupling.
2. Secure the EPick to the coupling with four M5 screws
and toothlock washers, using a 4mm hex key.
3. Plug coupling connector into tool connector.
M6 screws
coupling
connector
dowel pin
tool connector
PLEASE
4.MOUNTING
I/O C
OUPLING
EP
I/O C
ICK ON THE
OUPLING
suction cup
vacuum generator
M5 screws
CAREFUL !
FRAGILE PINS
I/O coupling
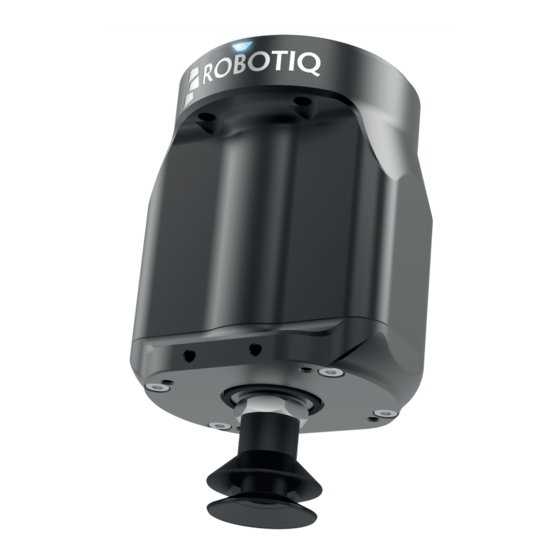
Figure 1. EPick wrist connection kit
exploded view, on robot arm.
5. CONFIGURING
On the teach pendant, select the I/O tab. Tool ouput
must be set to 24 volts (see figure 2).
For more details on configuring coupling
presets, see section 7, "Configuring Presets".
Figure 2. Set tool output to 24 volts.
6.INSTALLING SOFTWARE
1. Have a USB stick that contains the .urcap file (see
section 3, "Get the latest").
2. Insert the USB stick in the robot teach pendant.
3. Tap Setup Robot > URCaps Setup.
4. Tap
.
5. Open UCH-X.X.X.urcap.
6. Tap Restart to activate the URCap.
7. The Wrist Connection toolbar will display shortly after
completing the installation.
Figure 3. The Wrist Connection toolbar.
Advertisement
Table of Contents

Subscribe to Our Youtube Channel
Related Manuals for ROBOTIQ E PICK


Summary of Contents for ROBOTIQ E PICK
- Page 1 7, “Configuring Presets”. 1. Insert the provided dowel pin into the tool flange. It your EPick vacuum gripper on Universal Robots CB Series robots fitted with a Robotiq I/O coupling. should fit tightly on the flange, and loosely on the coupling.
- Page 2 Vacuum Gripper coupling micro-USB port. 2. Connect the cable to a computer USB port. PICK Figure 4. The Wrist Connection toolbar contains four presets. 3. Configure coupling using the Robotiq User Interface. 9. PROGRAMMING ONFIGURING VIA THE OBOTIQ NTERFACE WITH THE NODE QUICK START GUIDE support.robotiq.com.
Need help?
Do you have a question about the E PICK and is the answer not in the manual?
Questions and answers