ROBOTIQ EPick Manual
Hide thumbs
Also See for EPick:
- Original notice (119 pages) ,
- Instruction manual (93 pages) ,
- Manual (2 pages)
Advertisement
Quick Links
THANK YOU FOR
CHOOSING ROBOTIQ
This step-by-step guide will allow you to install and
use your EPick Vacuum Gripper on CB Series Universal
Robots.
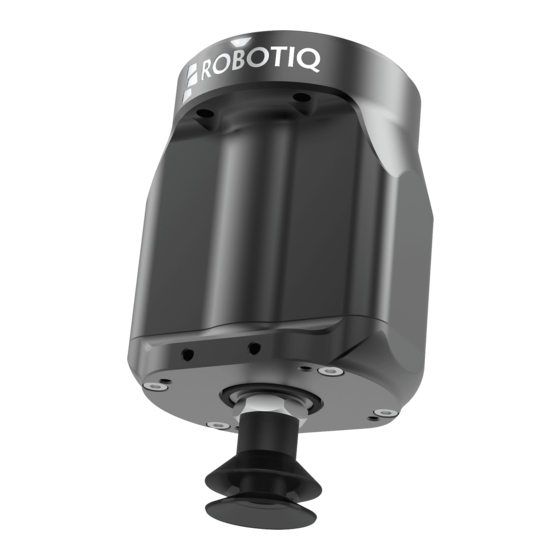
1.WHAT IS SUPPLIED?
VAC-CB-UR-EPICK-KITX
Standard upon delivery of
• Vacuum generator.......................(
VAC-GRP-EPICK
• Gripper coupling...............................(GRP-CPL-062)
• USB to RS485 Adapter..........(ACC-ADT-USB-RS485)
• High-flex device cable.........(CBL-COM-2065-10-HF)
• Suction Cup Option
KIT1...................................................(1
KIT2.................................................(
KIT4.................................................(
Required hardware
2.TOOLS YOU NEED
4 mm
Hex Key
3.GET THE LATEST
support.robotiq.com
Visit:
D
URCAP
OWNLOADING THE
1. Select brand > Universal Robots > Vacuum Grippers
> Software > Gripper Software.
2. Select DOWNLOAD ZIP.
3. Save the ZIP file UCG-X.X.X to a USB stick.
BEFORE OPERATING THE GRIPPER,
PLEASE READ INSTRUCTION MANUAL.
4.MOUNTING
1. Mount the coupling on your robot arm. Align with the
provided dowel pin.
2. Secure by inserting the M6 screws and tooth lock washers.
3. Mount the Vacuum Gripper on the coupling.
Align with the dowel pin.
4. Secure by inserting the M5 screws and tooth lock washers.
5. Plug the device cable into the coupling pigtail and secure
the cable along the robot arm using a cable routing system.
6. To install the 2 or 4 suction cups kits for gripper, please
refer to the Connector Assembly Guide. You can find
details on assembling the Suction Cup System.
)
)
SUCTION CUP
2
)
SUCTION CUPS
(M5 screws and
)
4
SUCTION CUPS
(M6 screws and
washers)
(coupling pigtail)
(suction cup)
(hand tightened)
(vacuum generator)
washers)
CAREFUL !
FRAGILE PINS
(gripper coupling)
(dowel pin)
5.WIRING
The red (24V) and black (0V) wires of the device cable
(CBL-COM-2065-10-HF) provide power to the Gripper.
1. Connect the red wire to a 24V pin.
2. Connect the black wire to a 0V pin.
Power
CI
CI
CO
PWR
24V
24V
0V
GND
CI4
CI0
CO0
24V
24V
24V
0V
0V
CI1
CI5
CO1
24V
24V
0V
CI2
CI6
CO2
24V
24V
0V
CI3
CI7
CO3
3. Connect the communication wires in the USB converter
(ACC-ADT-USB-RS485) as shown.
(1)
485+
1
(2)
485-
2
(3)
485 GND
3
4
5
CBL-COM-2065-10-HF
Pin
Signal Name
High-Flex Device Cable
1
485 + (A)
2
485 - (B)
3
485 GND
4. Connect the USB converter to the UR controller.
6.SOFTWARE INSTALLATION
1. Have a USB stick that contains the .urcap file (
2. Insert the USB stick in the robot teach pendant.
3. Tap Setup Robot and then URCaps Setup.
4. Tap the
sign.
5. Open UCG-X.X.X.urcap.
6. Tap the Restart button to activate the URCap.
7. The Vacuum toolbar button will display a short time after
the installation of the software is completed.
CO
0V
CO4
0V
CO5
0V
CO6
0V
CO7
WHITE
GREEN
SHIELD
3).
STEP
Advertisement

Related Manuals for ROBOTIQ EPick


Summary of Contents for ROBOTIQ EPick
- Page 1 This step-by-step guide will allow you to install and 3. Mount the Vacuum Gripper on the coupling. use your EPick Vacuum Gripper on CB Series Universal 2. Connect the black wire to a 0V pin. Align with the dowel pin.
- Page 2 Vacuum Gripper Toolbar 8. PROGRAMMING THE GRIPPER Vacuum command - RELEASE ACUUM support.robotiq.com 1. Tap the Program tab at the top of the screen. 2. Tap the Structure tab. 3. Tap the URCaps tab and select the Vacuum URCap. support@robotiq.com November 2021 4.
Need help?
Do you have a question about the EPick and is the answer not in the manual?
Questions and answers