
Related Manuals for DIEBOLD NIXDORF CS 7780


Summary of Contents for DIEBOLD NIXDORF CS 7780
- Page 1 Diebold Nixdorf CS 7780 Through-the-Wall Drive-up System Operating Guide TP-821813-001B PD 7516 April 2020...
- Page 2 Diebold, Incorporated or its subsidiaries (collectively “Diebold Nixdorf”) that appear in this document are used for informational purposes only and Diebold Nixdorf claims no rights thereto, nor does such use indicate any affiliation with or any endorsement of Diebold Nixdorf or Diebold Nixdorf products by the owners thereof.
-
Page 3: Table Of Contents
Appendix B Cleaning the Exterior of the terminal ....... Copyright ©Diebold, Incorporated (7/2015, 3/2017) - All Rights Reserved Copyright ©Diebold Nixdorf (4/2020) - All Rights Reserved TP-821813-001B... - Page 4 ......2-30 Copyright ©Diebold, Incorporated (7/2015, 3/2017) - All Rights Reserved Copyright ©Diebold Nixdorf (4/2020) - All Rights Reserved TP-821813-001B...
- Page 5 Related Hardware Documentation ....... Copyright ©Diebold, Incorporated (7/2015, 3/2017) - All Rights Reserved Copyright ©Diebold Nixdorf (4/2020) - All Rights Reserved TP-821813-001B...
-
Page 6: Introduction
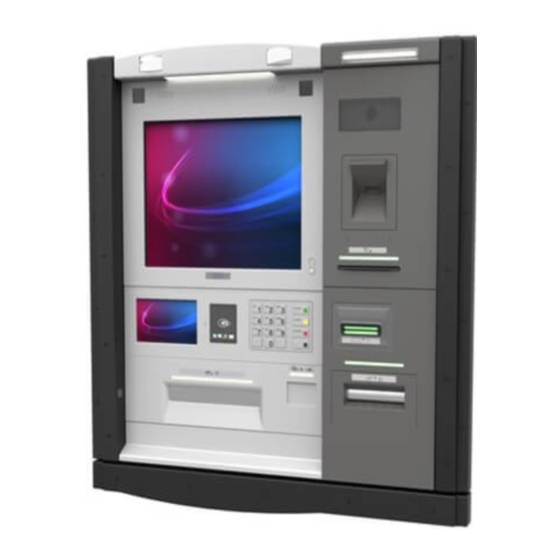
Section 1 Introduction The CS 7780 through-the-wall drive-up terminal is a rear-load through-the-wall terminal. The terminal dispenses cash and presents transaction records to the consumers and optionally accepts cash and check deposits. It is designed with a flat fascia so that consumers can drive up to the terminal, view the options, and perform transactions while remaining in their automobiles. -
Page 7: Before Performing Maintenance Procedures On The Terminal
Strictly observe the following safety precautions when servicing the terminal. By following these precautions, you can reduce the risk of equipment damage, severe personal injury, or death. Copyright ©Diebold, Incorporated (7/2015, 3/2017) - All Rights Reserved Copyright ©Diebold Nixdorf (4/2020) - All Rights Reserved TP-821813-001B... - Page 8 Severe bodily injury, death from electrical shock, or equipment damage can result. • Always turn off the terminal before removing or installing devices. Copyright ©Diebold, Incorporated (7/2015, 3/2017) - All Rights Reserved Copyright ©Diebold Nixdorf (4/2020) - All Rights Reserved TP-821813-001B...
-
Page 9: Radio Interference Label
A warning label (see Figure 1-2) is included on ATMs available in Taiwan to meet Taiwan Class A regulatory requirements for radio frequency interference. Copyright ©Diebold, Incorporated (7/2015, 3/2017) - All Rights Reserved Copyright ©Diebold Nixdorf (4/2020) - All Rights Reserved TP-821813-001B... -
Page 10: Terminology
• Module refers to the major electro-mechanical devices of the terminal, such as displays, printers, and dispensers. Copyright ©Diebold, Incorporated (7/2015, 3/2017) - All Rights Reserved Copyright ©Diebold Nixdorf (4/2020) - All Rights Reserved TP-821813-001B... -
Page 11: Device Usage
Coin dispenser ActivMedia depositor Receipt printer Journal printer Terminal power (on/off) switch Maintenance mode switch Speakers Near Field Communication (NFC) contactless card reader Copyright ©Diebold, Incorporated (7/2015, 3/2017) - All Rights Reserved Copyright ©Diebold Nixdorf (4/2020) - All Rights Reserved TP-821813-001B... - Page 12 Table 1-1 Device Usage (continued) Used By... Device Consumer Operator Guide lights Local access keypad Rear service display Safe devices (locks) Copyright ©Diebold, Incorporated (7/2015, 3/2017) - All Rights Reserved Copyright ©Diebold Nixdorf (4/2020) - All Rights Reserved TP-821813-001B...
-
Page 13: Terminal Devices
The location of some devices and features can vary, depending on how they are installed on the terminal. Some configurations of the fascia is shown in Figure 2-1. Copyright ©Diebold, Incorporated (7/2015, 3/2017) - All Rights Reserved Copyright ©Diebold Nixdorf (4/2020) - All Rights Reserved TP-821813-001B... -
Page 14: Figure 2-1 Modules And Devices Mounted On The Fascia
Figure 2-1 Modules and Devices Mounted on the Fascia (sheet 1 of 2) Copyright ©Diebold, Incorporated (7/2015, 3/2017) - All Rights Reserved Copyright ©Diebold Nixdorf (4/2020) - All Rights Reserved TP-821813-001B... - Page 15 ActivView display/Identification card scanner Consumer display Function key Speakers Task light Figure 2-1 Modules and Devices Mounted on the Fascia (sheet 2 of 2) Copyright ©Diebold, Incorporated (7/2015, 3/2017) - All Rights Reserved Copyright ©Diebold Nixdorf (4/2020) - All Rights Reserved TP-821813-001B...
-
Page 16: Figure 2-2 Camera
The consumer display is also used for routine maintenance, balancing, and monitoring supplies and service tasks. The display has a privacy screen option. Copyright ©Diebold, Incorporated (7/2015, 3/2017) - All Rights Reserved Copyright ©Diebold Nixdorf (4/2020) - All Rights Reserved TP-821813-001B... -
Page 17: Figure 2-3 Consumer Display
The display also has a privacy screen option. Figure 2-3 Consumer Display Copyright ©Diebold, Incorporated (7/2015, 3/2017) - All Rights Reserved Copyright ©Diebold Nixdorf (4/2020) - All Rights Reserved TP-821813-001B... -
Page 18: Figure 2-4 Encrypting Pin Pad (Epp7)
• ActivEdge card reader/dip card reader/motorized card reader • ActivCash dispenser • ActivMedia depositor • Coin dispenser • Receipt printer Copyright ©Diebold, Incorporated (7/2015, 3/2017) - All Rights Reserved Copyright ©Diebold Nixdorf (4/2020) - All Rights Reserved TP-821813-001B... -
Page 19: Figure 2-5 Guide Lights
Visually impaired consumers can plug headphones into a jack on the fascia (see Figure 2-1) to receive voice guidance. The fascia speakers are turned off when the headphone jack is being used. Copyright ©Diebold, Incorporated (7/2015, 3/2017) - All Rights Reserved Copyright ©Diebold Nixdorf (4/2020) - All Rights Reserved TP-821813-001B... -
Page 20: Figure 2-6 Identification Card Scanner
LEDs on the card reader bezel flash red if the card is inserted short edge first. Refer to the ActivEdge Secure Card Reader Operating Guide (TP-821629-001A). Copyright ©Diebold, Incorporated (7/2015, 3/2017) - All Rights Reserved Copyright ©Diebold Nixdorf (4/2020) - All Rights Reserved TP-821813-001B... -
Page 21: Figure 2-7 Activedge Card Reader
The dip card reader cannot retract, capture, or retain cards. Refer to the Dip Card Reader (with chip, 123) Operating Guide (TP-820814-001B). Copyright ©Diebold, Incorporated (7/2015, 3/2017) - All Rights Reserved Copyright ©Diebold Nixdorf (4/2020) - All Rights Reserved TP-821813-001B... -
Page 22: Figure 2-8 Dip Card Reader
• Power failure occurs while the card is in the card reader, and the option to return the card on power failure is not present. 2-10 Copyright ©Diebold, Incorporated (7/2015, 3/2017) - All Rights Reserved Copyright ©Diebold Nixdorf (4/2020) - All Rights Reserved TP-821813-001B... -
Page 23: Figure 2-9 Motorized Card Reader
Refer to the Motorized Card Reader (with chip, 123) Operating Guide (TP-820815-001C). Figure 2-9 Motorized Card Reader 2-11 Copyright ©Diebold, Incorporated (7/2015, 3/2017) - All Rights Reserved Copyright ©Diebold Nixdorf (4/2020) - All Rights Reserved TP-821813-001B... -
Page 24: Figure 2-10 Nfc Contactless Card Reader
At the end of a transaction, the consumer receives a printed receipt. Speakers Speakers at the side of the fascia can be used to guide consumers through transactions. 2-12 Copyright ©Diebold, Incorporated (7/2015, 3/2017) - All Rights Reserved Copyright ©Diebold Nixdorf (4/2020) - All Rights Reserved TP-821813-001B... -
Page 25: Upper Chassis
Your terminal might not contain all devices described in this section. Some devices are optional and some devices cannot be used in combination with other devices (mutually exclusive combinations). 2-13 Copyright ©Diebold, Incorporated (7/2015, 3/2017) - All Rights Reserved Copyright ©Diebold Nixdorf (4/2020) - All Rights Reserved TP-821813-001B... -
Page 26: Figure 2-11 Upper Chassis Devices
Coin dispenser Receipt printer Journal printer ActivMedia head unit Motorized card reader Figure 2-11 Upper Chassis Devices 2-14 Copyright ©Diebold, Incorporated (7/2015, 3/2017) - All Rights Reserved Copyright ©Diebold Nixdorf (4/2020) - All Rights Reserved TP-821813-001B... -
Page 27: Figure 2-12 Activcash Shuttle Tracks
ActivCash dispenser. The shuttle tracks guide the shuttle assembly (containing currency or media) between the ActivCash dispenser and the terminal fascia. Figure 2-12 ActivCash Shuttle Tracks 2-15 Copyright ©Diebold, Incorporated (7/2015, 3/2017) - All Rights Reserved Copyright ©Diebold Nixdorf (4/2020) - All Rights Reserved TP-821813-001B... -
Page 28: Figure 2-13 Activmedia Depositor
For more information, refer to the ActivMedia (Mixed Media Acceptor) Operating Guide (TP-821683-001A). ActivMedia head unit ActivMedia cassette unit Figure 2-13 ActivMedia Depositor 2-16 Copyright ©Diebold, Incorporated (7/2015, 3/2017) - All Rights Reserved Copyright ©Diebold Nixdorf (4/2020) - All Rights Reserved TP-821813-001B... -
Page 29: Figure 2-14 Coin Dispenser
The terminal has a high-speed coin dispenser that dispenses coins in four different denominations. See Figure 2-14. Terminal Coin slot Coin chute Coin dispenser Upper chassis Figure 2-14 Coin Dispenser 2-17 Copyright ©Diebold, Incorporated (7/2015, 3/2017) - All Rights Reserved Copyright ©Diebold Nixdorf (4/2020) - All Rights Reserved TP-821813-001B... -
Page 30: Figure 2-15 Journal Printer
Refer to the Journal Printer Operating Guide (TP-820817-001A). Figure 2-15 Journal Printer 2-18 Copyright ©Diebold, Incorporated (7/2015, 3/2017) - All Rights Reserved Copyright ©Diebold Nixdorf (4/2020) - All Rights Reserved TP-821813-001B... -
Page 31: Figure 2-16 80 Mm Receipt Printer
Refer to the Two-sided Enhanced Graphical Thermal Receipt Printer Operating Guide (TP-821540-001A). Figure 2-16 80 mm Receipt Printer 2-19 Copyright ©Diebold, Incorporated (7/2015, 3/2017) - All Rights Reserved Copyright ©Diebold Nixdorf (4/2020) - All Rights Reserved TP-821813-001B... -
Page 32: Figure 2-17 Location Of The Local Access Keypad
Managing authorized users is on a per terminal basis and can be managed solely by Diebold customers. Terminal Local access keypad Upper chassis rear door Figure 2-17 Location of the Local Access Keypad 2-20 Copyright ©Diebold, Incorporated (7/2015, 3/2017) - All Rights Reserved Copyright ©Diebold Nixdorf (4/2020) - All Rights Reserved TP-821813-001B... -
Page 33: Figure 2-18 Rear Service Display
Section 3.4 for information about accessing the rear service display. Location of rear service display on the terminal Terminal Rear service display Figure 2-18 Rear Service Display 2-21 Copyright ©Diebold, Incorporated (7/2015, 3/2017) - All Rights Reserved Copyright ©Diebold Nixdorf (4/2020) - All Rights Reserved TP-821813-001B... -
Page 34: Figure 2-19 Heater
During cold weather, the heater helps maintain the operating temperature in the fascia area of the terminal. Terminal Heater Figure 2-19 Heater 2-22 Copyright ©Diebold, Incorporated (7/2015, 3/2017) - All Rights Reserved Copyright ©Diebold Nixdorf (4/2020) - All Rights Reserved TP-821813-001B... -
Page 35: Figure 2-20 Upper Control Card
Location of upper control card in the terminal Power switch Idle switch Maintenance switch USB power ports (service) USB ports Figure 2-20 Upper Control Card 2-23 Copyright ©Diebold, Incorporated (7/2015, 3/2017) - All Rights Reserved Copyright ©Diebold Nixdorf (4/2020) - All Rights Reserved TP-821813-001B... - Page 36 LED blinks rapidly for 30 seconds, then when the terminal is in idle mode, the LED blinks at a slower pace. 2-24 Copyright ©Diebold, Incorporated (7/2015, 3/2017) - All Rights Reserved Copyright ©Diebold Nixdorf (4/2020) - All Rights Reserved TP-821813-001B...
-
Page 37: Devices Located In The Safe
• Alarm sensors (Section 2.4.9) • Seismic detectors (Section 2.4.10) • Third party alarms (Section 2.4.11) • Heat thermostat (Section 2.4.12) 2-25 Copyright ©Diebold, Incorporated (7/2015, 3/2017) - All Rights Reserved Copyright ©Diebold Nixdorf (4/2020) - All Rights Reserved TP-821813-001B... -
Page 38: Figure 2-21 Devices Located In The Safe
For security reasons, the location of the alarm sensors, seismic detectors, and heat thermostat are not shown. Terminal ActivCash dispenser ActivMedia cassette unit Safe Safe door Figure 2-21 Devices Located in the Safe 2-26 Copyright ©Diebold, Incorporated (7/2015, 3/2017) - All Rights Reserved Copyright ©Diebold Nixdorf (4/2020) - All Rights Reserved TP-821813-001B... -
Page 39: Activcash Dispenser
Dumping the media prepares the ActivCash dispenser for the next dispense command. Refer to the ActivCash Dispenser Operating Guide (TP-821707-001A). ActivCash dispenser Convenience divert/retract cassette Convenience cassette Figure 2-22 ActivCash Dispenser 2-27 Copyright ©Diebold, Incorporated (7/2015, 3/2017) - All Rights Reserved Copyright ©Diebold Nixdorf (4/2020) - All Rights Reserved TP-821813-001B... -
Page 40: Figure 2-23 Activcash Dispenser
Figure 2-23 ActivCash Dispenser 2-28 Copyright ©Diebold, Incorporated (7/2015, 3/2017) - All Rights Reserved Copyright ©Diebold Nixdorf (4/2020) - All Rights Reserved TP-821813-001B... -
Page 41: Activcash Divert/Retract Cassette And Divert Bin
(with a lock) or a convenience cassette (without a lock). Refer to the ActivCash Dispenser Operating Guide (TP-821707-001A). Convenience divert/retract cassette Secure divert/retract cassette Figure 2-24 Divert Cassette Types 2-29 Copyright ©Diebold, Incorporated (7/2015, 3/2017) - All Rights Reserved Copyright ©Diebold Nixdorf (4/2020) - All Rights Reserved TP-821813-001B... -
Page 42: Activcash Dispense Cassettes
Dispense cassettes are available with no lock (convenience) or with a lock (secure). Refer to the ActivCash Dispenser Operating Guide (TP-821707-001A). 2-30 Copyright ©Diebold, Incorporated (7/2015, 3/2017) - All Rights Reserved Copyright ©Diebold Nixdorf (4/2020) - All Rights Reserved TP-821813-001B... -
Page 43: Figure 2-25 Dispense Cassettes
Convenience cassette Dispense cassette lock Dispense cassette sensor Secure cassette Dispense cassette key Figure 2-25 Dispense Cassettes 2-31 Copyright ©Diebold, Incorporated (7/2015, 3/2017) - All Rights Reserved Copyright ©Diebold Nixdorf (4/2020) - All Rights Reserved TP-821813-001B... -
Page 44: Activmedia Cassette Unit
The retract cassette (see Figure 2-26) stores notes diverted from the ActivMedia depositor. The retract cassette is available as a secure cassette (with a lock). Figure 2-26 Retract Cassette 2-32 Copyright ©Diebold, Incorporated (7/2015, 3/2017) - All Rights Reserved Copyright ©Diebold Nixdorf (4/2020) - All Rights Reserved TP-821813-001B... -
Page 45: Activmedia Deposit Cassettes
Check deposit cassette Key with lock for check deposit cassette Key with lock for cash deposit cassette Figure 2-27 Deposit Cassettes 2-33 Copyright ©Diebold, Incorporated (7/2015, 3/2017) - All Rights Reserved Copyright ©Diebold Nixdorf (4/2020) - All Rights Reserved TP-821813-001B... -
Page 46: Safe Lock
Institutions may want to install their own alarm systems within the safe. An area within the safe is designated for third party alarm installation. 2-34 Copyright ©Diebold, Incorporated (7/2015, 3/2017) - All Rights Reserved Copyright ©Diebold Nixdorf (4/2020) - All Rights Reserved TP-821813-001B... -
Page 47: 2.4.12 Heat Thermostat
The heat thermostat, integral to the basic alarms panel, senses when the temperature inside the terminal safe exceeds a certain level. If this level is exceeded, the heat thermostat initiates an alarm. 2-35 Copyright ©Diebold, Incorporated (7/2015, 3/2017) - All Rights Reserved Copyright ©Diebold Nixdorf (4/2020) - All Rights Reserved TP-821813-001B... -
Page 48: Accessing The Upper Chassis And Safe
NOTE For maintenance procedures for the individual terminal modules, refer to the module operating guides listed in Appendix A. Copyright ©Diebold, Incorporated (7/2015, 3/2017) - All Rights Reserved Copyright ©Diebold Nixdorf (4/2020) - All Rights Reserved TP-821813-001B... -
Page 49: Switching The Terminal To Maintenance Mode
5. Refer to the appropriate operating guide listed in Appendix A for information on completing the maintenance procedures for your terminal modules. Copyright ©Diebold, Incorporated (7/2015, 3/2017) - All Rights Reserved Copyright ©Diebold Nixdorf (4/2020) - All Rights Reserved TP-821813-001B... -
Page 50: Figure 3-1 Opening The Upper Chassis Rear Door
Key for the upper chassis rear door lock (turn key clockwise) Upper chassis rear door in open position Figure 3-1 Opening the Upper Chassis Rear Door Copyright ©Diebold, Incorporated (7/2015, 3/2017) - All Rights Reserved Copyright ©Diebold Nixdorf (4/2020) - All Rights Reserved TP-821813-001B... -
Page 51: Closing The Upper Chassis Rear Door
Upper chassis rear door in open position Key for the upper chassis rear door lock (turn key counterclockwise) Figure 3-2 Closing the Upper Chassis Rear Door Copyright ©Diebold, Incorporated (7/2015, 3/2017) - All Rights Reserved Copyright ©Diebold Nixdorf (4/2020) - All Rights Reserved TP-821813-001B... -
Page 52: Terminal And Device Touch Points
See Figure 3-3 and Figure 3-4 for examples of these touch points. Printer tray release latch Coin tray handle Rear service display handle Upper chassis rear door Copyright ©Diebold, Incorporated (7/2015, 3/2017) - All Rights Reserved Copyright ©Diebold Nixdorf (4/2020) - All Rights Reserved TP-821813-001B... -
Page 53: Figure 3-3 Upper Chassis Touch Points
Rear service display release latch Coin tray release latch Printer tray handle ActivMedia head unit release latch Figure 3-3 Upper Chassis Touch Points Copyright ©Diebold, Incorporated (7/2015, 3/2017) - All Rights Reserved Copyright ©Diebold Nixdorf (4/2020) - All Rights Reserved TP-821813-001B... -
Page 54: Figure 3-4 Safe Touch Points
Terminal ActivCash dispenser handle ActivCash dispenser release latch ActivCash dispenser ActivMedia depositor ActivMedia cassette unit release latch Figure 3-4 Safe Touch Points Copyright ©Diebold, Incorporated (7/2015, 3/2017) - All Rights Reserved Copyright ©Diebold Nixdorf (4/2020) - All Rights Reserved TP-821813-001B... -
Page 55: Accessing The Rear Service Display
5. Close the upper chassis rear door (refer to Section 3.2.2). Copyright ©Diebold, Incorporated (7/2015, 3/2017) - All Rights Reserved Copyright ©Diebold Nixdorf (4/2020) - All Rights Reserved TP-821813-001B... -
Page 56: Figure 3-5 Accessing The Rear Service Display
Rear service display handle Rear service display release latch Rear service display in operational position Figure 3-5 Accessing the Rear Service Display Copyright ©Diebold, Incorporated (7/2015, 3/2017) - All Rights Reserved Copyright ©Diebold Nixdorf (4/2020) - All Rights Reserved TP-821813-001B... -
Page 57: Accessing The Activcash Dispenser
4. Push the ActivCash dispenser completely into the safe until it latches securely in place. 5. Close the safe door. Refer to Section 3.11.2 or Section 3.12.2. 3-10 Copyright ©Diebold, Incorporated (7/2015, 3/2017) - All Rights Reserved Copyright ©Diebold Nixdorf (4/2020) - All Rights Reserved TP-821813-001B... -
Page 58: Figure 3-6 Accessing The Activcash Dispenser
Figure 3-6 Accessing the ActivCash Dispenser (sheet 1 of 2) 3-11 Copyright ©Diebold, Incorporated (7/2015, 3/2017) - All Rights Reserved Copyright ©Diebold Nixdorf (4/2020) - All Rights Reserved TP-821813-001B... -
Page 59: Accessing The Activmedia Cassette Unit
4. Push the ActivMedia cassette unit completely into the safe until it latches securely in place. 5. Close the safe door. Refer to Section 3.11.2 or Section 3.12.2. 3-12 Copyright ©Diebold, Incorporated (7/2015, 3/2017) - All Rights Reserved Copyright ©Diebold Nixdorf (4/2020) - All Rights Reserved TP-821813-001B... -
Page 60: Figure 3-7 Accessing The Activmedia Cassette Unit
Direction to pull out ActivMedia cassette unit ActivMedia cassette unit ActivMedia cassette unit release latch Figure 3-7 Accessing the ActivMedia Cassette Unit 3-13 Copyright ©Diebold, Incorporated (7/2015, 3/2017) - All Rights Reserved Copyright ©Diebold Nixdorf (4/2020) - All Rights Reserved TP-821813-001B... -
Page 61: Accessing The Activmedia Head Unit
5. Push the ActivMedia cassette unit completely into the upper chassis until it latches securely in place. 6. Close the upper chassis rear door (refer to Section 3.2.2). 3-14 Copyright ©Diebold, Incorporated (7/2015, 3/2017) - All Rights Reserved Copyright ©Diebold Nixdorf (4/2020) - All Rights Reserved TP-821813-001B... -
Page 62: Figure 3-8 Accessing The Activmedia Head Unit
Direction to pull out ActivMedia head unit ActivMedia head unit ActivMedia head unit release latch Upper chassis Figure 3-8 Accessing the ActivMedia Head Unit 3-15 Copyright ©Diebold, Incorporated (7/2015, 3/2017) - All Rights Reserved Copyright ©Diebold Nixdorf (4/2020) - All Rights Reserved TP-821813-001B... -
Page 63: Accessing The Card Reader And The Receipt Printer
5. Push the printer tray back into the terminal until it latches securely in place. 6. Close the upper chassis rear door (refer to Section 3.2.2). 3-16 Copyright ©Diebold, Incorporated (7/2015, 3/2017) - All Rights Reserved Copyright ©Diebold Nixdorf (4/2020) - All Rights Reserved TP-821813-001B... -
Page 64: Figure 3-9 Accessing The Card Reader And The Receipt Printer
Printer tray in extended position Location of printer tray latch assembly Figure 3-9 Accessing the Card Reader and the Receipt Printer 3-17 Copyright ©Diebold, Incorporated (7/2015, 3/2017) - All Rights Reserved Copyright ©Diebold Nixdorf (4/2020) - All Rights Reserved TP-821813-001B... -
Page 65: Accessing The Coin Dispenser
5. Push the coin dispenser tray back into the terminal until it latches securely in place. 6. Close the upper chassis rear door (refer to Section 3.2.2). 3-18 Copyright ©Diebold, Incorporated (7/2015, 3/2017) - All Rights Reserved Copyright ©Diebold Nixdorf (4/2020) - All Rights Reserved TP-821813-001B... -
Page 66: Figure 3-10 Accessing The Coin Dispenser
Right mounting tray latch assembly Right mounting tray release latch Upper chassis rear door Right mounting tray handle Figure 3-10 Accessing the Coin Dispenser 3-19 Copyright ©Diebold, Incorporated (7/2015, 3/2017) - All Rights Reserved Copyright ©Diebold Nixdorf (4/2020) - All Rights Reserved TP-821813-001B... -
Page 67: 3.10 Accessing The Safe
This lock has a lock dial that spins to generate electrical power to operate a keypad. Once the keypad is energized, the lock code can be entered on the keypad. 3-20 Copyright ©Diebold, Incorporated (7/2015, 3/2017) - All Rights Reserved Copyright ©Diebold Nixdorf (4/2020) - All Rights Reserved TP-821813-001B... -
Page 68: 3.11 Opening And Closing Safe Doors With Electronic Combination Locks
4. Open the safe door and complete all maintenance (refer to the appropriate maintenance manuals listed in Appendix A for information about the maintenance procedures for your terminal). 3-21 Copyright ©Diebold, Incorporated (7/2015, 3/2017) - All Rights Reserved Copyright ©Diebold Nixdorf (4/2020) - All Rights Reserved TP-821813-001B... -
Page 69: Figure 3-12 Opening Safe Door With Electronic Combination Lock
Safe handle (turn clockwise) Safe door in open position Mechanical keylock Electronic combination lock Figure 3-12 Opening Safe Door with Electronic Combination Lock 3-22 Copyright ©Diebold, Incorporated (7/2015, 3/2017) - All Rights Reserved Copyright ©Diebold Nixdorf (4/2020) - All Rights Reserved TP-821813-001B... -
Page 70: Closing The Safe Door
4. Make sure that the safe handle does not turn. 5. Pull firmly on the safe door to confirm that the safe is securely locked. 3-23 Copyright ©Diebold, Incorporated (7/2015, 3/2017) - All Rights Reserved Copyright ©Diebold Nixdorf (4/2020) - All Rights Reserved TP-821813-001B... -
Page 71: Figure 3-13 Closing Safe Door With Electronic Combination Lock
Safe handle (turn counterclockwise) Mechanical keylock Electronic combination lock Safe door in open position Figure 3-13 Closing Safe Door with Electronic Combination Lock 3-24 Copyright ©Diebold, Incorporated (7/2015, 3/2017) - All Rights Reserved Copyright ©Diebold Nixdorf (4/2020) - All Rights Reserved TP-821813-001B... -
Page 72: 3.12 Opening And Closing Safe Doors With Mechanical Combination Locks
6. Open the safe door and complete all maintenance (refer to the appropriate maintenance manual listed in Appendix A for information about the maintenance procedures for your terminal). 3-25 Copyright ©Diebold, Incorporated (7/2015, 3/2017) - All Rights Reserved Copyright ©Diebold Nixdorf (4/2020) - All Rights Reserved TP-821813-001B... -
Page 73: Figure 3-14 Opening Safe Door With Mechanical Combination Lock
Safe door in open position Mechanical keylock Key for mechanical keylock Safe handle Figure 3-14 Opening Safe Door with Mechanical Combination Lock 3-26 Copyright ©Diebold, Incorporated (7/2015, 3/2017) - All Rights Reserved Copyright ©Diebold Nixdorf (4/2020) - All Rights Reserved TP-821813-001B... -
Page 74: 3.12.2 Closing The Safe Door
7. Make sure that the safe handle does not turn. 8. Pull firmly on the safe door to confirm that the safe is securely locked. 3-27 Copyright ©Diebold, Incorporated (7/2015, 3/2017) - All Rights Reserved Copyright ©Diebold Nixdorf (4/2020) - All Rights Reserved TP-821813-001B... -
Page 75: Figure 3-15 Closing Safe Door With Mechanical Combination Lock
Mechanical combination lock (remove key) Mechanical keylock Key for mechanical keylock Safe door in open position Figure 3-15 Closing Safe Door with Mechanical Combination Lock 3-28 Copyright ©Diebold, Incorporated (7/2015, 3/2017) - All Rights Reserved Copyright ©Diebold Nixdorf (4/2020) - All Rights Reserved TP-821813-001B... - Page 76 TP-821579-001A SafeGard Electronic Lock Customer Operating Instructions TP-820466-001A Two-sided Enhanced Graphical Thermal Receipt Printer Operating Guide TP-821540-001A Available in English language only Copyright ©Diebold, Incorporated (7/2015, 3/2017) - All Rights Reserved Copyright ©Diebold Nixdorf (4/2020) - All Rights Reserved TP-821813-001B...
- Page 77 • Do not spray cleaners directly onto the terminal surface, spray the cleaner onto a cleaning cloth, then use the damp cloth to wipe the surface. Copyright ©Diebold, Incorporated (7/2015, 3/2017) - All Rights Reserved Copyright ©Diebold Nixdorf (4/2020) - All Rights Reserved TP-821813-001B...
Need help?
Do you have a question about the CS 7780 and is the answer not in the manual?
Questions and answers