
Related Manuals for DIEBOLD NIXDORF CS 7790


Summary of Contents for DIEBOLD NIXDORF CS 7790
- Page 1 Diebold Nixdorf CS 7790 Island Drive-up System Operating Guide TP-821815-001C PD 7522 September 2018...
- Page 2 Diebold, Incorporated or its subsidiaries (collectively “Diebold Nixdorf”) that appear in this document are used for informational purposes only and Diebold Nixdorf claims no rights thereto, nor does such use indicate any affiliation with or any endorsement of Diebold Nixdorf or Diebold Nixdorf products by the owners thereof.
-
Page 3: Table Of Contents
Appendix A Related Documentation ........Copyright ©Diebold, Incorporated (7/2015) - All Rights Reserved Copyright ©Diebold Nixdorf, Inc. (4/2017, 9/2018) - All Rights Reserved TP-821815-001C... - Page 4 ......3-31 Copyright ©Diebold, Incorporated (7/2015) - All Rights Reserved Copyright ©Diebold Nixdorf, Inc. (4/2017, 9/2018) - All Rights Reserved TP-821815-001C...
- Page 5 ........Copyright ©Diebold, Incorporated (7/2015) - All Rights Reserved Copyright ©Diebold Nixdorf, Inc. (4/2017, 9/2018) - All Rights Reserved TP-821815-001C...
-
Page 6: Introduction
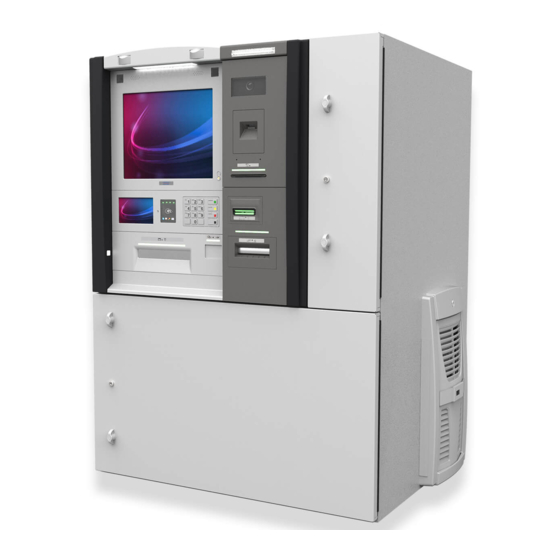
Section 1 Introduction The Diebold Nixdorf CS 7790 island drive-up system is a front-load freestanding system intended for drive-up locations or shopping center parking areas. The system dispenses cash, accepts cash and check deposits, and presents transaction records to consumers. -
Page 7: Before Performing Maintenance Procedures
• Cleaning the exterior of the system (Appendix B) Refer to the operating guides in Appendix A for more information about maintenance procedures for individual components. Copyright ©Diebold, Incorporated (7/2015) - All Rights Reserved Copyright ©Diebold Nixdorf, Inc. (4/2017, 9/2018) - All Rights Reserved TP-821815-001C... -
Page 8: Observing Safety Precautions
• Always turn OFF the system before removing or installing devices. Copyright ©Diebold, Incorporated (7/2015) - All Rights Reserved Copyright ©Diebold Nixdorf, Inc. (4/2017, 9/2018) - All Rights Reserved TP-821815-001C... - Page 9 High temperatures that can cause pain or High temperature burns are present in the area of this label. hazard Do not touch until cooled. Copyright ©Diebold, Incorporated (7/2015) - All Rights Reserved Copyright ©Diebold Nixdorf, Inc. (4/2017, 9/2018) - All Rights Reserved TP-821815-001C...
-
Page 10: Radio Interference Label
• Fascia refers to the front area of the system where the consumer transacts business. • Institution refers to any bank or business that might purchase the system. Copyright ©Diebold, Incorporated (7/2015) - All Rights Reserved Copyright ©Diebold Nixdorf, Inc. (4/2017, 9/2018) - All Rights Reserved TP-821815-001C... - Page 11 • Safe refers to the high security enclosure below the upper chassis. Devices in the safe store the media dispensed from and deposited into the system. • System refers to the complete Diebold Nixdorf CS 7790 terminal. • Upper chassis refers to the area behind the fascia and directly above the safe.
-
Page 12: Devices Listed By Operator
Upper chassis Speakers Fascia Contactless card reader Upper chassis Lead-through indicators Fascia Local access keypad Upper chassis Safe devices (locks) Safe Copyright ©Diebold, Incorporated (7/2015) - All Rights Reserved Copyright ©Diebold Nixdorf, Inc. (4/2017, 9/2018) - All Rights Reserved TP-821815-001C... -
Page 13: Description Of Devices
The location of some devices and features can vary depending on how they are installed on the system. One configuration of the fascia is shown below in Figure 2-1. Copyright ©Diebold, Incorporated (7/2015) - All Rights Reserved Copyright ©Diebold Nixdorf, Inc. (4/2017, 9/2018) - All Rights Reserved TP-821815-001C... -
Page 14: Figure 2-1 Modules And Devices Mounted On The Fascia
Consumer display Card reader Speakers Dip card reader Task light Motorized card reader Figure 2-1 Modules and Devices Mounted on the Fascia Copyright ©Diebold, Incorporated (7/2015) - All Rights Reserved Copyright ©Diebold Nixdorf, Inc. (4/2017, 9/2018) - All Rights Reserved TP-821815-001C... -
Page 15: Figure 2-2 Cash Camera
Consumer Awareness Mirrors Convex mirrors located at the top of the fascia help consumers monitor the surroundings while they are using the system. Copyright ©Diebold, Incorporated (7/2015) - All Rights Reserved Copyright ©Diebold Nixdorf, Inc. (4/2017, 9/2018) - All Rights Reserved TP-821815-001C... -
Page 16: Figure 2-3 Consumer Display
The display is also available with a touch screen or vandal glass. Figure 2-3 Consumer Display Copyright ©Diebold, Incorporated (7/2015) - All Rights Reserved Copyright ©Diebold Nixdorf, Inc. (4/2017, 9/2018) - All Rights Reserved TP-821815-001C... -
Page 17: Figure 2-4 Consumer Keypad
• ActivEdge card reader, Dip card reader, or motorized card reader • ActivCash dispenser • ActivMedia depositor • Coin dispenser • Receipt printer Copyright ©Diebold, Incorporated (7/2015) - All Rights Reserved Copyright ©Diebold Nixdorf, Inc. (4/2017, 9/2018) - All Rights Reserved TP-821815-001C... -
Page 18: Figure 2-5 Lead-Through Indicators
Receipt printer Dip card reader Motorized card reader ActivEdge card reader ActivMedia depositor Coin dispenser ActivCash dispenser Figure 2-5 Lead-through Indicators Copyright ©Diebold, Incorporated (7/2015) - All Rights Reserved Copyright ©Diebold Nixdorf, Inc. (4/2017, 9/2018) - All Rights Reserved TP-821815-001C... -
Page 19: Figure 2-6 Identification Card Scanner
first. Refer to the ActivEdge Secure Card Reader Operating Guide (TP-821629-001A) for more information. Figure 2-7 ActivEdge Card Reader Copyright ©Diebold, Incorporated (7/2015) - All Rights Reserved Copyright ©Diebold Nixdorf, Inc. (4/2017, 9/2018) - All Rights Reserved TP-821815-001C... -
Page 20: Figure 2-8 Dip Card Reader
Refer to the Dip Card Reader (with chip, 123) Operating Guide (TP-820814-001C) for more information. Figure 2-8 Dip Card Reader Copyright ©Diebold, Incorporated (7/2015) - All Rights Reserved Copyright ©Diebold Nixdorf, Inc. (4/2017, 9/2018) - All Rights Reserved TP-821815-001C... -
Page 21: Figure 2-9 Motorized Card Reader
Refer to the Motorized Card Reader (with chip, 123) Operating Guide (TP-820815-001C). Figure 2-9 Motorized Card Reader Copyright ©Diebold, Incorporated (7/2015) - All Rights Reserved Copyright ©Diebold Nixdorf, Inc. (4/2017, 9/2018) - All Rights Reserved TP-821815-001C... -
Page 22: Figure 2-10 Contactless Card Reader
Speakers Speakers at the top of the fascia can be used to guide consumers through transactions. 2-10 Copyright ©Diebold, Incorporated (7/2015) - All Rights Reserved Copyright ©Diebold Nixdorf, Inc. (4/2017, 9/2018) - All Rights Reserved TP-821815-001C... -
Page 23: Upper Chassis
Coin dispenser ActivMedia head unit Receipt printer Motorized card reader Journal printer ActivCash shuttle tracks Figure 2-11 Upper Chassis Devices 2-11 Copyright ©Diebold, Incorporated (7/2015) - All Rights Reserved Copyright ©Diebold Nixdorf, Inc. (4/2017, 9/2018) - All Rights Reserved TP-821815-001C... -
Page 24: Figure 2-12 Activcash Shuttle Tracks
ActivCash dispenser and the system fascia. ActivCash shuttle tracks Convenience divert/retract cassette Convenience cassette Figure 2-12 ActivCash Shuttle Tracks 2-12 Copyright ©Diebold, Incorporated (7/2015) - All Rights Reserved Copyright ©Diebold Nixdorf, Inc. (4/2017, 9/2018) - All Rights Reserved TP-821815-001C... -
Page 25: Figure 2-13 Activmedia Head Unit
75 checks or bank notes. Refer to ActivMedia (Mixed Media Acceptor) Operating Guide (TP-821683-001B) for more information. Figure 2-13 ActivMedia Head Unit 2-13 Copyright ©Diebold, Incorporated (7/2015) - All Rights Reserved Copyright ©Diebold Nixdorf, Inc. (4/2017, 9/2018) - All Rights Reserved TP-821815-001C... -
Page 26: Figure 2-14 Coin Dispenser
The system has a high-speed coin dispenser that dispenses coins in four different denominations. See Figure 2-14. Upper main tray Coin dispenser System Figure 2-14 Coin Dispenser 2-14 Copyright ©Diebold, Incorporated (7/2015) - All Rights Reserved Copyright ©Diebold Nixdorf, Inc. (4/2017, 9/2018) - All Rights Reserved TP-821815-001C... -
Page 27: Figure 2-15 Journal Printer
Refer to the Journal Printer Operating Guide (TP-820817-001A) for more information. Figure 2-15 Journal Printer 2-15 Copyright ©Diebold, Incorporated (7/2015) - All Rights Reserved Copyright ©Diebold Nixdorf, Inc. (4/2017, 9/2018) - All Rights Reserved TP-821815-001C... -
Page 28: Figure 2-16 80 Mm Receipt Printer
Refer to the Two-sided Enhanced Graphical Thermal Receipt Printer Operating Guide (TP-821540-001A) for more information. Figure 2-16 80 mm Receipt Printer 2-16 Copyright ©Diebold, Incorporated (7/2015) - All Rights Reserved Copyright ©Diebold Nixdorf, Inc. (4/2017, 9/2018) - All Rights Reserved TP-821815-001C... -
Page 29: Figure 2-17 Location Of The Local Access Keypad
An optional local access keypad (see Figure 2-17) provides an alternate means for Diebold Nixdorf customers to manage and monitor access to the upper chassis of the system by requiring authorized users to enter an access code when they open the upper chassis. -
Page 30: Figure 2-18 Upper Control Card
Location of Upper Control Card in the system Maintenance switch Fascia USB power ports (service) Power switch USB ports Figure 2-18 Upper Control Card 2-18 Copyright ©Diebold, Incorporated (7/2015) - All Rights Reserved Copyright ©Diebold Nixdorf, Inc. (4/2017, 9/2018) - All Rights Reserved TP-821815-001C... - Page 31 (including the battery and hubs). The idle LED will blink rapidly for 30 seconds. Then, when the system reaches idle mode, the LED will blink slowly. 2-19 Copyright ©Diebold, Incorporated (7/2015) - All Rights Reserved Copyright ©Diebold Nixdorf, Inc. (4/2017, 9/2018) - All Rights Reserved TP-821815-001C...
-
Page 32: Devices Located In The Safe
• Alarm sensors (Section 2.3.9) • Seismic detectors (Section 2.3.10) • Third party alarms (Section 2.3.11) • Heat thermostat (Section 2.3.12) 2-20 Copyright ©Diebold, Incorporated (7/2015) - All Rights Reserved Copyright ©Diebold Nixdorf, Inc. (4/2017, 9/2018) - All Rights Reserved TP-821815-001C... -
Page 33: Activcash Dispenser
For security reasons, the location of the alarm sensors, seismic detectors, and heat thermostat are not shown. System Safe door cover Safe door ActivMedia cassette unit ActivCash dispenser Figure 2-19 Devices Located in the Safe 2-21 Copyright ©Diebold, Incorporated (7/2015) - All Rights Reserved Copyright ©Diebold Nixdorf, Inc. (4/2017, 9/2018) - All Rights Reserved TP-821815-001C... -
Page 34: Activcash Dispenser
Dumping the media prepares the ActivCash dispenser for the next dispense command. Refer to the ActivCash Dispenser Operating Guide (TP-821707-001B) for more information. 2-22 Copyright ©Diebold, Incorporated (7/2015) - All Rights Reserved Copyright ©Diebold Nixdorf, Inc. (4/2017, 9/2018) - All Rights Reserved TP-821815-001C... -
Page 35: Figure 2-20 Activcash Dispenser
ActivCash dispenser Convenience divert/retract cassette Convenience cassette Figure 2-20 ActivCash Dispenser 2-23 Copyright ©Diebold, Incorporated (7/2015) - All Rights Reserved Copyright ©Diebold Nixdorf, Inc. (4/2017, 9/2018) - All Rights Reserved TP-821815-001C... -
Page 36: Figure 2-21 Activcash Dispenser
Figure 2-21 ActivCash Dispenser 2-24 Copyright ©Diebold, Incorporated (7/2015) - All Rights Reserved Copyright ©Diebold Nixdorf, Inc. (4/2017, 9/2018) - All Rights Reserved TP-821815-001C... -
Page 37: Activcash Divert/Retract Cassette And Divert Bin
Refer to the ActivCash Dispenser Operating Guide (TP-821707-001B) for more information. Convenience divert/retract cassette Secure divert/retract cassette Figure 2-22 Divert Cassette Types 2-25 Copyright ©Diebold, Incorporated (7/2015) - All Rights Reserved Copyright ©Diebold Nixdorf, Inc. (4/2017, 9/2018) - All Rights Reserved TP-821815-001C... -
Page 38: Activcash Dispense Cassettes
Dispense cassettes are available with no lock (convenience) or with a lock (secure). Refer to the ActivCash Dispenser Operating Guide (TP-821707-001B) for more information. 2-26 Copyright ©Diebold, Incorporated (7/2015) - All Rights Reserved Copyright ©Diebold Nixdorf, Inc. (4/2017, 9/2018) - All Rights Reserved TP-821815-001C... -
Page 39: Figure 2-23 Activcash Dispense Cassettes
Convenience cassette Secure cassette Dispense cassette key Dispense cassette lock lever Figure 2-23 ActivCash Dispense Cassettes 2-27 Copyright ©Diebold, Incorporated (7/2015) - All Rights Reserved Copyright ©Diebold Nixdorf, Inc. (4/2017, 9/2018) - All Rights Reserved TP-821815-001C... -
Page 40: Activmedia Cassette Unit
Refer to ActivMedia (Mixed Media Acceptor) Operating Guide (TP-821683-001B) for more information. Retract cassette Deposit cassettes ActivMedia cassette unit Figure 2-24 ActivMedia Cassette Unit 2-28 Copyright ©Diebold, Incorporated (7/2015) - All Rights Reserved Copyright ©Diebold Nixdorf, Inc. (4/2017, 9/2018) - All Rights Reserved TP-821815-001C... -
Page 41: Activmedia Deposit Cassettes
0.07 to 0.12 mm (0.0003 to 0.0005 inch) Grammage 70 to 120 g/m² (0.15 to 0.26 lb) 65 to 125 g/m² (0.14 to 0.26 lb) 2-29 Copyright ©Diebold, Incorporated (7/2015) - All Rights Reserved Copyright ©Diebold Nixdorf, Inc. (4/2017, 9/2018) - All Rights Reserved TP-821815-001C... -
Page 42: Figure 2-26 Deposit Cassettes
Check deposit cassette Key with lock for check deposit cassette Key with lock for cash deposit cassette Figure 2-26 Deposit Cassettes 2-30 Copyright ©Diebold, Incorporated (7/2015) - All Rights Reserved Copyright ©Diebold Nixdorf, Inc. (4/2017, 9/2018) - All Rights Reserved TP-821815-001C... -
Page 43: Safe Lock
2-31 Copyright ©Diebold, Incorporated (7/2015) - All Rights Reserved Copyright ©Diebold Nixdorf, Inc. (4/2017, 9/2018) - All Rights Reserved TP-821815-001C... -
Page 44: 2.3.10 Seismic Detectors
If this level is exceeded, the heat thermostat initiates an alarm. 2-32 Copyright ©Diebold, Incorporated (7/2015) - All Rights Reserved Copyright ©Diebold Nixdorf, Inc. (4/2017, 9/2018) - All Rights Reserved TP-821815-001C... -
Page 45: Accessing The Upper Chassis And Safe
NOTE For maintenance procedures for the individual system modules, refer to the module operating guides listed in Appendix A. Copyright ©Diebold, Incorporated (7/2015) - All Rights Reserved Copyright ©Diebold Nixdorf, Inc. (4/2017, 9/2018) - All Rights Reserved TP-821815-001C... -
Page 46: General Guidelines For Environmental Exposure
• Make sure an overhead cover (such as a canopy or service tent) is present before opening the system. Copyright ©Diebold, Incorporated (7/2015) - All Rights Reserved Copyright ©Diebold Nixdorf, Inc. (4/2017, 9/2018) - All Rights Reserved TP-821815-001C... -
Page 47: Cold Start Condition
(supplying AC power for the system) is ON. If the circuit breaker is not on, you need to perform a cold start. Copyright ©Diebold, Incorporated (7/2015) - All Rights Reserved Copyright ©Diebold Nixdorf, Inc. (4/2017, 9/2018) - All Rights Reserved TP-821815-001C... -
Page 48: Table 3-1 System Exposure And Recovery Times
Maximum exposure (any upper chassis or door of the safe open) 5 minutes (-13° to -30° F) Minimum recovery if 5 minutes are exceeded (warm-up) 6 hours Copyright ©Diebold, Incorporated (7/2015) - All Rights Reserved Copyright ©Diebold Nixdorf, Inc. (4/2017, 9/2018) - All Rights Reserved TP-821815-001C... -
Page 49: Guidelines To Minimize Environmental Exposure
9. Refer to the appropriate operating guide listed in Appendix A for information on completing the maintenance procedures for your system modules. Copyright ©Diebold, Incorporated (7/2015) - All Rights Reserved Copyright ©Diebold Nixdorf, Inc. (4/2017, 9/2018) - All Rights Reserved TP-821815-001C... -
Page 50: Figure 3-1 Opening The Fascia And Access Door
Fascia access door Fascia access door key slot (turn the key clockwise to open) Figure 3-1 Opening the Fascia and Access Door Copyright ©Diebold, Incorporated (7/2015) - All Rights Reserved Copyright ©Diebold Nixdorf, Inc. (4/2017, 9/2018) - All Rights Reserved TP-821815-001C... -
Page 51: Closing The Upper Chassis
8. Turn the key counterclockwise to lock the fascia access door (see Figure 3-1). 9. Remove the key from the key slot. Copyright ©Diebold, Incorporated (7/2015) - All Rights Reserved Copyright ©Diebold Nixdorf, Inc. (4/2017, 9/2018) - All Rights Reserved TP-821815-001C... -
Page 52: Figure 3-2 Closing The Fascia
System Fascia lock (turn key counterclockwise to close) Fascia in extended position Figure 3-2 Closing the Fascia Copyright ©Diebold, Incorporated (7/2015) - All Rights Reserved Copyright ©Diebold Nixdorf, Inc. (4/2017, 9/2018) - All Rights Reserved TP-821815-001C... -
Page 53: Upper Chassis Touch Points
Printer tray release lever ActivMedia head unit latch assembly ActivMedia head unit release lever Coin tray release lever Figure 3-3 Upper Chassis Touch Points Copyright ©Diebold, Incorporated (7/2015) - All Rights Reserved Copyright ©Diebold Nixdorf, Inc. (4/2017, 9/2018) - All Rights Reserved TP-821815-001C... -
Page 54: Accessing The Activmedia Head Unit
5. Push the ActivMedia head unit completely into the safe until it latches securely in place. 6. Close the upper chassis (refer to Section 3.3.2). 3-10 Copyright ©Diebold, Incorporated (7/2015) - All Rights Reserved Copyright ©Diebold Nixdorf, Inc. (4/2017, 9/2018) - All Rights Reserved TP-821815-001C... -
Page 55: Figure 3-4 Accessing The Activmedia Head Unit
ActivMedia head unit release latch ActivMedia head unit Upper chassis ActivMedia head unit slider Figure 3-4 Accessing the ActivMedia Head Unit 3-11 Copyright ©Diebold, Incorporated (7/2015) - All Rights Reserved Copyright ©Diebold Nixdorf, Inc. (4/2017, 9/2018) - All Rights Reserved TP-821815-001C... -
Page 56: Accessing The Coin Dispenser
5. Push the coin dispenser tray back into the system until it latches securely in place. 6. Close the upper chassis (refer to Section 3.3.2). 3-12 Copyright ©Diebold, Incorporated (7/2015) - All Rights Reserved Copyright ©Diebold Nixdorf, Inc. (4/2017, 9/2018) - All Rights Reserved TP-821815-001C... -
Page 57: Figure 3-5 Accessing The Coin Dispenser
Coin dispenser assembly Coin dispenser tray Coin dispenser tray handle Coin dispenser release lever Figure 3-5 Accessing the Coin Dispenser 3-13 Copyright ©Diebold, Incorporated (7/2015) - All Rights Reserved Copyright ©Diebold Nixdorf, Inc. (4/2017, 9/2018) - All Rights Reserved TP-821815-001C... -
Page 58: Accessing The Safe Components
Section 3.5. 3.4.1 Safe Touch Points See Figure 3-6 for an example of the safe touch points. 3-14 Copyright ©Diebold, Incorporated (7/2015) - All Rights Reserved Copyright ©Diebold Nixdorf, Inc. (4/2017, 9/2018) - All Rights Reserved TP-821815-001C... -
Page 59: Figure 3-6 Safe Touch Points
ActivMedia cassette unit release latch ActivMedia cassette unit handle ActivCash dispenser handle ActivCash dispenser release latch Figure 3-6 Safe Touch Points 3-15 Copyright ©Diebold, Incorporated (7/2015) - All Rights Reserved Copyright ©Diebold Nixdorf, Inc. (4/2017, 9/2018) - All Rights Reserved TP-821815-001C... -
Page 60: Accessing The Activcash Dispenser
4. Push the ActivCash dispenser completely into the safe until it latches securely in place. 5. Close the door of the safe. Refer to Section 3.6.2 or Section 3.7.2. 3-16 Copyright ©Diebold, Incorporated (7/2015) - All Rights Reserved Copyright ©Diebold Nixdorf, Inc. (4/2017, 9/2018) - All Rights Reserved TP-821815-001C... -
Page 61: Figure 3-7 Accessing The Activcash Dispenser
ActivCash dispenser in extended position ActivCash dispenser slider (quantity 2) ActivCash dispenser release latch Figure 3-7 Accessing the ActivCash Dispenser 3-17 Copyright ©Diebold, Incorporated (7/2015) - All Rights Reserved Copyright ©Diebold Nixdorf, Inc. (4/2017, 9/2018) - All Rights Reserved TP-821815-001C... -
Page 62: Accessing The Activmedia Cassette Unit
4. Push the ActivMedia cassette unit completely into the safe until it latches securely in place. 5. Close the door of the safe. Refer to Section 3.6.2 or Section 3.7.2. 3-18 Copyright ©Diebold, Incorporated (7/2015) - All Rights Reserved Copyright ©Diebold Nixdorf, Inc. (4/2017, 9/2018) - All Rights Reserved TP-821815-001C... -
Page 63: Figure 3-8 Accessing The Activmedia Cassette Unit
ActivMedia cassette unit handle System Safe door cover Safe door ActivMedia cassette unit in extended position Figure 3-8 Accessing the ActivMedia Cassette Unit 3-19 Copyright ©Diebold, Incorporated (7/2015) - All Rights Reserved Copyright ©Diebold Nixdorf, Inc. (4/2017, 9/2018) - All Rights Reserved TP-821815-001C... -
Page 64: Accessing The Safe
90 degrees. See Figure 3-9. 2. Rotate both fixed grip latches counterclockwise 90 degrees and open the safe door cover. See Figure 3-9. 3-20 Copyright ©Diebold, Incorporated (7/2015) - All Rights Reserved Copyright ©Diebold Nixdorf, Inc. (4/2017, 9/2018) - All Rights Reserved TP-821815-001C... -
Page 65: Figure 3-9 Opening The Safe Door Cover
Figure 3-9 Opening the Safe Door Cover 3. Reverse Step 1 and Step 2 to close the safe door cover. 3-21 Copyright ©Diebold, Incorporated (7/2015) - All Rights Reserved Copyright ©Diebold Nixdorf, Inc. (4/2017, 9/2018) - All Rights Reserved TP-821815-001C... -
Page 66: Safe Door Lock Types
Cencon 2000 GEN II electronic lock Safe door cover in open position Safe handle Figure 3-10 Safe Door Locks and Handles 3-22 Copyright ©Diebold, Incorporated (7/2015) - All Rights Reserved Copyright ©Diebold Nixdorf, Inc. (4/2017, 9/2018) - All Rights Reserved TP-821815-001C... - Page 67 Refer to Section 3.6 for instruction on opening and closing electronic combination locks. Refer to Section 3.7 for instruction on opening and closing mechanical combination locks. 3-23 Copyright ©Diebold, Incorporated (7/2015) - All Rights Reserved Copyright ©Diebold Nixdorf, Inc. (4/2017, 9/2018) - All Rights Reserved TP-821815-001C...
-
Page 68: Opening And Closing Electronic Combination Locks
5. Open the door of the safe and complete all maintenance (refer to the appropriate maintenance manuals listed in Appendix A for information about the maintenance procedures for your system). 3-24 Copyright ©Diebold, Incorporated (7/2015) - All Rights Reserved Copyright ©Diebold Nixdorf, Inc. (4/2017, 9/2018) - All Rights Reserved TP-821815-001C... -
Page 69: Figure 3-11 Opening Electronic Combination Locks
System Safe door cover in open position Direction to turn dial (clockwise) Display Figure 3-11 Opening Electronic Combination Locks 3-25 Copyright ©Diebold, Incorporated (7/2015) - All Rights Reserved Copyright ©Diebold Nixdorf, Inc. (4/2017, 9/2018) - All Rights Reserved TP-821815-001C... -
Page 70: Closing The Safe Door
7. Remove the key from the key slot. 8. Pull the door cover to ensure that it is locked and secure. 3-26 Copyright ©Diebold, Incorporated (7/2015) - All Rights Reserved Copyright ©Diebold Nixdorf, Inc. (4/2017, 9/2018) - All Rights Reserved TP-821815-001C... -
Page 71: Figure 3-12 Closing Electronic Combination Locks
Safe door cover in open position Cencon 2000 electronic lock Direction to turn dial (counterclockwise) Display Factory-set combination Figure 3-12 Closing Electronic Combination Locks 3-27 Copyright ©Diebold, Incorporated (7/2015) - All Rights Reserved Copyright ©Diebold Nixdorf, Inc. (4/2017, 9/2018) - All Rights Reserved TP-821815-001C... -
Page 72: Opening And Closing Mechanical Combination Locks
7. Open the door of the safe and complete all maintenance (refer to the appropriate maintenance manual listed in Appendix A for information about the maintenance procedures for your system). 3-28 Copyright ©Diebold, Incorporated (7/2015) - All Rights Reserved Copyright ©Diebold Nixdorf, Inc. (4/2017, 9/2018) - All Rights Reserved TP-821815-001C... -
Page 73: Figure 3-13 Opening Mechanical Combination Locks
Turn the handle of the safe clockwise until it stops Open the safe door Figure 3-13 Opening Mechanical Combination Locks 3-29 Copyright ©Diebold, Incorporated (7/2015) - All Rights Reserved Copyright ©Diebold Nixdorf, Inc. (4/2017, 9/2018) - All Rights Reserved TP-821815-001C... -
Page 74: Closing The Safe Door
9. Remove the key from the key slot. 10. Pull the door cover to ensure that it is locked and secure. 3-30 Copyright ©Diebold, Incorporated (7/2015) - All Rights Reserved Copyright ©Diebold Nixdorf, Inc. (4/2017, 9/2018) - All Rights Reserved TP-821815-001C... -
Page 75: Figure 3-14 Closing Mechanical Combination Locks
Insert the key into the lock and turn it counterclockwise Remove the key from the dial Figure 3-14 Closing Mechanical Combination Locks 3-31 Copyright ©Diebold, Incorporated (7/2015) - All Rights Reserved Copyright ©Diebold Nixdorf, Inc. (4/2017, 9/2018) - All Rights Reserved TP-821815-001C... -
Page 76: Appendix A Related Documentation
SafeGard Electronic Lock Customer Operating Instructions TP-820466-001A Two-sided Enhanced Graphical Thermal Receipt Printer Operating Guide TP-821540-001A Available in English language only. Copyright ©Diebold, Incorporated (7/2015) - All Rights Reserved Copyright ©Diebold Nixdorf, Inc. (4/2017, 9/2018) - All Rights Reserved TP-821815-001C... -
Page 77: Appendix B Cleaning The Exterior Of The System
• DO NOT spray cleaners directly onto the system surface. Instead, spray the cleaner onto a cleaning cloth, then use the damp cloth to wipe the surface. Copyright ©Diebold, Incorporated (7/2015) - All Rights Reserved Copyright ©Diebold Nixdorf, Inc. (4/2017, 9/2018) - All Rights Reserved TP-821815-001C...
Need help?
Do you have a question about the CS 7790 and is the answer not in the manual?
Questions and answers