
Related Manuals for Labnet VorTemp 56


Summary of Contents for Labnet VorTemp 56
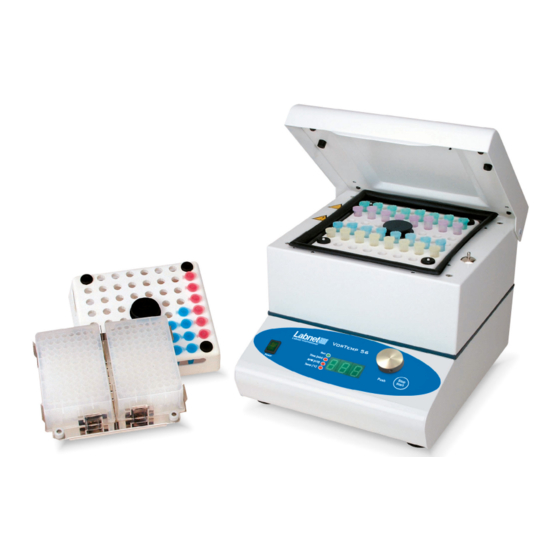
- Page 1 VorTemp™ 56 Shaking Incubator Instruction Manual Catalog Numbers: S2056A S2056A-230V...
-
Page 2: Table Of Contents
Table of Contents 1.0 Introduction ..................1 2.0 Packing . -
Page 3: Introduction
4.0 Technical Description 4.1. Construction The housing of VorTemp 56 is constructed of steel plate coated with highly resistant polyurethane lacquer. The interior chamber is isolated with special thermal protection materials and insulation foam. Both the shaking mechanism and temperature chamber regulated via microprocessors, which control all sensors for motor speed, temperature and time. -
Page 4: Accessories
The motor drives the eccentricity control mechanism which generates the orbital motion of the sample platform. The motion of the motor also drives the fan, which moves air over the heating element and throughout the temperature chamber. The convection action of the airflow creates a very uniform temperature environment throughout the chamber. -
Page 5: Microplate Holder Platform
5.2. Microplate Holder Platform CAUTION: Be careful if the unit has been used to heat samples because the internal components can be extremely hot and can cause burns to uncovered skin. Always check the handle temperature before changing the platform. The Microplate Holder Platform is designed for shaking up to 4 microplates or 2 deep well microplates. -
Page 6: Safety Information
6.0 Safety Information NOTE: Be careful when changing the microtube platform, especially when you have used unit at temperatures higher than 60°C. Always wear protective clothing before you handle a hot platform. The unit will continue to shake for 5 seconds after the lid is opened. Be careful when opening the lid as the parts inside may still be in motion. -
Page 7: Operating Instructions
8.0 Operating Instructions 8.1. Control Panel Encoder Time [min] Power 88.8 RPM [x10] Start Stop Temp [°C] 1. Power Key – switch ON (illuminates when on) or OFF. 2. Run – green signal light illuminated when the shaker is operating. 3. - Page 8 Time Illuminated With the Encoder knob, right (+) or left (-) sets the run time to the desire value from 30 sec to 99 min 50 sec: 99.5 = 99 min 50 sec 9.59 = 9 min 59 sec 0.30 = 30 sec If you want the unit to run continuously, set Time on hold.
- Page 9 Temperature Illuminated Rotating the encoder right (+) or left (-) set the temperature to the desired value: 37.4 = 37.4°C If you want use shaker without temperature control activated turn the encoder under 0.5 or above 99.5 until the display reads “OFF”. Press Start/Stop Button Run and Time are illuminated.
-
Page 10: Shaking Without Heating
8.3. Shaking Without Heating If you want shake samples without heating, set Temp to OFF. 8.4. Heating Without Shaking If you want heat samples without shaking, set RPM to OFF. NOTE: The shaker motor drives the fan, which circulates warm air throughout the chamber aiding in temperature uniformity. -
Page 11: Troubleshooting
9.0 Troubleshooting The VorTemp features built in self-diagnostic procedures which are constantly checking the operating parameters and performance, as well as functions that are necessary for safe and reliable operation. An error code is shown on the LCD display if an error occurs. Sample of Error display: Encoder Time [min]... -
Page 12: Temperature Calibration
10.0 Temperature Calibration The temperature control software allows for user calibration of the temperature settings. First, measure the temperature in the middle of the chamber after allowing the temperature to equilibrate for two hours. The temperature should be measured with a digital calibrated thermometer with precision 0.1°C or more. -
Page 13: Limited Warranty
13.0 Limited Warranty Corning Incorporated (Corning) warrants that this product will be free from defects in material and workmanship for a period of one (1) year from date of purchase. CORNING DISCLAIMS ALL OTHER WARRANTIES WHETHER EXPRESSED OR IMPLIED, INCLUDING ANY IMPLIED WARRANTIES OF MERCHANTABILITY OR OF FITNESS FOR A PARTICULAR PURPOSE. - Page 14 To request certificates, please contact us at www.labnetlink.com. Warranty/Disclaimer: Unless otherwise specified, all products are for research use or general laboratory use only.* Not intended for use in diagnostic or therapeutic procedures. Not for use in humans. These products are not intended to mitigate the presence of microorganisms on surfaces or in the environment, where such organisms can be deleterious to humans or the environment.
Need help?
Do you have a question about the VorTemp 56 and is the answer not in the manual?
Questions and answers