Advertisement
Quick Links
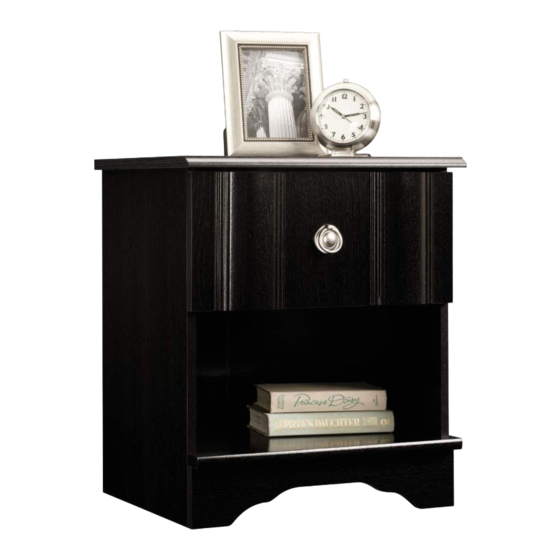
Night Stand
Jaclyn Smith Gatsby Collection | 415693
Need help? Visit Sauder.com to view video assembly tips or chat with a live rep.
Prefer the phone? Call 1-800-523-3987.
Share your journey!
Sweet stand.
Sweet dreams.
NOTE: THIS INSTRUCTION
BOOKLET CONTAINS IMPORTANT
SAFETY INFORMATION.
PLEASE READ AND KEEP FOR
FUTURE REFERENCE.
English pg 1-15
Français pg 16-18
Español pg 19-21
Lot # 358697
01/10/14
Purchased: __________________
Be sure to give us a ring before
making any returns. 1-800-523-3987
Advertisement

Subscribe to Our Youtube Channel
Related Manuals for Sauder Jaclyn Smith Gatsby 415693


Summary of Contents for Sauder Jaclyn Smith Gatsby 415693
- Page 1 Jaclyn Smith Gatsby Collection | 415693 NOTE: THIS INSTRUCTION BOOKLET CONTAINS IMPORTANT SAFETY INFORMATION. Need help? Visit Sauder.com to view video assembly tips or chat with a live rep. PLEASE READ AND KEEP FOR FUTURE REFERENCE. Prefer the phone? Call 1-800-523-3987.
- Page 2 Table of Contents Assembly Tools Required Part Identifi cation No. 2 Phillips Screwdriver Tip Shown Actual Size Hardware Identifi cation Assembly Steps 5-15 Hammer Not actual size Français 16-18 Español 19-21 Safety Warranty Page 2 415693 www.sauder.com/services...
- Page 3 LEFT DRAWER SIDE (1) LEFT END (1) DRAWER FRONT (1) D158 DRAWER BACK (1) TOP (1) BOTTOM MOLDING (1) D964 DRAWER BOTTOM (1) BOTTOM (1) DRAWER MOLDING (2) BACK (1) RIGHT DRAWER SIDE (1) D158 D964 www.sauder.com/services 415693 Page 3...
- Page 4 3S GOLD 5/16" FLAT HEAD SCREW - 8 BLACK 9/16" LARGE HEAD SCREW - 8 30S BLACK 1-9/16" FLAT HEAD SCREW - 4 SILVER 1-1/8" FLAT HEAD SCREW - 4 BLACK 7/8" MACHINE SCREW - 1 Page 4 415693 www.sauder.com/services...
- Page 5 Look for this icon. It means a Step 1 video assembly tip is available at www.sauder.com/services/tips Assemble your unit on a carpeted fl oor or on the empty å carton to avoid scratching your unit or the fl oor. Push ten HIDDEN CAMS (1F) into the ENDS (A and B) å...
- Page 6 END. Turn a SCREW into this hole. Push the release lever in and pull the SLIDE from the RAIL. Open end GOLD 5/16" FLAT HEAD SCREW Finished edge (4 used in this step) Open end Finished edge Page 6 415693 www.sauder.com/services...
- Page 7 Tighten Risk of damage or Arrow injury. HIDDEN CAMS must be completely Arrow Maximum tightened. HIDDEN 210 degrees CAMS that are not completely tightened may loosen, and parts may separate. To Minimum completely tighten: 190 degrees www.sauder.com/services 415693 Page 7...
- Page 8 Fasten the BOTTOM MOLDING (H) to the BOTTOM (D). å Tighten two HIDDEN CAMS. Rounded edge Angled edge S u r f a c i t h h o l Unfi nished surface Maximum Arrow 210 degrees Minimum 190 degrees Page 8 415693 www.sauder.com/services...
- Page 9 Fasten the FRONT SKIRT (F) to the ENDS (A and B) and BOTTOM (D). å Use four BLACK 9/16" LARGE HEAD SCREWS (1S) through the ANGLE BRACKETS and into the FRONT SKIRT. Flat edge BLACK 9/16" LARGE HEAD SCREW (8 used in this step) www.sauder.com/services 415693 Page 9...
- Page 10 BACK fastened. The unit may collapse. on opposite corners of your unit if needed to make it “square”. Fasten the BACK (E) to your unit using the NAILS (1N). å NAIL (16 used in this step) Page 10 415693 www.sauder.com/services...
- Page 11 Step 7 Fasten the DRAWER MOLDINGS (I2) to the DRAWER FRONT (G2). å Use four SILVER 1-1/8" FLAT HEAD SCREWS (10S). SILVER 1-1/8" FLAT HEAD SCREW (4 used in this step) www.sauder.com/services 415693 Page 11...
- Page 12 Fasten the DRAWER BACK (D158) to the DRAWER å SIDES (D12 and D13). Use four BLACK 1-9/16" FLAT HEAD SCREWS (30S). NOTE: Be sure the DRAWER BOTTOM (D964) inserts into å the groove of the DRAWER BACK (D158). Page 12 415693 www.sauder.com/services...
- Page 13 (1 used in this step) Open end Screw head - turn CAM to line up holes in the SLIDES with holes in DRAWER SIDES Open end GOLD 5/16" FLAT HEAD SCREW (4 used in this step) www.sauder.com/services 415693 Page 13...
- Page 14 The drawer will push in hard until it is all the way in, then it will slide in and out easier. 40 lbs. 30 lbs. 20 lbs. Page 14 415693 www.sauder.com/services...
- Page 15 The higher the screw in the oblong hole, the higher your drawer front will be. The lower the screw, the lower the drawer front. www.sauder.com/services 415693 Page 15...
- Page 16 élément et conserver le livret pour future référence. EXTRÉMITÉ DROITE ..........1 (ENSEMBLE DE GLISSIÈRE ILLUSTRÉ À PART) Pour contacter Sauder EXTRÉMITÉ GAUCHE ..........1 GLISSIÈRE D'EXTENSION ........2 en ce qui concerne cet DESSUS ................1 COULISSE D'EXTENSION ........2 élément, faire référence...
- Page 17 Attention: Risque des dégâts ou blessures. Les Excentriques Escamotables doivent être serrés à bloc. Les Excentriques Escamotables que ne sont pas serrées à bloc peuvent desserrer et les pièces peuvent séparer. Pour serrer à bloc, faire tourner l'excentrique escamotable de 210 degrés. www.sauder.com/services 415693 Page 17...
- Page 18 REMARQUE : La tête de vis dans l'EXCENTRIQUE doit être visible à travers le trou fendu dans les COULISSES. Fixer la POIGNÉE (82K) au DEVANT DE TIROIR (G2). Utiliser une VIS À MÉTAUX 22 mm NOIRES (37S). Page 18 415693 www.sauder.com/services...
- Page 19 (JUEGO DE EXTENSIÓN SE MUESTRA POR SEPARADO) et conserver le livret pour future référence. RIEL DE EXTENSIÓN ............2 EXTREMO IZQUIERDO ............1 Pour contacter Sauder CORREDERA DE EXTENSIÓN ........2 PANEL SUPERIOR ..............1 en ce qui concerne cet 10A EXCÉNTRICO DE CORREDERA ........2 FONDO ....................
- Page 20 Precaución: Riesgo de daños o heridas. Los Excéntricos Escondidos deben apretarse completamente. Los Excéntricos Escondidos que no se aprieten completamente se afl ojarán y las partes pueden separarse. Para apretar completamente, atornille el excéntrico escondido 210 grados. Page 20 415693 www.sauder.com/services...
- Page 21 NOTA: La cabeza de tornillo del EXCÉNTRICO debe ser visible a través del agujero alargado de la CORREDERA. Fije el TIRADOR (82K) a la CARA DE CAJÓN (G2). Utilice un TORNILLO NEGRO PARA METAL de 22 mm (37S). www.sauder.com/services 415693 Page 21...
- Page 22 Además, el peso y la ubicación del tubo de imagen tienden a causar la inestabilidad de televisores y son propensos a inclinarse hacia adelante. Page 22 415693 www.sauder.com/services...
- Page 23 GARANTIE LIMITÉE DE 1 AN 1. Sauder Woodworking Co. (Sauder®) off re une couverture de garantie limitée à l’ a cheteur 4. La présente garantie ne s’ a pplique qu’ a ux défauts garantis qui se produisent pour initial du présent produit pendant une période un an à...
- Page 24 Dear Valued Customer: So, how did it go? Thanks so much for choosing Sauder® furniture. I hope the Set a world record for speed? purchase and assembly process was a positive experience Feeling good about yourself? and you feel good about the furniture you just built. If you Nice.
Need help?
Do you have a question about the Jaclyn Smith Gatsby 415693 and is the answer not in the manual?
Questions and answers