Table of Contents
Advertisement
Quick Links
415547
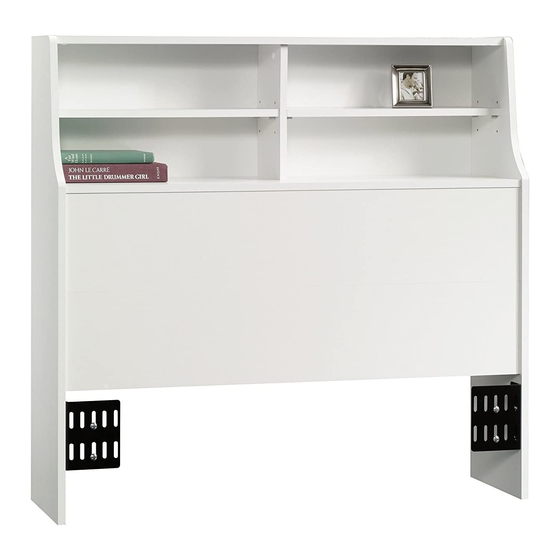
Twin Bookcase Headboard
PLEASE CONTACT US
BEFORE RETURNING
YOUR UNIT TO THE STORE
1-800-523-3987
www.sauder.com
NOTE: THIS INSTRUCTION BOOKLET CONTAINS
IMPORTANT SAFETY INFORMATION.
PLEASE READ AND KEEP FOR FUTURE REFERENCE.
English .................... Page 1-14
Français ...............Pages 15-16
Made in the USA
Espanol .............Páginas 17-18
Archbold, OH
Lot #: 353689
Date Purchased: ____________________
08 / 16 / 13
Advertisement
Table of Contents

Related Manuals for Sauder 415547


Summary of Contents for Sauder 415547
- Page 1 415547 Twin Bookcase Headboard NOTE: THIS INSTRUCTION BOOKLET CONTAINS IMPORTANT SAFETY INFORMATION. PLEASE CONTACT US PLEASE READ AND KEEP FOR FUTURE REFERENCE. BEFORE RETURNING English ....Page 1-14 YOUR UNIT TO THE STORE Français ....Pages 15-16 Made in the USA 1-800-523-3987 Espanol .....Páginas 17-18...
- Page 2 Hardware Identifi cation .....4 ASSEMBLY TOOLS REQUIRED Assembly Steps ....5-14 No. 2 Phillips Screwdriver Français ......15-16 Tip Shown Actual Size Espanol ....... 17-18 Warranty ........19 Hammer Electric drill with 1/4" bit (ONLY in indicated step) Page 2 www.sauder.com/services 415547...
-
Page 3: Part Identification
While not all parts are labeled, some of the parts will have a label or an inked letter on the edge to help distinguish similar parts from each other. Use this PART IDENTIFICATION to help identify similar parts. RIGHT END SHELF LEFT END BACK UPRIGHT PANEL ADJUSTABLE SHELF 415547 www.sauder.com/services Page 3... -
Page 4: Hardware Identification
BLACK 1-7/8" FLAT HEAD SCREW - 2 BLACK 1-1/8" PAN HEAD SCREW - 2 SILVER 2" BOLT - 4 102S SILVER 1" LARGE HEAD SCREW - 2 Screws are shown actual size. You may receive extra hardware with your unit. Page 4 www.sauder.com/services 415547... - Page 5 Assemble your unit on a carpeted fl oor or on the empty carton to avoid scratching your unit or the fl oor. Push eighteen HIDDEN CAMS (1F) into the UPRIGHT (C), TOP (D), SHELF (E), and both PANELS (G). Then, insert the metal end of a CAM DOWEL (2F) into each HIDDEN CAM. 415547 www.sauder.com/services Page 5...
- Page 6 Tighten Arrow Risk of damage or injury. Hidden Cams must be completely Arrow Maximum tightened. Hidden 210 degrees Cams that are not completely tightened Minimum may loosen, and parts 190 degrees may separate. To completely tighten: Page 6 www.sauder.com/services 415547...
- Page 7 210 degrees Minimum 190 degrees Fasten the UPRIGHT (C) to the SHELF (E). Use two BLACK 1-7/8" FLAT HEAD SCREWS (2S). Fasten the TOP (D) to the RIGHT END (A) and UPRIGHT (C). Tighten four HIDDEN CAMS. 415547 www.sauder.com/services Page 7...
- Page 8 Fasten the PANEL (G) to the RIGHT END (A). Tighten two HIDDEN CAMS. Fasten the PANEL (G) to the SHELF (E). Use two BLACK 9/16" LARGE HEAD SCREWS (1S) through the ANGLE BRACKETS on the PANEL and into the SHELF. Page 8 www.sauder.com/services 415547...
- Page 9 Fasten the remaining PANEL (G) to the RIGHT END (A). Tighten two HIDDEN CAMS. Fasten the PANEL (G) to the other PANEL (G). Use two TIE PLATES (3G) and four BLACK 9/16" LARGE HEAD SCREWS (1S). 415547 www.sauder.com/services Page 9...
- Page 10 Curved edge Maximum Arrow 210 degrees Minimum 190 degrees Fasten the LEFT END (B) to the TOP (D), SHELF (E), and both PANELS (G). Tighten eight HIDDEN CAMS. Page 10 www.sauder.com/services 415547...
- Page 11 Make equal margins along all four edges of the BACK (F). Push on opposite corners of your unit if needed to make it “square”. Fasten the BACK (F) to your unit using the NAILS (1N). NOTE: Be sure to tap NAILS into the holes that line up over the UPRIGHT (C). 415547 www.sauder.com/services Page 11...
- Page 12 NOTE: If fastening your Headboard to the 415546 Split-Platform Bed with Storage, go to Step 10 now. Fasten the HEADBOARD BRACKETS (16G) to the ENDS (A and B). Use eight BLACK 9/16" LARGE HEAD SCREWS (1S). NOTE: Select the holes to use for the correct height of your bed frame. Page 12 www.sauder.com/services 415547...
- Page 13 NOTE: Your bed frame must be attached to the headboard as indicated in this step. Push a CAM COVER (19P) onto each visible HIDDEN CAM. This completes assembly. Clean with your favorite furniture polish or a damp cloth. Wipe dry. 415547 www.sauder.com/services Page 13...
- Page 14 Next, fasten the PANEL (G) to the 415546 Headboard. Use two SILVER 1" LARGE HEAD SCREWS (102S) and two BLACK 1-1/8" PAN HEAD SCREWS (9S). Refer back to Step 9 for Adjustable Shelves and Cam Cover assembly. This completes assembly. Clean with your favorite furniture polish or a damp cloth. Wipe dry. Page 14 www.sauder.com/services 415547...
-
Page 15: Liste De Pièces
élément SUIF 32 mm ARGENT .....4 et conserver le livret 94S BOULON ARGENTÉ 51 mm ....4 pour future référence. Pour contacter Sauder en ce qui concerne cet élément, faire référence au numéro de lot et numéro de modèle en appelant notre numéro... - Page 16 TABLETTE (E) et les deux PANNEAUX (G). Serrer huit EXCENTRIQUES ESCAMOTABLES. Se reporter à l’étape 9 pour assembler les Tablettes réglables et les Couvercles d'excentrique. Ceci complète l'assemblage. Nettoyer à l’aide d’une encaustique pour meubles ou d’un chiffon humide. Essuyer. Page 16 www.sauder.com/services 415547...
-
Page 17: Lista De Partes
CABEZA REDONDA de 32 mm ..4 Si necesita ponerse 94S PERNO PLATEADO de 51 mm ..4 en contacto con Sauder en cuanto a esta unidad, refi érase al número de lote y al número de modelo cuando llame a nuestro número gratis. - Page 18 CABEZA REDONDA de 6 mm (45S). Devuélvase al paso 9 para el ensamblaje de los estantes ajustables y la cubierta de excéntrico. Esto completa el ensamblaje. Limpie con su pulimento para muebles preferido o un paño húmedo. Seque con un paño. Page 18 www.sauder.com/services 415547...
-
Page 19: Year Limited Warranty
4. La présente garantie ne s’applique qu’aux défauts garantis qui se produisent des composantes de mobilier Sauder. Le mot « défaut », tel qu’il est utilisé sous pour la première fois et qui sont signalés à Sauder dans les limites de ouverture les termes de la présente garantie, comprend les imperfections des pièces qui... - Page 20 Archbold, Ohio, where it all began. Certifi cate of Conformity The Sauder name on the box ensures that 1. This certifi cate applies to the Sauder Woodworking Product identifi ed by this Instruction Book. the item you have purchased is made with 2.
Need help?
Do you have a question about the 415547 and is the answer not in the manual?
Questions and answers