Homeright PAINTSTICK EZ-TWIST Instruction Manual
Five-piece painting system
Hide thumbs
Also See for PAINTSTICK EZ-TWIST:
- Installation manual ,
- Instruction manual (8 pages) ,
- Instruction sheet (2 pages)
Table of Contents
Advertisement
Available languages
Available languages
Quick Links
PAINTSTICK
Five-Piece Painting System
Instruction Manual
WARNING: To reduce the risk of injury, user must read the instruction
manual before using the PAINTSTICK
For Customer Service in Canada or US, call:
763-780-5115 or 1-800-264-5442, 8:00 am to 5:00 pm CST.
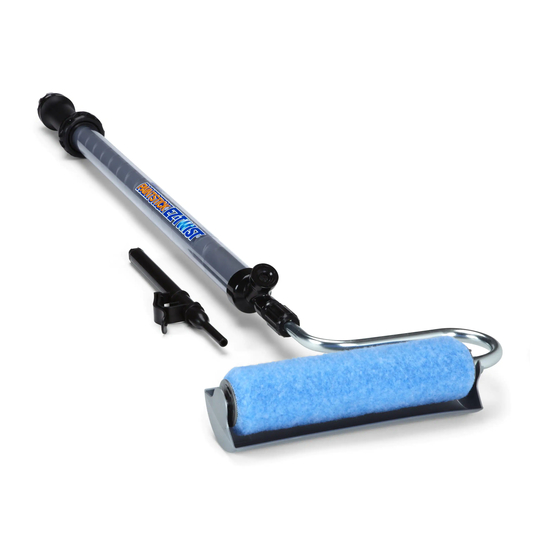
PAINTSTICK EZ-TWIST Parts List
NOTE: Use only PaintStick
or PaintStick
®
The PaintStick or PaintStick EZ-TWIST will not operate with a normal (non-perforated) roller cover.
**Call 1-800-264-5442 to order the C800798 Tune-up Kit for your PaintStick EZ-TWIST.
EZ-TWIST
®
EZ-TWIST
®
EZ-TWIST
perforated roller covers.
®
®
PAINTSTICK
EZ-TWIST
®
®
®
.
®
P ARTS LIST
I tem Part No.
Description
1
C806005
PAINTSTICK EZ-TWIST Handle Assembly
2
—
Inner Tube
3
—
Handle
4
—
Toggle
5
C816853
Quad Rings
6
C805291
Valve Kit for Fill Port
7
C805995
Frame
8
C817295
Inner End Cap and Seal*
9
C805277
Spacer*
10
C817300
Roller Cover-9", 3/8" nap
11
C817296
Outer End Cap with Snap Cap, Gray*
12
C806010
Spatter Shield
13
C805263
Paint Can Cover
14
C805266
Fill Tube
—
C820414
Instruction Manual (Not Shown)
—
C800798
Tune-up Kit (*Included in Kit, Not Shown)
Not Included in Five-Piece Painting System**
—
C816894
Petroleum Packet (Not Shown)
1
ENGLISH • ESPAÑOL • FRANÇAIS
Advertisement
Table of Contents

Related Manuals for Homeright PAINTSTICK EZ-TWIST


Summary of Contents for Homeright PAINTSTICK EZ-TWIST
- Page 1 WARNING: To reduce the risk of injury, user must read the instruction manual before using the PAINTSTICK EZ-TWIST ® ® For Customer Service in Canada or US, call: 763-780-5115 or 1-800-264-5442, 8:00 am to 5:00 pm CST. PAINTSTICK EZ-TWIST Parts List P ARTS LIST I tem Part No. Description 1 C806005 PAINTSTICK EZ-TWIST Handle Assembly 2 —...
- Page 2 • Inspect roller cover for lint before painting. If needed, rinse with water and let dry before using. • When using the PAINTSTICK EZ-TWIST for the first time, it will take most of the paint in the PAINTSTICK EZ-TWIST tube to saturate the roller cover.
-
Page 3: Troubleshooting
Problem: Air is drawn into the PAINTSTICK EZ-TWIST instead of paint. Solution: Slowly push handle in to expel air. Remove and reinsert PAINTSTICK EZ-TWIST on fill tube. Be sure fill tube is fully seated in valve body. If necessary apply petroleum jelly to fill tube which makes it easier to seat fill tube and valve body. - Page 4 NOTE: If painting with an oil-based paint, use manufacturer’s recommended cleaning solvent instead of warm water in the following steps. Follow manufacturer’s directions for using mineral spirits and disposal, then wash out the PAINTSTICK EZ-TWIST with warm water. 1. Return paint from PAINTSTICK 2. Remove paint from roller 3. Clean PAINTSTICK EZ-TWIST 4. Remove roller frame by EZ-TWIST to paint can by assembly by holding finger over by submerging PAINTSTICK unscrewing nut on end of roller...
- Page 5 PAINTSTICK EZ-TWIST Cleaning and Disassembling the ® ® 8. Depress the PUSH TO REMOVE 9. Remove the roller cover from 10. DO NOT REMOVE INNER END 11. Remove inner end cap from tab. It will snap to remove the the frame. CAP WITH A SCREWDRIVER! roller cover by inserting the outer end cap.
- Page 6 7. To reassemble, hold the tube 8. Assemble roller assembly onto roller frame by depressing the the outer handle and push securely and turn the handle PAINTSTICK EZ-TWIST handle locking tab. together. clockwise until secure. assembly and tighten nut. All parts must be thoroughly dry • N OTE: Do not allow the inner...
-
Page 7: Lista De Piezas
PAINTSTICK EZ-TWIST ® ® Sistema de pintura de 5 piezas Manual de instrucciones ADVERTENCIA: Para reducir el riesgo de lesiones, el usuario debe leer y entender el manual de instrucciones antes de usar el PAINTSTICK EZ-TWIST ® ® Para comunicarse con el departamento de servicio al cliente en Canadá o Estados Unidos, llame a los teléfonos: 763-780-5115 ó... - Page 8 • Si va a pintar en áreas estrechas, llene sólo parcialmente el PAINTSTICK EZ-TWIST; así se reducirá la longitud total del PAINTSTICK EZ-TWIST. • Si se va a dejar el PAINTSTICK EZ-TWIST sin usar durante un tiempo largo, envuelva el rodillo con una bolsa de plástico.
-
Page 9: Detección De Problemas
Problema: Entra aire dentro del PAINTSTICK EZ-TWIST en lugar de pintura. Solución: Empuje lentamente la manija para sacar el aire. Quite y vuelva a introducir el PAINTSTICK EZ-TWIST en el tubo de llenado. Asegúrese de que este tubo esté completamente asentado en la válvula. Si es necesario, aplique grasa de petróleo al tubo de llenado. - Page 10 NOTA: Si va a pintar con una pintura de aceite, use los solventes de limpieza recomendados por el fabricante en vez de usar agua caliente en los pasos siguientes. Siga las instrucciones del fabricante para el uso y desecho de alcoholes minerales, y luego lave el PAINTSTICK EZ-TWIST con agua tibia. 1. Devuelva la pintura del 2. Retire la pintura del conjunto 3. Limpie el PAINTSTICK EZ-TWIST 4. Quite la armadura del rodillo PAINTSTICK EZ-TWIST a la del rodillo sosteniendo el dedo sumergiéndolo en agua destornillando la tuerca situada...
- Page 11 Limpieza y desarmado del PAINTSTICK EZ-TWIST ® ® 8. Presione la lengüeta 9. Saque el rodillo de la armadura. 10. ¡NO QUITE LA TAPILLA 11. Retire la tapilla interna “PRESIONAR PARA SACAR” y INTERNA CON UN del rodillo insertando la se abrirá...
- Page 12 PAINTSTICK EZ-TWIST y apriete del reloj hasta que esté firme. la tuerca. Todas las partes • N OTA: No permita que los deben estar completamente anillos ‘O’/Quad ring de la...
-
Page 13: Manuel D'instruction
PAINTSTICK EZ-TWIST ® ® Système de peinture à cinq pièces Manuel d’instruction AVERTISSEMENT : Pour réduire les risques de blessure, l’utilisateur doit lire le manuel d’instruction avant d’utiliser le manche à peindre PAINTSTICK EZ-TWIST ® ® Pour le service à la clientèle au Canada ou aux États-Unis, appelez le : (763) 780-5115 ou (800) 264-5442 de 8 h à... - Page 14 être posé, sans être enfoncé, exigus. Cela réduit la longueur totale du manche. sur le dessus du pot. • Si vous devez laisser le manche PAINTSTICK EZ-TWIST sans surveillance pour un certain temps, enveloppez le manchon dans un sac en plastique. PAINTSTICK EZ-TWIST FRANÇAIS...
-
Page 15: Dépannage
Problème : De l’air plutôt que de la peinture est aspiré dans le manche PAINTSTICK EZ-TWIST. Solution: Poussez sur la poignée pour expulser l’air. Retirez puis réinsérez le manche PAINTSTICK EZ-TWIST dans le tube de remplissage. Assurez-vous que le tube de remplissage est bien installé dans le corps de valve. Si nécessaire, appliquez de la vaseline sur le tube de remplissage. - Page 16 3. Pour nettoyer le manche à 4. Retirez l’armature du rouleau en dans le manche PAINTSTICK en bouchant du doigt l’orifice peindre PAINTSTICK EZ-TWIST, dévissant l’écrou sur l’extrémité EZ-TWIST dans le pot en tenant de remplissage et en tirant sur submergez-le d’eau tiède de...
- Page 17 Nettoyage et démontage du manche à peindre PAINTSTICK EZ-TWIST ® ® 8. Appuyez sur la languette 9. Retirez le manchon de 10. NE PAS SE SERVIR D’UN 11. Retirez le bouchon interne « APPUYER POUR RETIRER ». l’armature. TOURNEVIS POUR RETIRER LE du manchon en y insérant Son déclic permet d’enlever le BOUCHON INTERNE AU RISQUE...
- Page 18 8. Fixez le rouleau sur le manche sur le manchon en appuyant sur l’intérieur de la poignée externe fermement le tube et tournez PAINTSTICK EZ-TWIST et serrez la languette de verrouillage. et poussez-les d’un coup. la poignée dans le sens horaire l’écrou.
-
Page 20: Two-Year Limited Warranty
Numéro de brevets : 7,556,447 Número de Patente 7,556,447 PaintStick is a registered trademark of Diversified Dynamics Corp. Reg. U.S. Pat. Tm. Off. ® Printed in China Manufactured by HOME RIGHT www.homeright.com ® Hecho en China Fabriqué à Chine © 2010 PN C820414 REV C 3/10...
Need help?
Do you have a question about the PAINTSTICK EZ-TWIST and is the answer not in the manual?
Questions and answers