Advertisement
Quick Links
Advertisement

Related Manuals for Hongda USA Gibbon Sushi M2011


Summary of Contents for Hongda USA Gibbon Sushi M2011
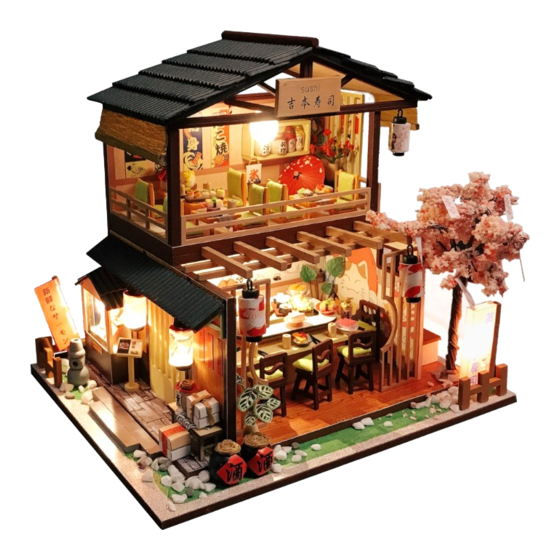
- Page 1 Gibbon Gibbon Sushi Sushi M2011 Instruction manual...
- Page 2 Tips for assembling 1.Picures shown on the package may be slightly different from the actual product. 2.All the materials are taken in the operation step, put the remaining materials back into the original pocket until the installation is completed.(Avoid material loss during installation) 3.The dimensions indicated in the step diagram are“cm”.
- Page 3 Thumbnail of material list( reference only) Contents Name Material Package Name Material Package They are total 6 pieces of A4 paper, Door D Bag+E Bag+Printing Paper Printing 1 piece of single printing A5 printing & Window +Template Paper Paper paper and template paper in A Bag A12 Advertising D Bag+G Bag+Printing Paper...
- Page 4 Please cut out B17, B18, B19 in A13 before making A12-13 (left side) A12-53 A12-14 A12-53 A12-14 A12-13 A12-13 (right side) (front side) (back side) 0.7CM (This picture is just for show B19(back side) results ,no need stick temporarily)
- Page 5 A12-44 Use same way, make 2 pieces. A12-29 A12-29 A12-44 Please cut out E01 and E19 according to the template before making. (cushion) B03 B03 B03 B03 B03 B03 B03 B03 B03 B03 (cushion) B04 B04 B04 B04 B04 Use same way, make 11 pieces, here only need 5 pieces, Stick E19 to E03,and cut it left 6 pieces will be use...
- Page 6 Use same way, make 5 pieces Please cut out E01 according to the template before making. E01(back pad) A12-22 A12-48 A12-49 Use same way, make 6 pieces. A12-50 A12-49 A12-48 A12-48 Cut at the dotted line, Use same way, A12-50 (front) (back) and adhere to the white area...
- Page 7 A12-22 Stick E07 to E03, and cut it according to E07 size Please cut out B11 in A13 before making, and cut out E03, E04, E05, E06, E07 according to the template 0.3CM 0.8CM (rice) (yellow sushi) (light orange (rose red (orange sushi) 0.3CM Sushi)
- Page 8 E06 Sushi A12-48(orange dish) Cut E04 into 2 small pieces. A12-48(purple dish) Cut out 2 pieces of 0.4 * 0.7CM E04 Sushi E04 Sushi A12-48(red dish) E06 Sushi A12-48(red dish) E05 Sushi E04 Sushi Use same way, make 2 pieces. E05 Sushi E03 rice E05 Sushi...
- Page 9 0.4CM Cut out 3 pieces high 0.4CM Cut 3 pieces of E04 (Sushi roll) 0.4CM A12-48(gray dish) Cut out 5 pieces high 0.4CM (Sushi roll) (Sushi roll) (Sushi roll) Cut out 1 piece E03+E04 Cut out about 0.1CM Cut in a half Then shred it.
- Page 10 Please cut out E02 and E09 according to the template before making. (tall bottle wine) (round bottle wine) 10CM A12-43 A12-32 A12-32 E02(tall bottle wine) A12-41 A12-42 A12-40 E02(round bottle wine) Twist E21 into 2 pieces Use same way, make 2 pieces. A12-40 E02(tall bottle wine) A12-41...
- Page 11 0.3CM A12-43 Please refer to the previous steps, Use same way, make 2 pieces Cut E17 and keep 0.3CM twist E21 and cut out 3 CM. For easy to make , A12-42 Place the wine bottles as shown in the picture, can twist E21 thinner.
- Page 12 A12-18 C13(back side) Use same way, make 2 pieces 1.2CM Put the product in tilt A11(Showcase-2) A11(Showcase-1) A11(Showcase-2) A12-28 Lightly cut a mark on the back of A11. A12-19 A12-45 A12-45 C03 C03 Please cut out C02 and C03 in A13 before making. Use same way, make the rest.
- Page 13 Please cut out C07 and C08 in A13 before making. A12-03 A12-03 11CM A12-05 A12-09 Twist E21 into 2 pieces A12-09 Use same way, make the rest A12-05 A12-09 A12-09 The two ends will be Twist to 90 degrees merged and glued. A12-51 A12-31 A12-51...
- Page 14 A12-27 A12-07 folds and bonding A12-34(back side) A12-07 A12-27 A12-34 (back side)(front side) Please cut out E08 A12-52 according to the template before making. use same way, make 2 pieces A12-36 D08 G01 E08(door) E08(door) A12-36 A12-52 (front side) (back side)
- Page 15 A12-47 A12-46 A12-46 A12-46 Use same way, make 2 pieces 1.5CM Complete the rest in the same way, where there is no need to Bend E11 in half install the steps of the lamp. A12-10 Cut at the dotted line and bond with the thick black line.
- Page 16 About Cut E12 to 22CM length and fold it evenly Cut four of them to Plug the E12 into F08 and Cut off the top end A12-15 different lengths. bend it into a different shape 0.7CM 4cm * 1 strip 3.5CM*1 strip A12-16 3CM*2 strip...
- Page 17 Please cut out E10 according Please cut out E10 according to the template before making. to the template before making. Roll up E10 from the bottom E10(blackout-1) E10(blackout-2) A12-06 A12-06 Screw e21 out of a single strip Use same way, make the rest. 1.6cm per interval house along Please cut outA10, E08 according...
- Page 18 A12-01 A12-20 A12-26 (front) (front) A12-38 A12-35 A12-26 A12-25 A12-20 (back) A12-01 (back) (back) A12-11 A12-35 A12-39 A12-38 (front)
- Page 19 A12-25 A12-11 A12-25(back side) (front side) A12-39 (Fold at right angles A03(back side) according to the dotted line) (back side) Upgraded accessories (need to be purchased separately) H01clockwork H02 movement H03 movement movement screw handle Align the gray reference (inside) (outside) (1 piece)...
- Page 20 Potted plants High chair Auto Sushi Table Add Sushi, wine bottle wine bottle Add cups and chopsticks (Please refer to page 10 Add Sushi, rice pot, high chair and make 10 pieces for E11 production method). A12-08 A12-21 A12-24 A12-33 A12-37...
- Page 21 A12-08 A12-37 A07(back side) 6.5CM right angle 3.8CM Mark three black dots on the back of A07 according to the picture. A12-33 Use same way, make 4 pieces (Pay attention to the light line)
- Page 22 D02+D03 wine cabinet A12-06 (hang tag) A12-24 A12-21 dining table Add dining table, seat...
- Page 23 D07(window) wooden shoes (Pay attention to the light line) (paper lantern) (Pay attention to the light line) Roof Art flower arrangement umbrella Use same way, make 2 pieces...
- Page 24 Signboard lantern E10(blackout-2) E10(blackout-1) 1.6CM Each pitch is about 1.6CM (Pay attention to the light line) lantern lantern (Pay attention to the light line) lantern lantern Showcase...
- Page 25 A12-17 flag Takeaway rack stone seat menu batten Eaves tiles (paste flush to the wall) doorplate potted plants wine bottle (You can bend the cherry tree branches according to your favorite shape.) A12-23 (Pay attention to the light line.) Advertising light board...
- Page 26 A12-12 (side view) (front side) First connect the red wire of the battery box and the gray wire of the LED light. Then conect the black wire of the battery box and the white wire of the LED light together. Classify the white line and Finally, wrap the bare wires with G03 adhesive tape to the gray line separately.
- Page 27 It's great i ~, your sushi restaurant is finished! Statement: the lamp wires cannot be inserted into the output socket. – – Can use 7 batteries – – Please notice the place of anode and cathode when pit in the batteries –...
- Page 28 Attention: Please keep the instruction for future enquires after installation.
Need help?
Do you have a question about the Gibbon Sushi M2011 and is the answer not in the manual?
Questions and answers