
Related Manuals for Hongda USA Rainbow Cafe M906


Summary of Contents for Hongda USA Rainbow Cafe M906
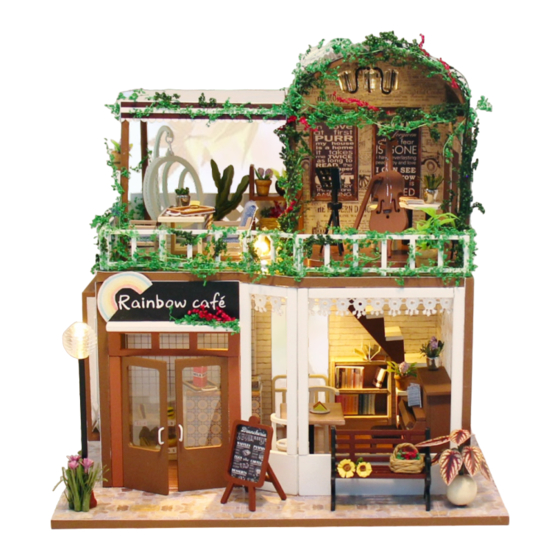
- Page 1 DIY mini house kits - DIY mini house kits - Rainbow Cafe Rainbow Cafe M906 Instruction manual M906 Instruction manual...
- Page 2 Tips for assembling Testing on LED function 1.Picures shown on the package may be slightly different from the actual product. Be sure to test the LED lights before making the lighting, 2.All the materials are taken in the operation step, put the remaining materials back into note that the LED white wire to the negative, gray wire the original pocket until the installation is completed.(Avoid material loss during installation) to the positive reference to the following figure...
- Page 3 Thumbnail of material list( reference only) details of miniature kit Name Material package Bag A-A10(All printing and template papers are Printing paper shown on A10 paper,total 5pieces of A4 ) small bookcase bag B+ printing paper small desk bag B display board bag B+p rinting paper steps...
- Page 4 Hello. I'm a mouse! Next I will lead you into the world of DIY! Hand-painted courses 01 Hand-painted courses 02 Hand-painted courses 03 Watercolor course A Watercolor course B Sketch course A Sketch course B A10-02 A10-01 B02 B02 A10-03 A10-04 1.4cm A10-04...
- Page 5 Cut equally spaced (0.1-0.2cm) using scissors 1.5cm 0.5cm Come on! You can do it. A10-07 A10-07 2pieces...
- Page 6 Let's take it one step at a time! Cut out the material G04,G06,G07,G08 and G14 according to the template paper before making. (sandwich) (sandwich) (sandwich) (tomato) (meat1) G14(leaves) J01 (7cm) G04(decoration) Paste the printing paper on the G04 (decoration) A10-09 card paper as shown, and cut out.
- Page 7 J01:2.5cm G14(leaves) G14(leaves) (2pieces) H02 ( some) G18 ( some) A10-19 G21 (2 0 cm ) A10-19 H03 (s ome) H03 (s ome) G18 ( 1/4 branch) G18 ( 1/4 branch) H02 ( some) A10-14-02 A10-14-01 A10-14-03 A10-14-04...
- Page 8 A10-10 A10-10 A10-11 J03 (5cm) A10-12 A10-13 A10-13 A10-11 A10-12 0.2cm 0.7cm 2pieces A10-14-04 A10-14-03 A10-14-02 A10-14-01...
- Page 9 Cut out the material G06,G07,G08,G09 and H14 according to the template paper before making. We need more patience to make food! (sandwich) (sandwich) (sandwich) (sandwich) (vegetable) (food cabinet) (meat1) (meat1) tomato) (sandwich) (hamburger) (hamburger) (hamburger) (hamburger) (pizza) (pizza) (meat 3) (meat 3) (hamburger) (hamburger)
- Page 10 Use a knife on the red line.At the dotted line of the template paper, gently draw a straight line and fold the line to paste. A10-18-02 0.4cm (food cabinet) 0.4cm A10-18-01 Using tweezers, put the box into the G20 bag, then wrap it with J01 wire and cut off the excess. sandwich 2 sandwich 1 sandwich 3...
- Page 11 Use scissors to cut off any excess material around the edges. (sofa cushion) (sofa backrest) 2pieces sofa cushion G01(sofa cushion) (front view) Use scissors to cut off any excess material around the edges. sofa cushion sofa backrest (sofa backrest) sofa backrest 2pieces (front view)...
- Page 12 2.5cm 0.5cm 9pieces twist between two sides fold it Whoo! You are so great. D16 D16 D17 D17 J03 (5cm) A10-06 2.5cm 1.5cm 2pieces Cut the length and width of the G11 mesh cloth as shown in the figure, stick it on as shown, and finally cut off the excess part. J03 (1cm) J03 (2cm) A10-06...
- Page 13 D09 D09 (piano stool (piano stool cushion) cushion) G13 (2 * 3cm) (piano stool cushion) D08 D08 D08 D08 D07 D07 D06 A10-20-01 A10-20-02 A10-20-01 1.1cm...
- Page 14 A10-20-02 (piano stool cushion) (piano stool cushion) (piano stool cushion) piano stool cushion Please refer to page 3 for the method of making green plants. piano stool cushion Use a knife to cut a bevel at the Perseverance and patience edge of the contact.
- Page 15 J04 through the two sides, at the back of the winding easy to fix. Cut out the material G14 according to the template paper before making. G16 (1 .2* 3cm ) A10-22 H02 ( some) G14(sunflower leaves) J01 (5cm) G21 (2 0 cm ) H03 (s ome) G06 (0 .4 * 1cm ) 0.2cm...
- Page 16 Come on!Don't be discouraged! Cut out the material H14 according to Victory is just around the corner. the template paper before making. H14(door) A10-24 H14(door) J03 (4cm) A10-23 A10-24 A10-23 H14(door) Pasting H14 on the back of the door will make it more beautiful. Cut out the material H14 according to the template paper before making.
- Page 17 H19 :8cm one of them needs to be combined with H19 to form a street light. J02 :2cm ceiling light street light (bend it) H19 (8 cm) 2pieces Success belongs to the persevering! 0.8cm 1.2cm J02:3.5cm 3pieces wall lamp A10-26 chandelier (bend it)...
- Page 18 Use the scissors to cut out arcs of Two folded sheets of paper stick to each other. different sizes around the edges. J01 Insert notch A10-26 2.3cm 2.5cm 2.5cm 3.5cm 3.5cm 3cm Cut a notch in half The length of J01 is shown in the figure. G13:1.5cm potted plant 2 G13:3.5cm...
- Page 19 Cut and paste the G12 lace at the appropriate distance as shown in the figure. F04 F05 F03 F03 A10-25 A10-27 A10-25 Pass the lamp wire through the two ends of the printing paper, and arrange the thread and stick it in the line slot, and then stick the printing paper. A10-29 A10-28-01 street light...
- Page 20 0.5cm triangular light ceiling Light A10-30-01 After the triangular light passes through the line hole, it is pasted with the top lamp line as shown in the figure. Cut out the material H14 according to the template paper before making. (second floor window) A10-31-02 A10-30-02...
- Page 21 A10-34-01 A10-34-02 Note: Cut a small corner with a small knife on the printed paper that is not recessed. back view Music machine core manual guide (If you have purchased the music machine core, please fix it firstly) K04 Music Music machine K05 Screw core handle...
- Page 22 small desk cello flower shelf potted plant 1 small round rocking potted plant 5 stool video A10-36 music chair recorde stand piano book case square table chair A10-37 G19(10.5*12.3cm) potted plant 4 sofa long chandelier table After the chandelier passes through the line hole, the line tent on the back is as shown in the figure.
- Page 23 How to assembl e the battery hol d er – – Can use 7 batteries – – Rechargeable batteries should be – – Please notice the place of anode removed from the toy before charging Statement: the lamp wires cannot be and cathode when pit in the batteries –...
- Page 24 Photo of Dust proof cover 1. Tear off kraft paper of each piece of transparent cover. 2.Paste K01,K02 and K03 together to complete the dust proof cover as shown. Attention: Please keep the instruction for future enquires after installation.
Need help?
Do you have a question about the Rainbow Cafe M906 and is the answer not in the manual?
Questions and answers