
Related Manuals for Hongda USA The Sound of the Sea M040


Summary of Contents for Hongda USA The Sound of the Sea M040
- Page 1 DIY handmade DIY handmade goods-- goods-- The Sound of the Sea The Sound of the Sea M040 Instruction manual M040 Instruction manual...
- Page 2 Making tips Warnings How to assemble the battery holder The product is not suitable for children 1. LED wiring indication: under 14 years old. The should be under custody of adults when playing with the White=Positive;Grey=Negative. product. 2.Use a craft blade to carefully There are small parts, please do not swallow skim over the plastic to bare the them for avoiding dangerous accidents.
-
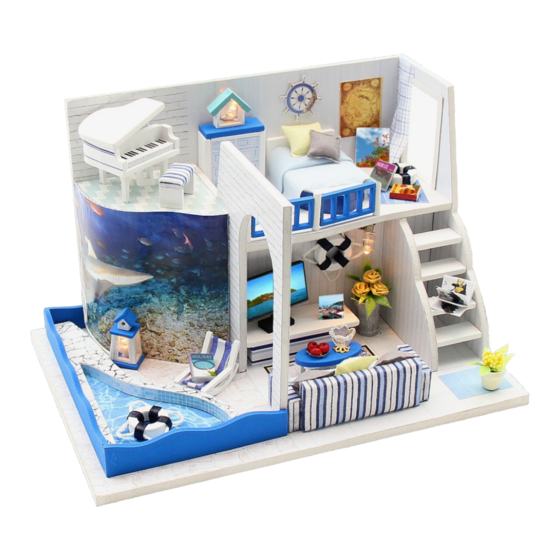
Page 3: Product Information
Product information bedside lamp Piano Life ring TV console Table Floor lamp Potted plant Swimming pool Sofa Flower Beach chair... - Page 4 A09-37 (back view) A09-37 (front view) A09-18 A09-18 A09-07 A09-07 0.3cm (photo frame support) (A09-07) (photo frame support) (A09-07) Cut E11 according to the template of E11. F01:1.5cm F08(3pieces) Cut out the material E01,E02, E01(sofa handrail)2pieces F01:1.5cm E01(sofa base) E01(sofa backrest) E03,E04 according to the template paper before making.
- Page 5 E01(sofa handrail) E01(Sofa base) (sofa cushion) (sofa cushion) (2pieces) (sofa pillow) (3pieces) Cut out the material E02,E03, C12(2pieces) A09-03 E04,E07 according to the template (sofa pillow) paper before making. A09-12 (bed cushion) (quilt) E04(bed pillow) E03(bed pillow) A09-12 (quilt) (bed cushion) after leaving 1cm and A09-03 fold up again as shown.
- Page 6 A09-06 F03:1.5cm A09-06 D11(3pieces) A09-19 F03:1.5cm A09-19 Cut out the material E01,E07,according to the template paper before making. (piano stool (piano stool cushion) cushion) (piano stool cushion) D14(2pieces) (piano stool cushion) Cut out the material E05 according to the template A09-35 F03:1cm paper before making.
- Page 7 (Making method of H06 is same as H05, remove E14.) E13:2.2cm E13:2.2cm E13:2.2cm (2pieces) A09-26 A09-26 A09-27 A09-27 A09-21 A09-20 Cut out the material E09 according to the template paper before making. A09-20 A09-30-1 F02: (2pieces) A09-30-2 (rose) A09-30-3 F02: 2.5cm A09-21 Fold in half...
- Page 8 Cut out the material E07 according to the template paper before making. F14(1 branch) A09-04-2 A09-04-2 A09-04-1 E07(slipper) A09-04-3 E07(slipper) Cut out the material E12 according to the template paper before making. A09-04-3 A09-04-1 E12(floor lamp) 4pieces B08(4pieces) (4pieces) F11:0.6cm F11:0.6cm C10(2pieces) C11(3pieces)
- Page 9 Cut out the material E11 and E12 according A09-05 to the template paper before making. A09-05 (window 2) (window 1) (window1)2pieces (window) (window) (window 2) (window 1) Cut out the material E06 according A09-01 0.8cm 0.5cm 0.8cm 0.5cm to the template paper before making. fold fold fold...
- Page 10 A09-29 Attach A09-29 on A04, cut a small opening on A04 with a knife according to he instruction on the A09-29 as shown. A09-24 A09-23 Fix H08 as shown. (front view) (back view) A09-16 A09-02 (front view) (back view)
- Page 11 A09-10 A09-13 (front view) (back view) A09-28 A09-31 A09-31 E10(wall) Reserve 0.1cm gap to facilitate light line passage. Swimming pool...
- Page 12 A09-17 curtain A09-08 (Making method of A09-08 is same as A09-07, remove phot frame support.) A09-15 A09-14 H07 paste along the dotted line A09-32 beach chair H09 paste along bedside table A09-09(Same as A09-08) the dotted line rose TV console A09-36 (same as A09-35)
- Page 13 red wire from battery box black wire from battery box grey wire from LED lamp white wire Trim all the LED wiring to from LED lamp the same length. Twist the following wire together: (I) BLACK wire from the battery box with the WHITE Roll and seal the duly twist copper with wire from LED bulb.
- Page 14 Photo of Dust proof cover 1. Tear off kraft paper of each piece of transparent cover. 2.Paste G04,G05,G06 and G07 together to complete the dust proof cover as shown.
-
Page 15: Photo Gallery
Photo gallery... - Page 16 Attention: Please keep the instruction for future enquires after installation.
Need help?
Do you have a question about the The Sound of the Sea M040 and is the answer not in the manual?
Questions and answers