
Related Manuals for Hongda USA Star Takoyaki


Summary of Contents for Hongda USA Star Takoyaki
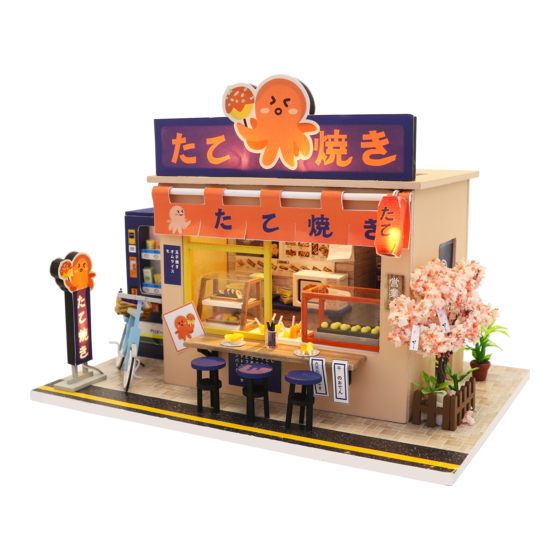
- Page 1 DIY mini house kits - DIY mini house kits - Star Takoyaki Star Takoyaki M913 Instruction manual M913 Instruction manual...
- Page 2 Tips for assembling Be sure to test the LED lights before making the lighting, note that the LED white wire to the negative, gray wire to the positive reference to the following figure operation test. Use the provide battery holder. Make sue the correct polarity.
- Page 3 details of minature kit Thumbnail of material list( reference only) Material package Name Bag A-A11(All printing and template papers are shown printing paper on A11 paper,total 3 pieces of A4 ) octopus ball B bag +E bag+ printing paper machine takoyaki rack B bag +E bag microwave...
- Page 4 A11-01 E08 (11pieces) B02 A11-01 (takoyaki rack3) (takoyaki rack1) (takoyaki (takoyaki rack 2) rack 2) Cut out the material E20 according to the template paper before making. (takoyaki rack 2) (takoyaki rack 2) (takoyaki A11-03 (takoyaki rack 1) rack 3)...
- Page 5 A11-02 A11-03 F06(1cm) A11-02 F06(1cm) A11-06 F06(3 .5cm) A11-06 A11-05-02 A11-05-01 A11-05-01 (10pieces) 0.5cm E08 (10pieces) A11-05-01 F06=3.5cm...
- Page 6 2pieces A11-05-02 microwave oven Cut out the material E01,E02,E03,E04,E05,E06 and E20 according to the template paper before making. E01(rice) E01(rice) E01(rice) E01(rice) E01(rice) E01(rice) E01(rice) (nori strip) sashimi ) sashimi ) (sashimi) sashimi sashimi ) ) (nori roll) (sushi ) (food rack)...
- Page 7 A11-04 2pieces Use a knife in the red line. (Note:The dotted line of the template paper), lightly draw a straight line, and fold and paste the line. (food rack) (food rack) C07(9pieces)...
- Page 8 A11-08 A11-16 A11-15 A11-14-02 A11-09 A11-10 A11-17 A11-14-01 A11-09 A11-08 E16 (1 6cm ) A11-10 3pieces A11-07 A11-12 A11-13-02 A11-11 A11-13-01 A11-15 A11-07 A11-12 A11-11 A11-16 A11-13-02 A11-17 A11-13-01...
- Page 9 A11-14-02 A11-14-01 F05(3 cm) (1 4cm) F06=6cm C16 C16 2pieces F05=1.5cm 2pieces The way of sticking the wire on both sides is shown in the picture.
- Page 10 F06=1.3cm Cut out the material E20 and E21 according to the template paper before making. A11-19-04 (vending A11-19-01 (vending machine) (vending machine) machine) A11-18-05 A11-18-01 A11-18-03 D11 D11 A11-19-05 A11-20-03 A11-19-02 (vending machine) D12(5pieces) (vending A11-18-04 machine) Picking Port A11-20-04 A11-19-03 A11-19-06 A11-18-02...
- Page 11 A11-20-04 E20(vending machine) (vending machine) A11-20-03 E20(vending machine) Picking Port A11-20-02 Cut out the material E02 and E05 according E11(1/4 branch) to the template paper before making. E11(2 branches) F07=1.5cm A11-23 2pieces plant 2pieces E16 (8 cm ) A11-23 (kanto cooking4)...
- Page 12 A11-24 A11-24 2pieces takoyaki rack food rack A11-17 octopus ball machine E09 (0 .8cm ) dining table A11-25-02 A11-25-01 F06(5 cm ) Roll up the printing paper A11-25-02 and put it into the rubber hose. A11-25-02 A11-25-01 1.2cm E09 =0.8cm 4pieces 0.5cm...
- Page 13 E09 (5 cm ) A11-22-01 A11-22-02 A11-21-02 A11-21-01 A11-21 Use a knife to cut out a position in the middle A11-21 lantern to allow the wire to pass through, so as to facilitate the subsequent wiring. A11-21-01 E09 =1.5cm A11-21-02 Please refer to the previous steps for making the signboard lights.
- Page 14 Vending Machine A11-26 light box Put the wire through the hole in the printed paper. Tidy up the lamp wire and stick it inside the wire slot. If D17 fails to engage in A03, rub the edges with sand paper. E20(window)...
- Page 15 A11-29 A11-33 Use a knife to cut a small corner on the top of the printed paper without protruding. Use a knife to cut out a small angle to facilitate the passage of subsequent wires. A11-30 A11-31 E21(roof) signboard 5.1cm lantern 0.7cm 0.7cm...
- Page 16 A11-08 A11-12 A11-15 dining table A11-16 stuff table barstool table A11-10 A11-32-03 A11-32-02 A11-32-01...
- Page 17 A11-32-04 bar table A11-34 bicycle round stool cherry tree A11-11 D05 D06 plant How to assembl e the battery hol d er Statement: the lamp wires cannot be inserted into the output socket. – – Can use two 7 batteries –...
- Page 18 white wire from LED lamp grey wire from LED lamp red wire from battery box black wire from battery Roll and seal the duly twist copper with the white tape F03 provided.
- Page 19 Installation of dust proof cover (For updated version, the parts need to be purchased separately) scale 1:4 scale 1:4 scale 1:4 G06 Transparent cover G05 Transparent cover G04 Transparent cover 20*14*0.18cm 15*13.64*0.18cm 20*15*0.18cm 1piece 2pieces 2pieces 1. Tear off kraft paper of each piece of transparent cover. 2.Paste G04,G05 and G06 together to complete the dust proof cover as shown.
- Page 20 Photo of Dust proof cover Attention: Please keep the instruction for future enquires after installation.
Need help?
Do you have a question about the Star Takoyaki and is the answer not in the manual?
Questions and answers