Advertisement
Quick Links
Advertisement

Related Manuals for Hongda USA S2010


Summary of Contents for Hongda USA S2010
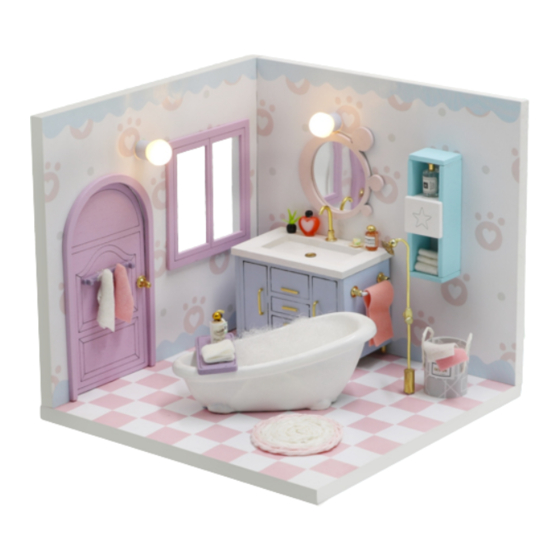
- Page 1 C o sy B a t h room S2010 Instruction manual...
- Page 2 Tips for assembling 1.Because this product contains small parts, children need to use this product with an adult to avoid accidental ingestion and cause suffocation hazard. There are sharp objects in the product, be careful not to pierce people to avoid injury. 2.After all the materials are used in the required amount in the operation steps, put the remaining materials back into the original bag until the installation is completed.
- Page 3 Contents Name Materials package A bag A04,A05(all of printing paper and template paper are in A04, printing paper A05;total 4pieces of A5 paper ) B bag + C bag +D bag+ printing paper+ template paper page 3-4 cabinet B bag +C bag+D bag+ printing paper+ template paper page 4-5 storage cabinet door...
- Page 4 Before making, cut out C01 according to A05-C01 template paper. B04(2pieces) C01-03 A04-02 (8pieces) 1.2cm 1.5cm Three are required. Bending as shown. 2.6cm 2.3cm Paste D06 to the Need to make two. corresponding position Bending as shown. as shown in the figures...
- Page 5 0.5cm 1.5cm Paste as shown. C01-03 fixed on Bending as shown. A04-02 Cut out as shown. Place as shown. Before making, cut out C02 according to A05-C02 template paper. B08(2pieces) Cut out D10 in half B07(2pieces) C02-03 C02-03 A04-03 C02-03 Place as shown.
- Page 6 1.5cm C02-03 A04-03 According to the previous Paste as shown. steps to do three. Before making, cut out C01 and C02 according to A05-C01A05-C02 template paper C01-01 C01-01 C02-04 Fold first. Paste as shown. C11(3pieces) C12 Complete C02-04 according C01-01(front) to the previous steps of C01-01.
- Page 7 0.8cm 6.8cm Bending as shown. Before making, cut out D12 according to A05-D12 template paper. D12-01 Tear off the blue adhesive film of D12-01 35cm Affix two turns around D15. 2.6cm Before making, cut out C01 and C02 according to A05-C01 and A05-C02 template paper.
- Page 8 C02-01 C01-02 Before making, cut out C02 according to A05-C02 template paper. 0.3cm C02-02 A04-06 0.7cm bending as shown. A04-06 A04-04 C02-02 A04-04 1.1cm A04-04 affixed to C13. Paste edge. Fold both sides in half. A04-07 Affix D13 alignment 2 pieces to be Added proper Paste as shown to the back of B14...
- Page 9 A04-01 A04-12 A04-10 Empty the window of door A04-11 A04-11...
-
Page 11: Battery Holder
How to assemble the battery holder Statement: the lamp wires cannot be inserted into the output socket. – – Can use 2*AAA batteries – – Please notice the place of anode and cathode when pit in the batteries – – Rechargeable batteries are not blunt electricity –... -
Page 12: Dust Cover
Installation of dust cover (plane display drawing) Dust cover (This side of kraft paper has been leave 0.5cm (This side of kraft torn,facing up) stick Z02 and Z03 on Z01 paper not torn, facing outward) Ripped one side of kraft paper, leaving one side of kraft paper The kraft paper that has been ripped off faces inwards, and the kraft paper that... - Page 13 Photo of Dust proof cover Great!It had finished! It can be combined with other designs, would you like to see them?
- Page 14 (Photos for reference,can be combined in different by yourself)
- Page 15 (Photos for reference,can be combined in different by yourself) (Photos for reference,can be combined in different by yourself) (Photos for reference,can be combined in different by yourself)
- Page 16 (Photos for reference,can be combined in different by yourself) (Photos for reference,can be combined in different by yourself) The instruction manual should be keep,after assembled...
Need help?
Do you have a question about the S2010 and is the answer not in the manual?
Questions and answers