Table of Contents
Advertisement
Quick Links
netPower Lite 7R
netPower Lite
7R (CSS610-1Gi-7R-2S+OUT)
Safety Warnings
Before you work on any equipment, be aware of the hazards involved with electrical circuitry, and be familiar with standard practices for preventing
accidents.
Read the installation instructions before connecting the system to the power source.
This equipment is to be installed by trained and qualified personnel, as per these installation instructions. The installer is responsible for obtaining any
required local or national safety inspections of the structural integrity of the installation by the local authority/inspection department.
All installation methods for mounting an access point on any wall surface is subject to the acceptance of local jurisdiction.
The Installation of the equipment must comply with local and national electrical codes.
This unit is intended to be mounted outdoors on a pole. Please read the mounting instructions carefully before beginning installation. Failure to use the
correct hardware and configuration or to follow the correct procedures could result in a hazardous situation to people and damage to the system.
We cannot guarantee that no accidents or damage will occur due to the improper use of the device. Please use this product with care and operate at your
own risk.
Quickstart
Please follow these quick steps to set up your device:
Download the latest SwitchOS software version
Connect your computer to any of the ethernet ports;
Connect the device to the power source;
Set an IP address of your computer to the 192.168.88.3;
Open your Web browser, the default management IP address is
Upload file with the web browser to the Upgrade tab, the device will reboot after an upgrade;
Set up your password to secure the device.
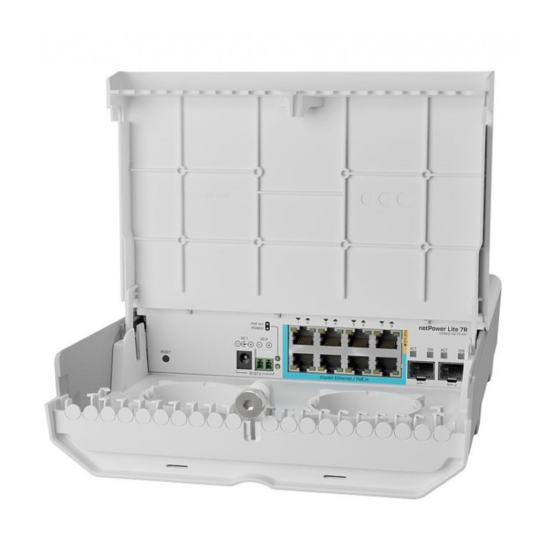
Expansion slots and ports
1.
Gigabit Ethernet, one port PoE-out.
2.
Gigabit Ethernet, eight ports.
3.
Gigabit Ethernet, seven ports, Reverse PoE (PoE in).
4.
Two - 10G SFP+ ports.
Configuration
The device can be discovered using Winbox utility, by clicking on the Neighbors list. The default management address is 192.168.88.1.
SwOS is a simple software designed for the switch. We suggest starting here to get yourself accustomed to the possibilities:
For recovery purposes, it is possible to boot the device for reinstallation, see section
from https://mikrotik.com/download;
192.168.88.1 / 192.168.88.2
netPower Lite 7R#Buttons and Jumpers
, with the username
admin
and no password;
https://mt.lv/help
.
.
Advertisement
Table of Contents

Related Manuals for MikroTik netPower Lite 7R


Summary of Contents for MikroTik netPower Lite 7R
- Page 1 SwOS is a simple software designed for the switch. We suggest starting here to get yourself accustomed to the possibilities: https://mt.lv/help For recovery purposes, it is possible to boot the device for reinstallation, see section netPower Lite 7R#Buttons and Jumpers...
- Page 2 The power consumption under maximum load can reach 7 W, with attachments 29 W. Power output The device supports passive PoE from Ethernet port eight. You can power Mikrotik devices which supports powering through Ethernet. The power delivered through the PoE port will depend on the incoming to the device.
- Page 3 Mounting and configuration of this device should be performed by a qualified person. Mounting on the mast or pole: Insert provided steel clamps into mounting spots. Attach the unit to the mast. Align the device and secure it by tightening steel clamps with a PH2 screwdriver. Guide Ethernet cables through the opening and connect to the Ethernet ports.
- Page 4 Use included a template to mark spots for drilling holes. Align accordingly, it will depend on how the device will be mounted finally. Insert dowels if needed, depends on wall structure and material. Insert screws and screw them by leaving approximately 1 cm out. Attach the unit to the position.
- Page 5 BG С настоящото Mikrotīkls SIA декларира, че този тип радиосъоръжение CSS610-1Gi-7R-2S+OUT е в съответствие с Директива 2014/30/ЕС, 2014/35/ЕС. Цялостният текст на ЕС декларацията за съответствие може да се намери на следния интернет адрес: https://mikrotik.com /products CS Tímto Mikrotīkls SIA prohlašuje, že typ rádiového zařízení CSS610-1Gi-7R-2S+OUT je v souladu se směrnicí 2014/35/EU, 2014/35/EU . Úplné...
- Page 6 Le soussigné, Mikrotīkls SIA , déclare que l'équipement radioélectrique du type CSS610-1Gi-7R-2S+OUT est conforme à la directive 2014/30/UE, 2014/35/UE. Le texte complet de la déclaration UE de conformité est disponible à l'adresse internet suivante: https://mikrotik.com/products HR Mikrotīkls SIA ovime izjavljuje da je radijska oprema tipa CSS610-1Gi-7R-2S+OUT u skladu s Direktivom 2014/35/EU, 2014/35/EU. Cjeloviti tekst EU izjave o sukladnosti dostupan je na sljedećoj internetskoj...
Need help?
Do you have a question about the netPower Lite 7R and is the answer not in the manual?
Questions and answers