
Subscribe to Our Youtube Channel
Related Manuals for HMS Premium L8022


Summary of Contents for HMS Premium L8022
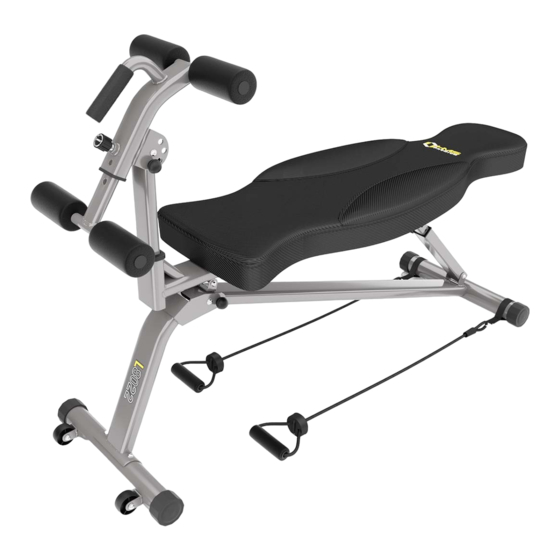
- Page 1 ŁAWKA WIELOFUNKCYJNA – MULTIFUNKCIONAL BENCH – LAVICE – MULTIFUNKTIONALE TRAININGSBANK L8022 INSTRUKCJA UŻYTKOWANIA – MANUAL INSTRUCTION – NÁVOD K OBSLUZE – BEDIENUNGSANLEITUNG...
-
Page 2: Uwagi Dotyczące Bezpieczeństwa
UWAGI DOTYCZĄCE BEZPIECZEŃSTWA Produkt ten przeznaczony jest wyłącznie do użytku domowego i zaprojektowano tak, aby zapewnić optymalne bezpieczeństwo. Powinny być przestrzegane następujące zasady: Przed rozpoczęciem treningu skonsultuj się z lekarzem w celu stwierdzenia braku przeciwwskazań do korzystania ze sprzętu do ćwiczeń. Decyzja lekarza jest niezbędna w przypadku przyjmowania leków wpływających na pracę serca, ciśnienie krwi i poziom cholesterolu. -
Page 3: Lista Części
LISTA CZĘŚCI #2. Rama główna z oparciem i śrubami – 1PCS #1. Przedni słupek– 1PCS #3. Stopa przednia - 1PCS #4. Regulator pionowy – 1PCS #5. . Rama do ćwiczeń nóg – 1PCS #6. Regulator poziomy - 1PSC #7. Wałek z pianki – 4PCS SZCZEGÓŁÓWA LISTA CZĘŚCI ZAMIENNYCH A. - Page 4 KROK 1: Zamontuj przedni słupek Przymocuj przedni słupek (1) do przedniej stopy (3) za pomocą śrub przedniej stopy M8*50. Uwaga: Nakrętki powinny znajdować się pod rurą, a kółka z przodu. KROK 2: Zamontuj ramę główną ławki Zamontowany przedni słupek (1) przymocuj do ramy głównej (2) używając Śruby M10*90 (B) oraz podkładki płaskie jM10 (E). Dokręć...
- Page 5 KROK 3: Załóż wałki z pianki na regulator poziomy Załóż wałki z pianki (7) na uchwyty znajdujące się na regulatorze poziomym (6). KROK 4: Załóż wałki z pianki na ramę do ćwiczeń nóg Załóż wałki z pianki (7) na uchwyty znajdujące się na ramie do ćwiczeń nóg (6). KROK 5: Złóż...
- Page 6 KROK 6: Złóż ramę do ćwiczeń nóg i regulator pionowy Złożoną ramę do ćwiczeń nóg (5) wyrównaj zgodnie z otworami znajdującymi się na regulatorze pionowym (4) oraz przymocuj te dwa elementy za pomocą Śruby M10*80 (C). Dodatkowo użyj płaskiej podkładki M10 (E) i zamocuj śrubę kulkową (F). Na koniec wyreguluj odpowiedni kąt ramy do ćwiczeń...
-
Page 7: Zakres Stosowania
ZAKRES STOSOWANIA Ławka do ćwiczeń jest urządzeniem przeznaczonym do ćwiczeń mięśni brzucha ramion oraz klatki piersiowej. Ławka do ćwiczeń L8022 jest urządzeniem klasy H przeznaczonym wyłącznie do użytku domowego. Nie może być używany jako sprzęt terapeutyczny lub rehabilitacyjny. INSTRUKCJA ĆWICZEŃ... -
Page 8: Karta Gwarancyjna
KARTA GWARANCYJNA Nazwa artykułu: Kod EAN: Data sprzedaży: WARUNKI GWARANCJI Sprzedawca w imieniu Gwaranta udziela gwarancji na terytorium RP na okres 24 miesięcy od daty sprzedaży. Gwarancja będzie respektowana przez sklep lub serwis po przedstawieniu przez klienta: czytelnie i poprawnie wypełnionej karty gwarancyjnej z pieczątką sprzedaży oraz podpisem sprzedawcy ważnego dowodu zakupu sprzętu z datą... -
Page 9: Important Safety Information
IMPORTANT SAFETY INFORMATION This product has been designed for home use only and built for optimum safety. Please note the following safety precautions: 1. Before starting any exercise program you should consult your doctor to determine if you have any physical or health conditions that could create a risk to your health and safety, or prevent you from using the equipment properly. -
Page 10: Part List
PART LIST #2. Main frame with back cushion– 1PCS #1. Front supporting tube– 1PCS #3. Front foot - 1PCS #4. Armrest – 1PCS #5. Hook tube witharmrest – 1PCS #6. Hook foot tube - 1PSC #7. Foam roller – 4PCS DETAIL LIST OF SPARE PARTS A. - Page 11 ASSEMBLY STEP 1: Assemble the front supporting tube of the Weight Bench Attach the front supporting tube (1) to the forefoot tube (3) with the Forefoot tube' screws M8*50. Note: The weld nuts are under the pipe, and transport-able wheel is forward. ASSEMBLY STEP 2: Assemble the main body of the Weight Bench Attach the assembled front bracket (1) to rear bracket (2) with (B) M10*90 Socket Cap Screws , put (E) 10 Washer then, tighten it with (D) M10 locknut and fix by (F) Steel ball bolts.
- Page 12 ASSEMBLY STEP 4: Add foam pad to the hook foot tube with armrest. (Similar as Step 3) Insert the protective foam pads (7) from the ends of hook-foot tube (5). ASSEMBLY STEP 5: Assemble hook-foot tube and hook-foot frame Attach the assembled (6) hook foot tube to (5) hook foot frame, and tighten with (A) circular spring pull pin. ASSEMBLY STEP 6: Install hook-foot tube and armrest Align the assembled (5) hook foot tube with the holes of the assembled (4) armrest, attach them with (C) Socket Cap Screws M10*80, and put (E) Washer M10, then tighten with (F) Steel ball bolts.
- Page 13 ASSEMBLY STEP 7: Assemble the main frame Attach the assembled (4) armrest to the main frame as shown firstly, then you could adjust the height according to personal preference, and fix it with a plug.
-
Page 14: Training Instruction
TERMS OF REFERENCES Exercises bench is use for abdominal, arms and lower body training. Bench LS3061 is class H item. Unit is not intended for therapy or rehabilitation. TRAINING INSTRUCTION 1. Warm-Up To prevent injury and maximize performance we recommend that each workout period starts with a warm-up. We suggest you do the following exercise as the sketch map. -
Page 15: Guarantee Card
GUARANTEE CARD Article name: EAN code: Date of sale: GUARANTEE TERMS The Seller provides guarantee on behalf of the Guarantor within the territory of the Republic of Poland for the period of 24 months from the date of sale. The Guarantee will be recognised by the shop or service centre after the client provides: - clearly and correctly filled-in guarantee card with the sale stamp and the seller’s signature - valid purchase confirmation for the equipment including the date of sale / bill / - complained product. -
Page 16: Bezpečnostní Předpisy
BEZPEČNOSTNÍ PŘEDPISY Výrobek je určen výhradně k domácímu použití a byl navržen tak, aby byla zajištěna maximální bezpečnost. Dodržujte následující rady: Před započetím tréninku se poraďte s lékařem za účelem vyloučení překážek ve využívání tohoto cvičebního zařízení. Rozhodnutí lékaře je nezbytné v případě užívání léků majících vliv na činnost srdce, tlak krve a hladinu cholesterolu. Je to také... -
Page 17: Seznam Dílů
SEZNAM DÍLŮ #2. Hlavní rám #1. Vzpěra #3. Stabilizátor #4. Výsuvný rám #5. Vnější rám podpěr #6. Vnitřní rám podpěr #7. Pěnové válce Spojovací materiál A. Ergonomický šroub, pružinový B. Šroub M10*90 C. Šroub M10*80 D. Matice M10 E. Podložka M10 F. - Page 18 KROK 1: Stabilizátor (3) spojte se vzpěrou (1) pomocí šroubů M8*50. Pozn.: kolečka na stabilizátoru směřují vpřed. KROK 2: Vzpěru (1) spojte s hlavním rámem (2) pomocí šroubu M10*90 (B), podložky 10 (E)a matice M10 (D). Spojení dotáhněte. Vzpěru (1) vztyčte a zajistěte čepem (F).
- Page 19 KROK 3: Pěnové válce (7) nasaďte na vnitřní rám podpěr (6). KROK 4: Pěnové válce (7) nasaďte na vnější rám podpěr (5). KROK 5: Vnitřní rám podpěr (6) vsuňte do vnějšího rámu podpěr (5) a zajistěte pomocí ergonomického šroubu s pružinou (A).
- Page 20 KROK 6: Výsuvný rám (4) vložte do konstrukce podpěr tak, že válcová objímka na čele výsuvného rámu bude zarovnána s prostředním otvorem. Tímto otvorem a válcovou objímkou protáhněte šroub M10*80 (C) a na druhé straně šroub zajistěte podložkou M10 (E) a maticí M10 (D). Pracovní úhel se nastavuje pomocí ostatnách otvorů a zajistí se čepem (F).
- Page 21 URČENÍ LAVIČKY Lavice pod činku je zařízením určeným k procvičování břišních, ramenních a prsních svalů. Lavice pod činku je zařízením LS3061 třídy H určeným k domacímu použití. Není určeno k terapeutickým nebo rehabilitačním účelům. CVIKY Cyklus tréninků Vám zaručí zlepšení kondice, růst svalů a ve spojení s dietou a snížením počtu kalorií umožní shodit nadbytečná...
-
Page 22: Záruční List
ZÁRUČNÍ LIST Název produktu: EAN kód: Datum prodeje: ZÁRUČNÍ PODMÍNKY Prodávající jménem Ručitele poskytuje záruku na území Polska po dobu 24 měsíců od data prodeje. Záruka bude respektována obchodem nebo servisem po předložení zákazníkem: čitelně a správně vyplněného záručního listu s razítkem a podpisem prodávajícího platného doklad o koupi produktu s datem prodeje (účtu) reklamovaného produktu Jakékoli závady a poškození... - Page 23 SICHERHEITSANMERKUNGEN Dieses Produkt ist nur für den Heimgebrauch bestimmt und wurde so konzipiert, um die optimale Sicherheit zu gewährleisten. Es sollten folgende Regeln eingehalten werden: Vor dem Beginn des Trainings sollten Sie sich von Ihrem Arzt beraten lassen, ob es keine Gegenanzeigen für den Gebrauch des Trainingsgeräts gibt.
-
Page 24: Technische Daten
TECHNISCHE DATEN Nettogewicht – 14.1 kg Aufstellmaße – 133,8 x 43,3 x 88 cm Maximale Belastbarkeit – 100 kg WARTUNG Verwenden Sie keine aggressiven Reinigungsmittel, um das Gerät zu reinigen. Verwenden Sie ein weiches, feuchtes Tuch, um Schmutz und Staub zu entfernen. Entfernen Sie Schweißspuren, da die Säurereaktion die Beschichtung dieses Geräts beschädigen kann. - Page 25 LISTE DER TEILE #2. Hauptrahmen mit der Rückenlehne und den Schrauben – 1 St. #4. Element zur Höhenverstellung #1. Vorderes Stützrohr– 1 St. #3. Vorderer Standfuß – 1 St. – 1 St. #6. Element zum Einstellen des – 1 St. #7.
- Page 26 SCHRITT 1: Montieren Sie das vordere Stützrohr. Befestigen Sie das vordere Stützrohr (1) am vorderen Standfuß (3) mittels der Schrauben M8*50 vom vorderen Standfuß. Vorsicht: Die Muttern sollen sich unter dem Rohr befinden und die Transportrollen sollen hingegen nach vorne stehen. SCHRITT 2: Montieren Sie den Hauptrahmen der Trainingsbank.
- Page 27 SCHRITT 3: Bringen Sie die Rollen aus Schaumstoff ans Element zum Einstellen des Abstandes an. Bringen Sie die Rollen aus Schaumstoff (7) an die Griffe an, die sich auf dem Rohr zum horizontalen Einstellen (6) befinden. SCHRITT 4: Bringen Sie die Rollen aus Schaumstoff an den Beincurler an. Bringen Sie die Rollen aus Schaumstoff (7) an die Griffe an, die sich auf dem Beincurler (5) befinden.
- Page 28 SCHRITT 6: Verbinden Sie den Rahmen des Beincurlers mit dem Element zur Höhenverstellung. Stellen Sie den bereits zusammengesetzten Rahmen des Beincurlers (5) entsprechend der Öffnungen ein, die sich auf dem Element zur Höhenverstellung (4) befinden. Verbinden Sie beide Elemente mittels der Schraube M10*80 (C). Benutzen Sie dazu die flache Unterlegscheibe M10 (E) und befestigen Sie die Kugelschraube (F).
- Page 30 ANWENDUNGSBEREICH Die Trainingsbank ist ein Gerät, das für Übungen der Bauch-, Schulter- und Brustmuskeln geeignet ist. Die Trainingsbank L8022 ist ein Gerät der Klasse H, daher ist es ausschließlich für den Heimgebrauch bestimmt. Es darf nicht als ein therapeutisches Gerät gebraucht oder zur Rehabilitation eingesetzt werden.
- Page 31 GARANTIEKARTE Artikelname: EAN-Code: Verkaufsdatum: GARANTIEBEDINGUNGEN Der Verkäufer gewährt im Namen des Garanten eine Garantie für 24 Monate nach dem Verkaufsdatum auf dem Hoheitsgebiet der Republik Polen. Die Garantie wird von dem Laden oder dem Service nach Vorlage: der leserlich und korrekt ausgefüllten Garantiekarte mit Verkaufsstempel und Unterschrift des Verkäufers eines gültigen Kaufnachweises für das Gerät mit dem Verkaufsdatum / Rechnung/ der beanstandeten Ware durch den Kunden respektiert...
Need help?
Do you have a question about the L8022 and is the answer not in the manual?
Questions and answers