Table of Contents
Advertisement
Available languages
Available languages
Quick Links
Advertisement
Table of Contents

Subscribe to Our Youtube Channel
Related Manuals for PCE Health and Fitness PCE-HVAC 2


Summary of Contents for PCE Health and Fitness PCE-HVAC 2
- Page 1 Kullanım Kılavuzu Debimetre PCE-HVAC 2 User manuals in various languages (français, italiano, español, português, nederlands, türk, polski, русский, 中文) can be downloaded here: www.pce-instruments.com Son değişiklik / Last change: 8 February 2017 v1.0...
-
Page 2: Table Of Contents
Türkçe İçerik Güvenlik Notları ................1 Özellikler..................2 Teknik Özellikler ..................2 Teslimat İçeriği ..................3 Sistem Açıklaması ................4 Ekran ....................4 Fonksiyon Tuşları ..................5 Hazırlık.....................5 Güç Kaynağı ..................5 Kullanım ..................6 Ölçüm....................6 Fonksiyonlar..................8 Ayarlar ....................10 Yazılım ....................14 Hata Kodları...................18 Garanti...................19 Geri Dönüşüm ................19... - Page 3 English Contents Safety notes ...................20 Specifications ................21 Technical specifications ................21 Delivery contents.................. 22 System description ................23 Display ....................23 Function keys ..................24 Getting started ................24 Power supply ..................24 Operation..................25 Measurement ..................25 Further functions .................. 27 Settings..................... 28 Software ...................
-
Page 4: Güvenlik Notları
Güvenlik Notları Lütfen cihazı kullanmadan önce bu kılavuzu dikkatli bir şekilde tamamen okuyun. Cihaz sadece kalifiye personel tarafından kullanılabilir ve sadece PCE Teknik Cihazlar personeli tarafından tamir edilebilir. Kılavuza uyulmamasından kaynaklanan hasar veya yaralanmalar bizim sorumluluğumuz dışındadır ve garantimiz kapsamında değildir. ... -
Page 5: Özellikler
Özellikler Teknik Özellikler Manometre Özellikleri Ölçüm Aralığı 5000 Pa Hassasiyet Ölçüm aralığının ± %0.3’ü (25 °C) Tekrarlanabilirlik ±%0.2 (ölçüm değerinin maks. ± %0.5’i) Doğrusallık / Histerezis Ölçüm değerinin ± %0.29‘u Maksimum Basınç 10 psi Tepki Süresi 0.5 s Hata Mesajı Err. -
Page 6: Teslimat İçeriği
90 % n.o (10 … 30 °C) 75 % n.o (30 … 40 °C) 45 % n.o (40 … 50 °C) Teslimat İçeriği 1 x Debimetre PCE-HVAC 2 1 x Pitot Tüp, 1 x USB Kablosu, 1 x Yazılım, 2 x Bağlantı Ucu, 1 x 9V Blok Pil, 1 x Taşıma Çantası,... -
Page 7: Sistem Açıklaması
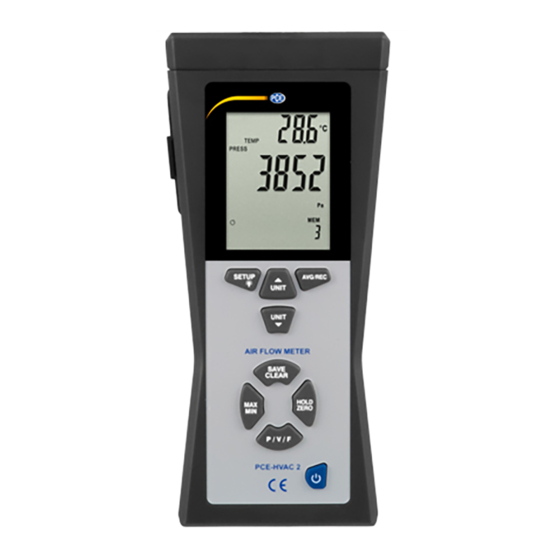
Sistem Açıklaması Ekran Dakika : saniye ya saat: dakika göstergesi Basınç, hız, hava akışı ya da sıcaklık modu etkinleştirildi Ana ekran Hava hızı birimi Hava basıncı birimi Bilgisayar bağlantı göstergesi Otomatik kapanma göstergesi Kanal şekli Düşük pil göstergesi 10. Hold (tutma) göstergesi 11. -
Page 8: Fonksiyon Tuşları
Fonksiyon Tuşları Tuş Fonksiyon Cihazı açmak/kapatmak için basın. MIN/MAX Minimum, maksimum ve ortalama hold fonksiyonu arasında geçiş yapmak için basın. Min/maks./ort. Hold fonksiyonundan çıkmak için 2 saniye basılı tutun. P/V/F Basınç, hız ve hava akışı göstergesi arasında geçiş yapmak için basın. Kanal boyutu ve şekli de görüntülenir. -
Page 9: Kullanım
Kullanım Ölçüm Basınç ölçümü 5.1.1 Bir ölçüm gerçekleştirmek için aşağıdaki adımları izleyin: Basınç moduna („PRESS“) girmek için „P/V/F“, tuşuna basın. Basınç modunda, ölçüm birimini değiştirmek için „Unit▼“ tuşuna basın. PSI, mbar, Pa, inH O ve mmH arasında seçim yapabilirsiniz. Cihazın „Input (+)“ (Giriş) konektörüne esnek tüpü bağlayın ve „Ref (-)“ konektörünü bırakın. - Page 10 Hız ölçüm ü 5.1.2 Fark basıncı ölçümünün yanı sıra hava hızı ölçümü de gerçekleştirilebilir. Bunun için cihaz standart koşulları (21,1 °C; 1013 mbar) kullanır. Hava hızını ölçmek için aşağıdaki adımları izleyin: Hız moduna („VEL“) girmek için „P/V/F“ tuşuna basın. Hız modunda, ölçüm birimini değiştirmek için „Unit ▼“...
-
Page 11: Fonksiyonlar
Hava akışı ölçüm ü 5.1.3 Cihaz ile havaakışı ölçümü de gerçekleştirilebilir. Bunun için cihaz standart koşulları kullanır (21,1 °C; 1013 mbar). Hava akışını ölçmek için aşağıdaki adımları izleyin: 5.1.2. bölümde belirtildiği gibi Pitot tüpü cihaza bağlayın. Ekranın sol alt tarafında „Duct Shape“ (Kanal şekli) görüntülenene kadar „P/V/F“ tuşuna basın. - Page 12 Ölçüm değeri kaydetme 5.2.4 Debimetrenin her ölçüm parametresi (basınç, hız ve hava akışı) için 99 ölçüm değerini kaydeden dahili bir hafızası bulunur. Bir ölçüm değeri kaydetmek için „Save/Clear“ tuşuna basın. Hafıza dolduğunda yeni ölçüm değeri kaydedilemez. Yeni bir değer Dikkat: kaydetmeye çalıştığınızda „FU“...
-
Page 13: Ayarlar
Ayarlar Ayarlar menüsüne girmek için „Setup “ tuşuna 2 saniye basılı tutun. Ekranda „SETUP“ simgesi görüntülenecektir. Burada aşağıdaki seçenekler mevcuttur: Menü öğesi Seçenek Unit (birim) Kanal boyutu birimini ayarlama Duct Shape (kanal şekli) Kanal şekli ve boyutunu ayarlama Type (tür) „P/V/F“... - Page 14 Kanal ayarları 5.3.2 Ayarlar menüsünde „Duct shape“ (kanal şekli) menü öğesini seçmek için „Unit▲“ ve „Unit▼“ tuşlarını kullanın ve bu menü öğesine girmek için „Avg/Rec“ tuşuna basın. Gerekli ayarlamaları yapmak için aşağıdaki adımları izleyin: Kanal şekli: Ekranda seçilmiş mevcut kanal şekli görüntülenir. „■“ simgesi dikdörtgen şeklini; „●“...
- Page 15 Kanal boyutunu (dairesel) değiştirme: Kanal dairesel bir şekle sahipse ekranda „D=“ görüntülenir ve kanalın çapını ayarlayabilirsiniz. Değer, ana ekranda görüntülenir. Ondalık virgülü hareket ettirmek için „Unit▲“ ve „Unit▼“ tuşunu kullanın. „Save/Clear“e basın. Son rakam yanıp sönmeye başlar. Değeri arttırıp azaltmak için „Unit▲“...
- Page 16 Ekran m odunu değiştirme 5.3.4 „P/V/F“ tuşu ile erişebilen ölçüm parametrelerini değiştirmek için aşağıdaki adımları izleyin: Ayarlar menüsünde „Type“ (tür) menü öğesini seçmek için „Unit▲“ ve „Unit▼“ tuşuna; bu menü öğesine girmek için „Avg/Rec“ tuşuna basın. Burada 3 farklı seçenek arasında seçim yapabilirsiniz: Basınç...
-
Page 17: Yazılım
Yazılım 5.4.1 Kurulum Sürücü ve yazılımı kurmak için aşağıdaki adımları izleyin: Teslimat içeriğinde yer alan USB kablosunu kullanarak cihazı bilgisayara bağlayın. İndirilen yazılımı bilgisayarda açın. Yazılım, www.pce-instruments.com internet sitesinden indirilebilir. Windows AutoPlay fonksiyonunun açılmasını bekleyin SETUPGUIDE.exe dosyasını çalıştırın. Yazılım ve sürücünün kurulumu otomatik olarak başlar. Sürücü... - Page 18 Sonrasında yazılım kurulum sihirbazında „Next“ seçeneğine tıklayarak yazılımı yükleyin. Kurulum dizinini seçerek ekrandaki talimatları izleyin. Kullanım 5.4.2 Yazılımı çalııştırın. Ana ekran şu şekildedir: Menü çubuğu Gerçek zamanlı grafik Cihazın gerçek zamanlı ekranı Durum çubuğu Ölçüm parametreleri ve alarm ayarları © PCE Teknik Cihazlar...
- Page 19 Veri bağlantısı kurma Yazılım ve cihaz arasında veri bağlantısı kurmak için aşağıdaki adımları izleyin: Cihazın bilgisayara bağlandığından emin olun. Menü çubuğunda „COM Port“a tıklayın ve „Autodetect“i seçin. Yazılım, otomatik olarak bağlantıyı kurmaya çalışacaktır. COM-Port’u manuel olarak da seçebilirsiniz: Cihazın bilgisayara bağlandığından emin olun. Windows Aygıt Yöneticisi’ni açın ve doğru COM bağlantı...
- Page 20 Veri kaydetme Gerçek zamanlı ölçüm sonuçlarını kaydetmek için aşağıdaki adımları izleyin: Menü çubuğunda „File(f)“ seçeneğine tıklayın ve „Save“i seçin. Kaydetme dizinini ve dosya adını seçebileceğiniz yeni bir pencere açılır. Verileri seçilen konuma kaydetmek için „Save“e tıklayın. Veriler, *.xls formatında kaydedilir ve Excel ile incelenebilir. Veri yazdırma Gerçek zamanlı...
-
Page 21: Hata Kodları
„Print“ seçeneğine tıklayarak seçilen verileri yazdırabilirsiniz. „Undozoom“, „Press“, „Vel“, „Temp“, „Flow“, „Combine“ ve „Y Axis“ seçeneklerine tıklayarak grafiğin görünümünü değiştirebilirsiniz. Hata kodları Cihaz, normal çalışmasını gerçekleştiremediğinde ekranda bir hata kodu belirir ve tüm tuşlar donar: Basınç ya da hava hızı değeri ölçüm aralığının üstünde. -OL: Basınç... -
Page 22: Garanti
Garanti Genel İş Şartlarımızdaki garanti şartlarımızı burada bulabilirsiniz: https://www.pce-instruments.com/turkish/sartlar-ve-kosullar#AGB Geri Dönüşüm Pillerin satışı ile ilgili olarak pil veya batarya ile çalışan cihazların satışı ile ilgili ve 2006/66 / EC sayılı pil ve batarya ile ilgili direktifine göre, bir satıcı olarak müşterilerimizi ilgili düzenlemeler ve yükümlülükler hakkında bilgilendirmek zorundayız. -
Page 23: Safety Notes
Safety notes Please read this manual carefully and completely before you use the device for the first time. The device may only be used by qualified personnel and repaired by PCE Instruments personnel. Damage or injuries caused by non-observance of the manual are excluded from our liability and not covered by our warranty. -
Page 24: Specifications
Specifications Technical specifications Manometer specifications Measuring range 5000 Pa Accuracy ±0.3 % FSO (25 °C) Repeatability ±0.2 % (Max. ±0.5 % FSO) Linearity/hysteresis ±0.29 % FSO Maximum pressure 10 psi Response time 0.5 seconds typical Error message Err. 1 Pressure > measuring range Error message Err. -
Page 25: Delivery Contents
General specifications Operating temperature 0 … +50 °C Storage temperature -10 … +60 °C Relative humidity Non-condensing (< 10 °C) 90 % RH (10 … 30 °C) 75 % RH (30 … 40 °C) 45 % RH (40 … 50 °C) Power supply 9 V battery Battery status indication... -
Page 26: System Description
System description Display Minute : second or hour : minute indication Pressure, velocity, air flow or temperature mode activated Primary display Air velocity unit air pressure unit PC connection indication Auto power-off indication Duct shape Low battery indication 10. Hold indication 11. -
Page 27: Function Keys
Function keys Function Press to turn the device on/off MIN/MAX Press to switch between minimum, maximum and average hold function. Press and hold for 2 seconds to exit min/max/avg hold function. P/V/F Press to switch between pressure, velocity and air flow display. Also shows the dimensions and shape of the duct. -
Page 28: Operation
Operation Measurement 5.1.1 Pressure measurement To take a pressure measurement, follow these steps: Press “P/V/F” to get to the pressure mode (“PRESS”). In pressure mode, press “Unit ▼” to chance the measuring unit. You can switch between PSI, mbar, Pa, inH O and Connect a flexible tube to the “Input (+)”... - Page 29 5.1.2 Velocity measurement Besides measuring the differential pressure, the device can also measure the air velocity. When doing so, the device uses standard conditions (21.1 °C; 1013 mbar). To measure the air velocity, follow these steps: Press “P/V/F” to get to the velocity mode (“VEL”). In velocity mode, press “Unit ▼” to change the measuring unit.
-
Page 30: Further Functions
5.1.3 Air flow measurement The device can also measure air flow. When doing so, the device uses standard conditions (21.1 °C; 1013 mbar). To measure air flow, follow these steps: Connect the Pitot tube to the device as described in chapter 5.1.2. Press “P/V/F”... -
Page 31: Settings
5.2.5 View/delete saved data The internal memory can fit up to 99 readings for each measuring parameter (pressure, velocity and air flow). You can access the memory at any time. If the memory is full and you try to save a new reading, the display shows “FU”... - Page 32 5.3.1 Set the duct dimension units To set the duct dimension unit, follow these steps: If you are in the settings menu, use “Unit ▲“ and „Unit ▼” to select the menu item “Unit” and press “Avg/Rec” to enter. The display either shows “cm” or “in” (inch). Select the desired option by using “Unit ▲“...
- Page 33 Change duct dimensions (circular): If the duct is circular the display shows “D=” and you can adjust the diameter of the duct. The value is shown on the primary display. Use “Unit ▲“ and “Unit ▼” to move the decimal point. Press “Save/Clear”.
- Page 34 5.3.4 Change the display mode To change the measuring parameters which can be accessed by pressing “P/V/F”, follow these steps: If you are in the settings menu, use “Unit ▲“ and “Unit ▼” to select the menu item “Type” and press “Avg/Rec” to enter. Here you can choose between 3 different options: Pressure and air velocity Air velocity and air flow...
-
Page 35: Software
Softw are 5.4.1 Installation To install the drivers and the software, follow these steps: Connect the device to your PC by using the supplied data cable. Open the dow nloaded software on your PC. The software may be dow nloaded from the www.pce-instruments.com w ebsite. - Page 36 After that, install the software by clicking “Next” in the software installer. Choose an installation directory and follow the instructions on the screen. 5.4.2 Operation Start the software. You get to the main screen: Menu bar Real-time graph Real-time display of the device Status bar Measuring parameters and alarm settings ©...
- Page 37 Establishing data connection To establish the data connection between the software and the device, follow these steps: Make sure that the device is connected to the PC. Click on “COM Port” in the menu bar and select “Autodetect”. The software now tries to establish the connection automatically.
-
Page 38: Error Codes
Print data To print out the results of the real-time measurement, follow these steps: Click on “File(f)” in the menu bar and select “Print” A new window appears where you can adjust the printing settings. Click on “OK” to print out the results. Load data To load saved data, follow these steps: Click on “File(f)”... -
Page 39: Warranty
Warranty You can read our warranty terms in our General Business Terms which you can find here: https://www.pce-instruments.com/english/terms. Disposal For the disposal of batteries in the EU, the 2006/66/EC directive of the European Parliament applies. Due to the contained pollutants, batteries must not be disposed of as household waste. They must be given to collection points designed for that purpose. - Page 40 PCE Instruments contact information Germ any France Spain PCE Deutschland GmbH PCE Instruments France EURL PCE Ibérica S.L. Im Langel 4 76, Rue de la Plaine des Bouchers Calle Mayor, 53 D-59872 Meschede 67100 Strasbourg 02500 Tobarra (Albacete) Deutschland France España Tel.: +49 (0) 2903 976 99 0 Téléphone: +33 (0) 972 3537 17...
- Page 41 © PCE Instruments...
- Page 42 © PCE Instruments...
- Page 43 © PCE Instruments...
- Page 44 User manuals in various languages (français, italiano, español, português, nederlands, türk, polski, русский, 中文) can be downloaded here: www.pce-instruments.com Specifications are subject to change without notice. © PCE Instruments...
Need help?
Do you have a question about the PCE-HVAC 2 and is the answer not in the manual?
Questions and answers