
Subscribe to Our Youtube Channel
Related Manuals for ABB AV410


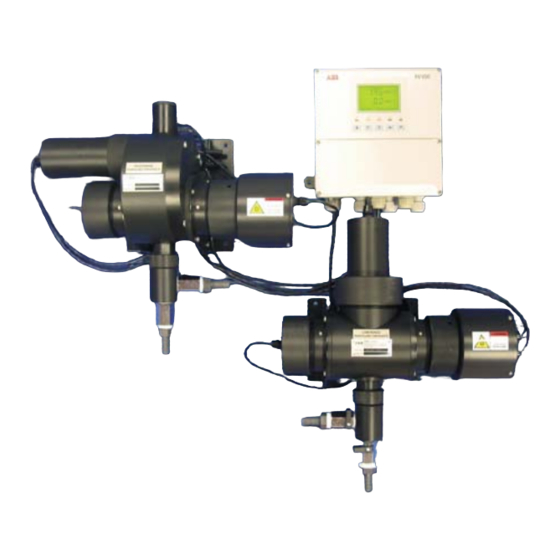
Summary of Contents for ABB AV410
- Page 1 User Guide Single and Dual Input Dissolved Organics Monitor IM/AV4ORG_3 AV410, AV411, AV412, AV420 and AV422...
- Page 2 We are an established world force in the design and manufacture of instrumentation for industrial process control, flow measurement, gas and liquid analysis and environmental applications. Cert. No. Q05907 As a part of ABB, a world leader in process automation technology, we offer customers application expertise, service and support worldwide. EN 29001 (ISO 9001) We are committed to teamwork, high quality manufacturing, advanced technology and unrivalled service and support.
-
Page 3: Table Of Contents
CONTENTS 1 INTRODUCTION .............. 2 6 INSTALLATION .............. 32 1.1 Introduction .............. 2 6.1 Siting Requirements ..........32 1.2 Principle of Operation ..........2 6.1.1 Transmitter ..........32 1.3 AV400 Series Systems ..........2 6.1.2 Sensor ............32 6.2 Mounting the Transmitter ........33 2 OPERATION .............. -
Page 4: Introduction
• The AV410 and AV411 low range monitors are primarily for use in potable water applications, such as monitoring the effectiveness of the coagulation control, THM precursor Many dissolved organic compounds (DOC) found commonly in detection and final treated water quality. -
Page 5: Operation
2 OPERATION 2.1 Powering Up the Monitor 2.2.1 Membrane Key Functions – Fig. 2.2 Warning. Ensure all connections are made Menu 1 correctly, especially to the earth studs – see Section 6.5. Advance to next menu 1) Ensure the input sensor(s) is (are) connected correctly. Menu 2 2) Switch on the power supply to the transmitter. - Page 6 …2 OPERATION Use the Menu Key Use the Sidescroll Key to scroll through the Pages within each Menu to scroll through the Menus Section 2.3, Page 6 Section 3.1, Page 8 Section 3.2, Page 9 Section 3.3, Page 9 Section 3.4, Page 10 Section 3.5, Page 10 Section 3.6, Page 11 VIEW SETPOINTS VIEW OUTPUTS VIEW HARDWARE...
- Page 7 2 OPERATION… Use the Menu Key Use the Sidescroll Key to scroll through the Pages within each Menu to scroll through the Menus Section 5.5, Page 23 CONFIG.OUTPUTS Config. Output 1 Config. Output 2 AO1: Assign AO2: Assign AO1: Range AO2: Range Use the Downscroll AO1: Span Value...
-
Page 8: Operating Page
…2 OPERATION 2.3 Operating Page 2.3.1 Single Input Dissolved Organics Measured Values 1. 2 5 H Reading in inferred units, e.g. . For units available, refer to Colour (°H) Inferred Units Section 5.3. 10. 2 5 mg/l C –1 Concentration of dissolved organics in mgl Diss. -
Page 9: Dual Input Dissolved Organics
2 OPERATION …2.3 Operating Page 2.3.2 Dual Input Dissolved Organics Measured Values in Inferred Units 1. 2 5 H Sensor A reading in inferred units, e.g. . For units available, refer to Colour (°H) Inferred Units in Section 5.3. 1. 2 5 H Sensor B reading in inferred units. -
Page 10: Wash Function
…2 OPERATION …2.3 Operating Page 2.3.3 Wash Function Note. The Wash function is available only if is set to – see Section 5.5. A3: Type Wash Wash Function Manual – Wash function off. Lower display line of Operating Page shows WASH INHIBITED ----- –... -
Page 11: Operator Views
3 OPERATOR VIEWS 3.1 View Set Points View Set Points This page shows alarm set points. The value of each of the set points is shown, together with the name of the parameter it's assigned to. ----- VIEW SETPOINTS Alarm assignments, set point values and relay/LED actions are programmable – see Section 5.4. -
Page 12: View Outputs
…3 OPERATOR VIEWS 3.2 View Outputs Theoretical Analog Output There are two analog outputs that are assigned automatically depending on monitor configuration. On a single input monitor, both are assigned to Sensor A. On a dual input ----- monitor, Output 1 is assigned to Sensor A and Output 2 is assigned to Sensor B. VIEW OUTPUTS 20. -
Page 13: View Software
3 OPERATOR VIEWS… 3.4 View Software ----- VIEW SOFTWARE Issue Shows the version number of the software. 1. 0 AV400/2000 Issue See Section 3.5. VIEW CLOCK VIEW SOFTWARE See Section 4.2. SENSOR CAL 3.5 View Clock ----- VIEW CLOCK Date Shows the current date. -
Page 14: View Logbook
…3 OPERATOR VIEWS 3.6 View Logbook Note. The View Logbook function is available only if is set to – see Section 5.7. Logbook The logbook stores data entries for alarm events, sensor errors, power failures and sensor calibrations. ----- VIEW LOGBOOK Cals View Logbook Power... - Page 15 3 OPERATOR VIEWS …3.6 View Logbook Errors View Logbook Alarms Use the keys to access the logbook. Power Cals ----- Power VIEW LOGBOOK Note. If no entries are stored in the logbook, the display shows No More Entries Power Power logbook contains up to 2 entries (entry 1 is the most recent), each comprising Power the power state (On or Off), and the date/time of the occurrence.
-
Page 16: Setup
4 SETUP 4.1 Sensor Calibration Standard Solutions 4.1.3 Calibration Checks UV absorption is a non-specific, aggregate measurement of The sensor's emitter module contains an optical system with organic carbon concentration therefore true standards are not very stable electronics that eliminate electronic drift, therefore, available. -
Page 17: Sensor Calibration
4 SETUP 4.2 Sensor Calibration Sensor Calibration ----- SENSOR CAL Sensor Calibration Security Code Note. This frame is displayed only if is not set to zero – see Section 5.8. Alter Cal. Code 0000 CAL. USER CODE Enter the required code number (between 0000 and 19999) to gain access to the sensor calibration pages. - Page 18 …4 SETUP …4.2 Sensor Calibration Span Calibration 50. 0 mg/l C Fill the flowcell with the required span standard calibration solution – see Section 4.1.2. 50. 0 mg/l C A:Fill Span Sol. Press the key to initiate calibration. Note. If the key is pressed again at any time before span calibration is complete, is shown on the lower display line (see below).
-
Page 19: Programming
5 PROGRAMMING 5.1 Security Code Note. This frame is displayed only if is not set to zero – see Section 5.8. Alter Sec. Code Enter the required code number (between 0000 and 19999) to gain access to the 0000 configuration pages. If an incorrect value is entered, access to the configuration pages is SECURITY CODE prevented and the display reverts to the Operating Page –... -
Page 20: Configure Display
…5 PROGRAMMING 5.2 Configure Display ----- CONFIG. DISPLAY Set Language Sets the language to be used on all displays. ----- Set Language Language Use the keys to select the required language. ----- English Deutsch Francais Espanol Italiano Set Language Set Up Display Backlight ----- Set Backlight Backlight... -
Page 21: Configure Sensors
5 PROGRAMMING… 5.3 Configure Sensors ----- CONFIG. SENSOR Configure Sensor A ----- Config. Sensor A Sensor B configuration (dual input monitors only) is identical to Sensor A Config. Sensor B configuration. Single input monitors only – return to main menu. CONFIG. - Page 22 …5 PROGRAMMING …5.3 Configure Sensors Infer. Units User Defined User Defined Units Enter the units to be displayed in the operating pages. A flashing cursor is shown in the upper display line. Press the keys until the first character of the required units is shown in the center display line. Press the key to A: User Defined enter the character into the upper display line and advance the cursor one character.
-
Page 23: Configure Alarms
5 PROGRAMMING… 5.4 Configure Alarms ----- CONFIG. ALARMS Configure Alarm 1 ----- Config. Alarm 1 Alarms 2 and 3 configuration is identical to Alarm 1. Config. Alarm 2 Alarm 1 Type Wash Status Select the type of alarm required: Alarm ----- –... - Page 24 …5 PROGRAMMING …5.4 Configure Alarms A1: Type set to Alarm Alarm 1 Failsafe Select to enable failsafe action, otherwise select Refer to Figs. 5.1 to 5.5 (page 22). ----- A1: Failsafe Alarm 1 Action Select the alarm action required, High Refer to Figs.
-
Page 25: Wash Cycle Configuration (Applicable Only To Alarm 3)
5 PROGRAMMING… …5.5 Configure Alarms 5.5.1 Wash Cycle Configuration (applicable only to Alarm 3) A3: Type set to Wash Wash Mode Select the wash mode required. Cont. ----- Pulsed Cont. – (continuous) the relay remains energized for the wash duration –... - Page 26 …5 PROGRAMMING …5.4 Configure Alarms Note. The following examples illustrate , i.e. the alarm is activated when the process variable exceeds the High Alarm Actions defined set point. are the same except the alarm is activated when the process variable drops below the Low Alarm Actions defined set point.
-
Page 27: Configure Outputs
5 PROGRAMMING… 5.5 Configure Outputs ----- CONFIG. OUTPUTS Configure Output 1 ----- Config. Output 1 Output 2 configuration is identical to Output 1 configuration. Config. Output 2 Assign Select either Sensor A ( ) or Sensor B ( Sen. A Sen. -
Page 28: Configure Clock
…5 PROGRAMMING 5.6 Configure Clock ----- CONFIG. CLOCK Set Clock Set the system clock. ----- Set Clock? Return to main menu. CONFIG. CLOCK See Section 5.7. CONFIG. LOGBOOK Date Format Select the required date format. ----- mm:dd:yy dd:mm:yy Format Date Set the date in the format selected above. -
Page 29: Configure Logbook
5 PROGRAMMING… 5.7 Configure Logbook ----- CONFIG. LOGBOOK Configure Logbook Set the logbook to is selected, all data entries in the logbook are cleared. ----- Logbook Return to main menu. CONFIG. LOGBOOK Option board fitted and Serial Communications feature enabled (Section 7.1) CONFIG. -
Page 30: Test Outputs And Maintenance
…5 PROGRAMMING 5.9 Test Outputs and Maintenance ----- TEST/MAINTENANCE Test Outputs Displays the output test details for the analog outputs. ----- frame only is shown. The format of frame is identical. Test Output 1 Test Output 2 Test Outputs Continued below. Maintenance Test Output 1 4. - Page 31 5 PROGRAMMING… …5.9 Test Outputs and Maintenance Hold Outputs set to Auto. Automatic Time If required, set a time period between 1 and 6 hours, in 30 minute increments, for which the outputs are held when is set to Hold Outputs Auto.
- Page 32 …5 PROGRAMMING …5.9 Test Outputs and Maintenance Calibration Coefficients (Sensor A) Sen. A The values for organics signal/reference totals and organics signal/reference peaks displayed below equate to the percentage light transmission through the sample. They are ----- stored during a sensor calibration and are shown for diagnostic purposes only. Cal.Coefficients Organics Signal Totals 100.
- Page 33 5 PROGRAMMING… …5.9 Test Outputs and Maintenance Load/Save Configuration Select whether a configuration is to be loaded or saved. ----- Note. If is selected, pressing the key has no effect. Load/Save Config Return to main menu. TEST/MAINTENANCE See Section 7.1. FACTORY SETTINGS Load User/Factory Configuration Load...
-
Page 34: Installation
6 INSTALLATION 6.1 Siting Requirements – Fig. 6.1 6.1.2 Sensor 6.1.1 Transmitter Notes. • The sensor is supplied fitted with mounting Notes. brackets. • Mount in a location free from excessive vibration. • Secure the sensor to a suitable vertical surface in a •... -
Page 35: Mounting The Transmitter
6 INSTALLATION… 6.2 Mounting the Transmitter – Figs. 6.2 and 6.3 Dimensions in mm (in.) Fixing Centers 94 (3.7) 210 (8.23) 192 (7.56) 96 (3.76) Fig. 6.2 Overall Dimensions 61 (2 ) OD Position 'U' bolts on pipe Vertical or Horizontal Position plate over 'U' bolts Drill suitable... -
Page 36: Installing The Sensor
…6 INSTALLATION 6.3 Installing the Sensor – Figs. 6.4 and 6.5 Notes. • Use flexible plastic or rigid PVC, polypropylene or metal connecting pipework, depending on the installation. • Fit isolating valves to enable removal of the sensor. Dimensions in mm (in.) 327 (12.87) 155 (6.1) 162 (6.3) - Page 37 6 INSTALLATION… …6.3 Installing the Sensor – Figs. 6.4 and 6.5 Dimensions in mm (in.) 405 (15.9) 191 (7.52) Standard Solution Filler Sample Outlet (8 [0.3] i.d. tube) Cleaner Module (14.7) Receiver Module Emitter Module Sample Inlet (12 [0.47] i.d. flexible 4 holes ø6 (0.24) hose connection) for mounting...
-
Page 38: Installing The Optional De-Bubbler
…6 INSTALLATION 6.4 Installing the Optional De-bubbler – Figs. 6.6 and 6.7 Dimensions in mm (in.) De-bubbler (3.47) (3.58) Part Number 7997 500 Drain Outlet Note. The de-bubbler MUST be mounted 150 (5.9) vertically with the flow upwards. Quick-release Fittings ø6.5 between (0.26) - Page 39 6 INSTALLATION… …6.4 Installing the Optional De-bubbler – Figs. 6.6 and 6.7 De-bubbler below Note 1 Drain Outlet AV400 150mm (5.9 in.) maximum – see below Note 2 Tundish Sample Outlet 7320 100 Connector Flow Regulator Adjust flow regulator valve 150mm (5.9 in.) maximum Valve (A) Flow Regulator...
-
Page 40: Electrical Connections
…6 INSTALLATION 6.5 Electrical Connections Warnings. • The transmitter is not fitted with a switch therefore a disconnecting device such as a switch or circuit breaker conforming to local safety standards must be fitted to the final installation. It must be fitted in close proximity to the transmitter within easy reach of the operator and must be marked clearly as the disconnection device for the transmitter. -
Page 41: Relay Contact Protection And Interference Suppression
6 INSTALLATION… …6.5 Electrical Connections 6.5.1 Relay Contact Protection and Interference Suppression – Fig. 6.8 If the relays are used to switch loads on and off, the relay contacts can become eroded due to arcing. Arcing also generates radio frequency interference (RFI) that can result in monitor malfunctions and incorrect readings. To minimize the effects of RFI, arc suppression components are required;... -
Page 42: Cable Entry Knockouts
…6 INSTALLATION …6.5 Electrical Connections 6.5.2 Cable Entry Knockouts – Fig. 6.9 The monitor is supplied with 7 cable glands, one fitted and six to be fitted, as required, by the user – see Fig. 6.9. Release the four captive screws and remove the terminal cover plate Factory-fitted cable gland... -
Page 43: Access To Terminals
6 INSTALLATION… …6.5 Electrical Connections 6.5.3 Access to Terminals – Fig. 6.10 Release the four captive screws and remove the terminal cover plate Terminal Block C Terminal Block B Terminal Block A Case Earth (Ground) Studs Fig. 6.10 Access to Terminals... -
Page 44: Connections
…6 INSTALLATION …6.5 Electrical Connections 6.5.4 Connections – Fig. 6.11 Before making any electrical connections, refer to the Warnings on page 36 Factory-fitted Links. DO NOT REMOVE Terminal Block C Terminal Block A Terminal Block B Terminal Block B Earth (Ground) Stud on Case Sensor Sensor... -
Page 45: Calibration
7 CALIBRATION Note. An AV400 System is supplied factory-configured as a matched system with each component bearing the same serial number. If any part of a system is replaced (transmitter or sensor[s]), a complete factory re-calibration must be carried out 7.1 Factory Settings Use the Sidescroll Key to scroll through the Pages within each Menu Section 7.1, Page 42... - Page 46 …7 CALIBRATION …7.1 Factory Settings ----- FACTORY SETTINGS Factory Settings Access Code Enter the required code number, between 0000 and 19999, to gain access to the factory settings. If an incorrect value is entered, access to subsequent frames is prevented and the 0000 display reverts to the top of the page.
- Page 47 7 CALIBRATION… …7.1 Factory Settings Set Up Sensor B ----- Set Up Sensor B Continued on next page. Factory Cal. A Operating Page – see Section 2.3. Diss. Organics Select Sensor Model For single input monitors, the display appears as shown. ----- For dual input monitors, Sensor B type selection is identical to Sensor A.
- Page 48 …7 CALIBRATION …7.1 Factory Settings Calibrate Sensor A Note. The Factory Calibration matches the specific linearity characteristics of the sensor ----- to the transmitter. Factory Cal. A Sensor B calibration (dual input monitors only) is identical to Sensor A Factory Cal. B calibration.
- Page 49 7 CALIBRATION… …7.1 Factory Settings Calibrate with Solution 2 50. 0 mg/l C Fill the flowcell with a 10mgl –1 (7320 100 sensor) or 50mgl –1 (7320 200 sensor) span standard solution prepared from the stock standard solution – see Section 4.1.2. 48.
- Page 50 …7 CALIBRATION …7.1 Factory Settings Calibrate Output 1 Note. When adjusting the 4 and 20mA output values, the display reading is unimportant ----- and is used only to indicate that the output is changing when the keys are pressed. Cal. Output 1 See below.
- Page 51 7 CALIBRATION …7.1 Factory Settings Configure Digital Communications Option Board None Select the communications mode required: Pb Dp ----- – PROFIBUS-DP digital communications enabled Pb Dp Digital Comms. None – Digital communications disabled Alter Factory Code Set the factory settings access code to a value between 0000 and 19999. 0000 Alter Fact.
-
Page 52: Sensor Maintenance
8 SENSOR MAINTENANCE 8.1 Scheduled Maintenance 8.2.1 Dismantling and Cleaning – Figs. 8.1 to 8.4 Warning. open the emitter module. It Warning. Isolate the transmitter and sensor DO NOT uses high voltages that can cause serious injury or from the power supply before dismantling the sensor. death. - Page 53 8 SENSOR MAINTENANCE… …8.2.1 Dismantling and Cleaning – Figs. 8.1 to 8.4 Perform a manual clean (see Section 2.3) to ensure that the wiper blade is in the 'parked' position. Unscrew the collar and carefully withdraw the cleaner module. Unscrew the collar and carefully withdraw the emitter module.
- Page 54 …8 SENSOR MAINTENANCE …8.2.1 Dismantling and Cleaning – Figs. 8.1 to 8.4 Sample Outlet Unscrew the collar and carefully withdraw the emitter module. Unscrew the collar and carefully withdraw the receiver module. Inlet/Isolating Valve Seal Flowcell Drain Valve Split the flowcell – see Fig. 8.3. Clean the inside of the flowcell and other assemblies using mild detergent.
- Page 55 8 SENSOR MAINTENANCE… …8.2.1 Dismantling and Cleaning – Figs. 8.1 to 8.4 View from emitter end Remove the two screws securing the mounting plate to the angle bracket. Remove the four stainless steel screws holding the flowcell halves together. Note. Reassembly is the reverse of dismantling. Insert two of the stainless steel screws into the holes indicated and screw them in them slowly and evenly to push the cell halves apart.
- Page 56 …8 SENSOR MAINTENANCE …8.2.1 Dismantling and Cleaning – Figs. 8.1 to 8.4 Wiper Drive Shaft (square section) Notes. • The proper functioning of the cleaner system depends Upper Wiper – on the correct assembly of the washers and orientation blade facing in of the wiper blades.
-
Page 57: Replacing The Emitter And Receiver Modules
8 SENSOR MAINTENANCE 8.3 Replacing the Emitter and Receiver Modules 8.4. Adjusting the Emitter Brightness 1) Fill the flowcell with high purity water. Notes. 2) Select the Page (see Section 5.9). TEST/MAINTENANCE • The emitter and receiver modules are matched 3) Scroll to the frame (page 28) for the relevant Org. -
Page 58: Diagnostics
9 DIAGNOSTICS 9.1 Status Messages The diagnostic facilities incorporated in the software displays the appropriate system status message (see Table 9.1) in the Operating Page (see Section 2.3) if a fault is detected. y l l n i t o i t / e l o l f / e l... -
Page 59: Spares
10 SPARES Cleaner Module Wiper Blade Assembly 7320 080 7997 096 O-Ring Kit: 7997 011 Comprising: 0211 323 x 1 0211 319 x 2 Emitter Module * * Emitter and Receiver Modules Valve (matched pair) – 7320 181 0216 509 Connector 0216 510 Receiver Module *... -
Page 60: Specification
Type General Dual 4 -digit, 7-segment backlit LCD Sensor range Information (Based on potassium hydrogen phthalate calibration standards) 16-character, single line dot matrix AV410/411 Low range 0 to 20mgl –1 Resolution AV420/422 High range 0 to 100mgl –1 –1 Low range 0.01mgl... - Page 61 SPECIFICATION Relay outputs Mechanical Data Number of relays Transmitter Three supplied as standard, IP66/NEMA4X configurable to one or both sensor inputs or status Dimensions 192mm (7.56 in.) high x 230mm (9.06 in.) wide x 94mm (3.7 in.) deep Set point adjustment Weight 1kg (2.2 lb) Fully programmable as normal or failsafe, high/low or status...
-
Page 62: Appendix A Replacing A 7320 Transmitter With An Av400
APPENDIX A REPLACING A 7320 TRANSMITTER WITH AN AV400 Before making any electrical connections, refer to the Warnings on page 37 Factory-fitted Links. DO NOT REMOVE Terminal Block C Terminal Block A Terminal Block B Terminal Block B Earth (Ground) Stud on Case Sensor Sensor... - Page 63 Service and Repair Centre. – Food & Beverage – Manufacturing United Kingdom – Metals and Minerals – Oil, Gas & Petrochemical ABB Limited – Pulp and Paper Tel: +44 (0)1453 826661 Fax: +44 (0)1453 829671 Drives and Motors United States of America •...
- Page 64 ABB has Sales & Customer Support The Company’s policy is one of continuous product improvement and the right is reserved to modify the expertise in over 100 countries worldwide information contained herein without notice. Printed in UK (09.05) www.abb.com © ABB 2005 ABB Limited ABB Inc.
Need help?
Do you have a question about the AV410 and is the answer not in the manual?
Questions and answers