Advertisement
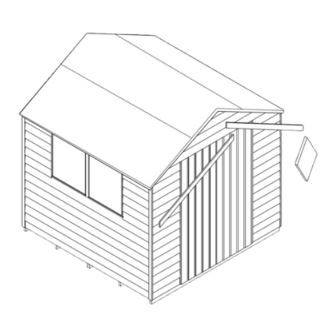
Overlap Apex Shed
7' x 7'
IMPORTANT, RETAIN FOR FUTURE REFERENCE; READ
CAREFULLY
Check all parts prior to assembly
This building is pressure treated to ensure longevity of all
timber components and to protect against rot. This may leave
a colour difference on some parts that will even out as the
moisture content stabilises. This will not need additional
treatment.
- This product must be built on a solid level base.
- The roof of this building is not a load bearing structure.
- Please keep all plastic bags and small parts away from
children
- Timber is a natural material. It will shrink and swell as a
result of varying moisture content.
- Due to the nature of the material the doors may need some
trimming for a neater fit.
0333 7777 089
Technical Helpline:
8.30 am and 5.00
pm Monday to Friday.
In line with your statutory rights, please check all parts prior
to assembly, as assembly of damaged parts may be deemed
to be acceptance and this may affect the remedies you are
entitled to.
If the product is not constructed in accordance with the
instructions, or is altered in any way (e.g. painted), the
manufacturer cannot be held liable for any resulting damage.
Not to Scale
Fixing Pack (OPA77DDFP)
This fixing pack is used for several products.
There may be additional fixings.
Flush Hinge
Turn Button
10mm Felt tacks
Qty 2
Qty 120
REQUIRED TOOLS :
(NOT SUPPLIED)
SHARP KNIFE
TAPE MEASURE
SCISSORS
POZI DRIVE
FLAT HEAD
SCREWDRIVER
SCREWDRIVER
STEP LADDER
HAMMER
Important :
Assembly of this
shed requires a
Must Pre-drill for
minimum of two
each screw used.
adults.
OPA77DD PARTS LIST
A
B
OPA7PE
OPA7DDE
PLAIN END
DOOR END
J
H
45281630PT
1630mm BATTEN QTY 1
N
84996
PLASTIC L' STRIP QTY 4
1 1
Fix the two floor sections together
using 3 x 50mm screws.
Qty 4
3
F
Place the hinges against the batten on the side of the door in line
with the battens on the back. Fix the inner/smaller part of the hinge
to the door using 25mm screws.
Place the Door into the Door End ensuring that the door is square
and fix the outer part of each hinge to the framing of the door end
using 25mm screws.
E
C
D
OPA7PS
OPA7WS
BRDFL37
PLAIN PANEL
WINDOW PANEL
FLOOR QTY 2
K
L
59121273PAII62PT
1273mm BARGE BOARD QTY 4
P
O
37281982PT
1982mm BATTEN QTY 4
E
4
J
Place the 1630mm batten against the inside of the door so that
it is tight against the battens on the reverse of the door and
leaves a small gap at the top and bottom. Fix the batten in
place with 3 x 60mm screws.
Fix a turn button to the top and bottom of the batten so that the
door will be held closed when fixed. Use a 30mm screw for
each turn button.
F
G
H
PCWIN1
WINDOW QTY 2
DDRPT
207012358
The windows are packed
DOOR
ROOF SHEET
together tightly, separate
QTY 2
QTY 2
before assembly.
M
44161570PT
1570mm C/STRIP QTY 4
45120675PPT
675mm STRIP QTY 1
2
B
C
D
A
Place the panels on top of the floor. Make sure that all the panels are tight and flush before fixing
them to each other using 3x50mm screws.
Make sure that the panels are tight and are sitting flush before fixing each panel to the floor using 3 x
50mm screws making sure that all of the screws are locating into the bearers underneath.
5
L
Place the corner strips so that they cover the joins between
the panels. Fix each in place using 3 x 30mm screws.
I
FIN20010512PTR
FINIAL
QTY 1
FELT4BLROSE
37282070PT
2070mm BATTEN QTY 2
Top View
Advertisement
Table of Contents

Related Manuals for Forest garden OPA77DD


Summary of Contents for Forest garden OPA77DD
- Page 1 OPA77DD PARTS LIST Overlap Apex Shed FIN20010512PTR 7' x 7' FINIAL QTY 1 IMPORTANT, RETAIN FOR FUTURE REFERENCE; READ CAREFULLY PCWIN1 Check all parts prior to assembly WINDOW QTY 2 FELT4BLROSE DDRPT 207012358 This building is pressure treated to ensure longevity of all...
- Page 2 Wear gloves when handling freshly treated wood. Avoid breathing dust when cutting treated or untreated wood. Dispose of off-cuts responsibly – do not burn. There are no splits in the wood and any large splinters removed. Forest Garden Ltd, Unit 288 Hartlebury Trading Estate, Hartlebury, Worcestershire, DY10 4JB ISSUE 0115...
Need help?
Do you have a question about the OPA77DD and is the answer not in the manual?
Questions and answers