Advertisement
Uniframe
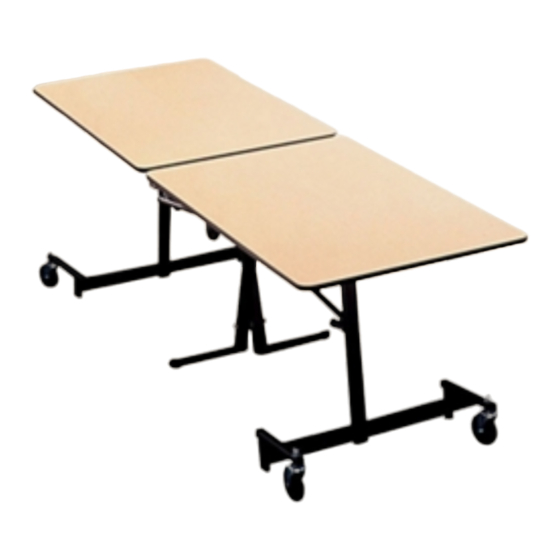
table
Figure 1
slot
rubber
plug
cap
table
latch
latch
rod
Figure 3
hammer
Figure 5
Repair & Replacement Instructions
Figure 2
apron
latch
rod
Figure 4
5
/ pin punch
"
32
5
/ " roll pin
32
2 / "
1
2
clevis pin
Uniframe
Tables
®
Latch Removal & Installation
February 2018
table
latch
slot
plug
hammer
Assemble units as described herein only. To do otherwise
may result in instability. All screws, nuts and bolts must be
tightened securely and must be checked periodically after
assembly. Failure to assemble properly, or to secure parts
may result in assembly failure and personal injury.
Required Tools
•
Hammer
•
/
Pin Punch
5
32
Latch Removal & Installation
1. Open the table half-way to gain
access to the broken table latch
(Figure 1).
2. Move under the table and locate the
broken table latch (Figure 2).
3. Where the latch rod goes through
the slot plug, remove the rubber cap
from the latch rod handle using your
finger tips (Figure 3).
4. From inside the apron, use a hammer
to gently tap the slot plug free from
the apron and save for re-installation
on page 6, step 11 (Figure 4).
5. Using a
/
" pin punch and hammer,
5
32
tap out the
/
" roll pin from the 2
5
32
clevis pin on the outer leg. Once the
roll pin has been removed, slide the
clevis pin out of the table latch and
leg brackets (Figure 5).
/
"
1
2
Advertisement
Table of Contents

Related Manuals for KI Uniframe Table


Summary of Contents for KI Uniframe Table
- Page 1 Repair & Replacement Instructions Uniframe Tables ® Latch Removal & Installation February 2018 Required Tools • Hammer • Pin Punch Latch Removal & Installation 1. Open the table half-way to gain access to the broken table latch (Figure 1). 2. Move under the table and locate the broken table latch (Figure 2).
- Page 2 Uniframe Tables - Latch Removal & Installation ® Assembly Instructions Assemble units as described herein only. To do otherwise may result in instability. All screws, nuts and bolts must be tightened securely and must be checked periodically after assembly. Failure to assemble properly, or to secure parts may result in assembly failure and personal injury.
- Page 3 Uniframe Tables - Latch Removal & Installation ® Assembly Instructions Assemble units as described herein only. To do otherwise may result in instability. All screws, nuts and bolts must be tightened securely and must be checked periodically after assembly. Failure to assemble properly, or to secure parts may result in assembly failure and personal injury.
- Page 4 Tables - Latch Removal & Installation ® Repair & Replacement Instructions 1330 Bellevue Street • P .O. Box 8100 • Green Bay, WI 54308-8100 • Tel 1-800-424-2432 • www.ki.com © 2018 Krueger International, Inc. All Rights Reserved • Code KI-RR-000011/KI/PDF/0218...
Need help?
Do you have a question about the Uniframe Table and is the answer not in the manual?
Questions and answers