Endress+Hauser iTEMP TMT84 Brief Operating Instructions
Temperature head transmitter with profibus pa protocol
Hide thumbs
Also See for iTEMP TMT84:
- Operating instructions manual (102 pages) ,
- Brief operating instructions (20 pages) ,
- Safety instructions (28 pages)
Table of Contents
Advertisement
Available languages
Available languages
Quick Links
Advertisement
Chapters
Table of Contents

Related Manuals for Endress+Hauser iTEMP TMT84


Summary of Contents for Endress+Hauser iTEMP TMT84
- Page 1 Brief Operating Instructions ® iTEMP TMT84 Temperature Head Transmitter ® with PROFIBUS PA Protocol Temperaturkopftransmitter (ab Seite 3) < Temperature head transmitter (from page 21) KA00258R/09/a2/01.11 71154749...
-
Page 2: Table Of Contents
Ausführliche Informationen entnehmen Sie bitte der Betriebsanleitung und der weiteren Dokumen- tation auf der mitgelieferten CD-ROM. Diese Kurzanleitung ersetzt nicht die Betriebsanleitung. Die komplette Gerätedokumentation besteht aus: • der vorliegenden Kurzanleitung • einer CD-ROM mit: – der Betriebsanleitung – Zulassungen und Sicherheitszertifikaten – weiteren gerätespezifischen Informationen. Endress+Hauser... -
Page 3: Sicherheitshinweise
Transmittergehäuse. Explosionsgefährdeter Bereich Bei Einsatz in explosionsgefährdeten Bereichen sind die entsprechenden nationalen Normen einzuhalten. Für Messsysteme, die im explosionsgefährdetem Bereich eingesetzt werden, gilt zusätzlich die separate Ex-Dokumentation. Die darin aufgeführten Installationsvorschriften, Anschlusswerte und Sicherheitshinweise müssen konsequent beachtet werden! Endress+Hauser... -
Page 4: Sicherheitszeichen Und -Symbole
- einen indirekten Einfluss auf den Betrieb haben oder eine unvorherge- sehene Gerätereaktion auslösen können. ESD - Electrostatic discharge Schützen Sie die Klemmen vor elektrostatischer Entladung. Ein Nichtbeachten kann zur Zerstö- rung oder Fehlfunktion von Teilen der Elektronik führen. Endress+Hauser... -
Page 5: Identifizierung
• Zusätzliche Dokumentation für Geräte, die für den Einsatz im explosionsgefährdeten Bereich 0 2 1 ) geeignet sind, wie z.B. Sicherheitshinweise (XA...), Control oder Installation Drawings (ZD...). Hinweis! Beachten Sie bitte die Zubehörteile des Gerätes im Kapitel ’Zubehör’ der Betriebsanleitung auf der mitgelieferten CD-ROM. Endress+Hauser... -
Page 6: Zertifikate Und Zulassungen
• Ist die gelieferte Ware vollständig? Vergleichen Sie den Lieferumfang mit Ihrer Bestellung. 3.1.2 Transport und Lagerung Beachten Sie folgende Punkte: • Für Lagerung (und Transport) ist das Gerät stoßsicher zu verpacken. • Die zulässige Lagertemperatur beträgt -40 bis +100 °C (-40 bis 212 °F). Endress+Hauser... -
Page 7: Montagebedingungen
• Umgebungstemperatur: -40 bis +85°C (-40 bis +185 °F). • Betauung nach IEC 60068-2-33 zulässig; Max. rel. Feuchte: 95% • Klimaklasse gemäß IEC 60654-1, Klasse C • Schutzart IP 00, im eingebauten Zustand vom verwendeten Anschlusskopf oder Feldgehäuse abhängig Endress+Hauser... -
Page 8: Montage
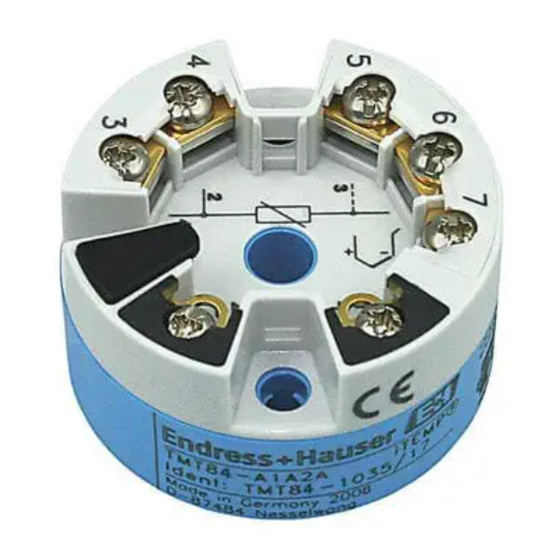
Führen Sie die Montageschrauben (7) durch die seitlichen Bohrungen des Kopftransmitters und des Messeinsatzes (3). Fixieren Sie danach beide Montageschrauben mit den Sicherungsringen (2). Schrauben Sie anschließend den Kopftransmitter (5) mit dem Messeinsatz (3) im Anschlusskopf fest. Schließen Sie nach erfolgter Verdrahtung (siehe Kapitel 4) den Anschlusskopfdeckel (8) wieder. Endress+Hauser... - Page 9 • Bringen Sie benötigte Halsrohrnippel und Adapter (3) am Schutzrohr an. • Sorgen Sie für den Einbau von Dichtungsringen, wenn diese für raue Umgebungsbeding- ungen oder spezielle Vorschriften benötigt werden. • Führen Sie die Montageschrauben (6) durch die seitlichen Bohrungen des Kopftransmitters (7). Endress+Hauser...
-
Page 10: Montagekontrolle
Anschlusskopfdeckel muss ordnungsgemäß befestigt werden, um den Anforderungen des Explosionsschutzes zu genügen. Montagekontrolle Führen Sie nach der Montage des Gerätes folgende Kontrollen durch: Gerätezustand und -spezifikationen Hinweise → Seite 7 Entspricht das Gerät den Messstellenspezifikationen, wie Umgebungs- temperatur, Montageort, usw.? Ist das Gerät unbeschädigt? Sichtkontrolle Endress+Hauser... -
Page 11: Verdrahtung
Schützen Sie die Klemmen vor elektrostatischer Entladung. Ein Nichtbeachten kann zur Zer- störung oder Fehlfunktion von Teilen der Elektronik führen. Anschluss Sensorleitungen " Achtung! Beim Anschluss von 2 Sensoren ist darauf zu achten, dass keine galvanische Verbindung zwischen den Sensoren entsteht. Die dadurch auftretenden Ausgleichsströme führen zu erheb- Endress+Hauser... - Page 12 RTD oder Wider- standsgeber, 4-Leiter Thermoelement (TC), Ã Ã Ã Ã Spannungsgeber 4.2.1 Anschluss an Federklemmen A0008322 Abb. 6: Federklemmenanschluss Leiterende einführen (Massivleiter oder Leiter mit Aderendhülse) Leiterende einführen, mit Werkzeug (Feindrähtige Leiter ohne Aderendhülse) Leiterende lösen, mit Werkzeug Leiterende herausziehen Endress+Hauser...
-
Page 13: Feldbusanschluss
Feldbus-Kabelspezifikationen nach IEC 61158-2 (MBP), Details siehe Betriebsanleitung (auf CD-ROM). Der Anschluss von Geräten an den Feldbus kann auf zwei Arten erfolgen: • Über herkömmliche Kabelverschraubung • Über Feldbus-Gerätestecker (optional, als Zubehör erhältlich) " Achtung! Es wird eine Erdung über eine der Erdungsschrauben (Anschlusskopf, Feldgehäuse) empfohlen. Endress+Hauser... - Page 14 • Einseitige Schirmung auf der speisenden Seite Die besten Ergebnisse hinsichtlich der EMV wird in den meisten Fällen mit einer einseitigen Schirmung auf der speisenden Seite (ohne kapazitivem Abschluss am Feldgerät) erzielt. Damit ist ein Betrieb bei Störgrößen gemäß NAMUR NE21 sichergestellt. Endress+Hauser...
-
Page 15: Anschlusskontrolle
Stimmt die Versorgungsspannung mit den Angaben auf dem Typenschild 9 bis 32 V DC überein? Erfüllen die verwendeten Kabel die Feldbusspezifikationen? siehe Betriebsanleitung auf CD-ROM Sind die montierten Kabel von Zug entlastet? Sind Hilfsenergie- und Signalkabel korrekt angeschlossen? siehe Anschlussschema auf der Oberseite des Kopftransmitters Endress+Hauser... -
Page 16: Bedienung Und Inbetriebnahme
Wurde die max. Länge der Stichleitungen gemäß den Feldbusspezifikatio- nen eingehalten? Ist das Feldbuskabel lückenlos abgeschirmt und korrekt geerdet? Bedienung und Inbetriebnahme Installationskontrolle Vor der ersten Inbetriebnahme vergewissern Sie sich bitte, dass: • das Gerät korrekt montiert wurde und • der elektrische Anschluss richtig ist. Endress+Hauser... -
Page 17: Anzeige- Und Bedienelemente (Optional)
Kanalanzeige C1 oder C2, P1, S1 oder P2, S2, RJ Anzeige ’Konfiguration gesperrt’-Symbol, bei Sperrung der Parametrierung/Konfiguration über Hardware Warnung oder Fehlermeldung Warnung: Abwechselnd Warncode und Messwert Fehler: Fehlercode und "- - - -" (kein Messwert) Detaillierte Hinweise finden Sie in der Betriebsanleitung auf der mitgelieferten CD-ROM. Endress+Hauser... -
Page 18: Konfiguration Kopftransmitter Und Pa-Funktionen
® Die Konfiguration von PROFIBUS PA-Funktionen sowie gerätespezifischer Parameter erfolgt über die Feldbus-Kommunikation. Dafür stehen folgende Konfigurationssysteme zur Verfügung: • Endress+Hauser FieldCare (DTM) • SIMATIC PDM (EDD) Hinweis! In der ausführlichen Betriebsanleitung auf der mitgelieferten CD-ROM ist das schrittweise Vor- gehen für die Erst-Inbetriebnahme der Feldbusfunktionen ausführlich beschrieben;... - Page 19 Geräteadresse vom Kopftransmitter übernommen und gespeichert wird. A0009701 Abb. 12: Einstellung der Geräteadresse am Beispiel Busadresse 49. DIP-Schalter auf ON: 32 + 16 + 1 = 49. Desweiteren DIP-Schalter SW/HW auf "HW" und ADDR ACTIVE auf "ON". Endress+Hauser...
-
Page 20: Einschalten Des Kopftransmitters
Der Kopftransmitter arbeitet nach ca. 8 Sekunden, das aufgesteckte Display nach ca. 12 Sekun- den im Normalbetrieb! Nach erfolgreichem Einschaltvorgang wird der normale Messbetrieb auf- genommen. Auf dem Display erscheinen verschiedene Mess- und/oder Statuswerte. Detaillierte Informationen zur Parametrierung des Gerätes sowie weitere Informationen finden Sie in der Betriebsanleitung auf der mitgelieferten CD-ROM. Endress+Hauser... - Page 21 These Brief Operating Instructions are not intended as a substitute for the Operating Instructions. The complete device documentation comprises: • These Brief Operating Instructions • A CD-ROM with: – The Operating Instructions – Approvals and safety certificates – Other device-specific information. Endress+Hauser...
-
Page 22: Safety Instructions
Strict compliance with the installation instructions, ratings and safety instructions as listed in this supplementary documentation is mandatory. The documentation number of this document (XA) is also indicated on the nameplate. Endress+Hauser... -
Page 23: Notes On Safety Conventions And Icons
This symbol draws attention to activities or procedures that have an indirect effect on operation, or can trigger an unforeseen unit reaction if not carried out properly. ESD - electrostatic discharge Protect the terminals from electrostatic discharge. Failure to observe this may result in destruction or malfunction of parts of the electronics. Endress+Hauser... -
Page 24: Identification
• Additional documentation for devices that are suitable for use in hazardous areas 0 2 1 ), such as Safety Instructions (XA...), Control or Installation Drawings (ZD...). Note! Please note the accessories of the device in the chapter ’accessories’ from the Operating Instruction on the CD-ROM. Endress+Hauser... -
Page 25: Certificates And Approvals
3.1.2 Transport and storage Note the following points: • Pack the device in such a way as to protect it reliably against impact for storage (and transportation). • The permitted storage temperature is -40 to +100 °C (-40 to 212 °F). Endress+Hauser... -
Page 26: Installation Conditions
• Condensation permitted as per IEC 60068-2-33; max. rel. humidity: 95%. • Climate class in accordance with IEC 60654-1, Class C. • IP 00 ingress protection, depends on the terminal head or field housing in its installed state. Installation instructions A screwdriver is needed to mount the head transmitter. Endress+Hauser... - Page 27 Guide the mounting screws (7) through the lateral bores of the head transmitter and the insert (3). Then fix both mounting screws in position with the circlips (2). Then screw down the head transmitter (5) to the insert (3) in the terminal head. After wiring (see chapter 4), close the terminal head cover (8) back on tight. Endress+Hauser...
- Page 28 • Fit the necessary neck tube nipples and adapter (3) on the thermowell. • Make sure sealing rings are installed if such rings are needed for harsh environmental conditions or special regulations. • Guide the mounting screws (6) through the lateral bores of the head transmitter (7). Endress+Hauser...
-
Page 29: Post-Installation Check
→ Page 31. Retighten the cable gland and close the housing cover. In order to avoid connection errors, prior to commissioning always follow the instructions given in the section on the post-connection check (→ Page 34). Endress+Hauser... -
Page 30: Quick Wiring Guide
(TC), voltage two-wire three-wire four-wire transmitter RTD or resistance à à à transmitter, two-wire RTD or resistance à à à transmitter, Sensor three-wire input 2 RTD or resistance transmitter, four-wire Thermocouple (TC), à à à à voltage transmitter Endress+Hauser... -
Page 31: Fieldbus Connection
Fieldbus cable specifications to IEC 61158-2 (MBP), for details, see Operating Instructions (on CD-ROM). Devices can be connected to the fieldbus in two ways: • Connection via conventional cable gland. • Connection via fieldbus connector (optional, can be purchased as an accessory). Endress+Hauser... - Page 32 • A shielded cable must be used for the connection. 4.3.2 Shielding and grounding Optimum electromagnetic compatibility (EMC) of the fieldbus system can only be guaranteed if the system components and, in particular, the lines are shielded and the shield forms as complete a cover as possible. Endress+Hauser...
- Page 33 NAMUR NE21 is thus guaranteed. A0008770 Fig. 8: Shielding and one-sided grounding of the fieldbus cable shielding Supply unit Distribution box (T-box) Bus terminator Grounding point for fieldbus cable shielding Optional grounding of the field device, isolated from cable shielding. Endress+Hauser...
-
Page 34: Post-Connection Check
Has the max. length of the fieldbus cable been observed in accordance with the fieldbus specifications? Has the max. length of the spurs been observed in accordance with the fieldbus specifications? Is the fieldbus cable fully shielded and correctly grounded? Endress+Hauser... -
Page 35: Operation And Commissioning
• The electrical connection is correct. Display and operating elements (optional) Option: display with transmitter. The display can also be reordered (see Section ’Accessories’ in the Operating Instructions on the CD-ROM supplied). A0010227 Fig. 9: Fit the display on the transmitter Endress+Hauser... - Page 36 Display the 'configuration locked' symbol when configuration is locked via the hardware. Warning or error message Warning: warning code and measured value alternate Error: error code and "- - - -" (no measured value) Detailed instructions are provided in the Operating Instructions on the CD-ROM provided. Endress+Hauser...
-
Page 37: Configuration Of The Head Transmitter And Pa Functions
PROFIBUS PA functions and device-specific parameters are configured via fieldbus communication. The following configuration systems are available for this purpose: • Endress+Hauser FieldCare (DTM) • SIMATIC PDM (EDD) Note! A detailed step-by-step description of the procedure for commissioning the fieldbus functions, together with information on configuring device-specific parameters, is given in the Operating Instructions on the CD-ROM provided. - Page 38 A0009701 Fig. 12: Configuring the device address using the example of bus address 49. DIP switch set to ON: 32 + 16 + 1 = 49. Furthermore, "SW/HW" DIP switch set to "HW" and "ADDR ACTIVE" set to "ON". Endress+Hauser...
-
Page 39: Switching On The Head Transmitter
12 seconds. Normal measuring mode commences as soon as the switch-on procedure is completed. Various measured values and/or status values appear on the display. For a more detailed temperature transmitter configuration description and further information, please refer to the Operating Instructions on the CD-ROM provided. Endress+Hauser... - Page 40 KA00258R/09/a2/01.11 71154749 FM9.0...
Need help?
Do you have a question about the iTEMP TMT84 and is the answer not in the manual?
Questions and answers