Table of Contents
Advertisement
Quick Links
Advertisement
Table of Contents

Related Manuals for biochrom WPA Lightwave S2000


Summary of Contents for biochrom WPA Lightwave S2000
- Page 1 Instruction Manual Lightwave S2000 UV/Vis Diode Array Spectrophotometer Biochrom Ltd 22 Cambridge Science Park Milton Road Cambridge CB4 0FJ, UK Tel: +44 (0) 1223 423723 Fax: +44 (0) 1223 420164 E-mail: enquires@biochrom.co.uk Website: www.wpa.co.uk Issue 02 02/2004 English,S2000...
- Page 2 Lightwave UV/Vis Diode Array Spectrophotometer Declaration of Conformity This is to certify that the WPA Lightwave S2000: 80-3000-72 manufactured by Biochrom Ltd. conform to the requirements of the following Directives-: 73/23/EEC & 89/336/EEC Standards to which conformity is declared EN 61 010-1: 2001 Safety requirements for electrical equipment for measurement, control and laboratory use.
-
Page 3: Table Of Contents
Lightwave UV/Vis Diode Array Spectrophotometer TABLE OF CONTENTS INTRODUCTION......................4 CONDITIONS OF SERVICE..................4 PRINCIPLE OF OPERATION ..................5 SPECIFICATIONS ....................... 6 CONTROLS ......................... 7 CUVETTE CHAMBER....................8 INSTALLATION & START-UP..................9 MEASUREMENT OF CELL DENSITY ............... 11 GENERAL OPERATIONS..................12 9.1 R ...................... -
Page 4: Introduction
Please contact: - Sales Co-ordinator Tel: +44 (0)1223 423723 Fax: +44 (0)1223 420164 E-mail: enquires@biochrom.co.uk 2 Conditions of Service The Lightwave is intended for use under cover at a temperature of between 5 and 40°C. If dangerous or aggressive chemicals are used, care should be taken to avoid spillage. -
Page 5: Principle Of Operation
Lightwave UV/Vis Diode Array Spectrophotometer For other problems please contact our sales office or local authorised dealer in your region. Health & Safety Notice Instruments will only be accepted for repair or re-calibration when accompanied by a signed letter or certificate from the sender to the effect that there is no hazard to health due to biological, chemical or radioactive contamination. -
Page 6: Specifications
Lightwave UV/Vis Diode Array Spectrophotometer 4 Specifications Specification S2000 Lightwave Optical arrangement Single beam, diode array (512 pixel) using Rowland Circle optics with flat field corrected concave grating. Wavelength range 200 –825nm Spectral bandpass Resolution/Bandwidth Stray Light <0.1% at 220nm NAI and 340nm NaNO Wavelength Accuracy ±1.5nm Wavelength reproducibility... -
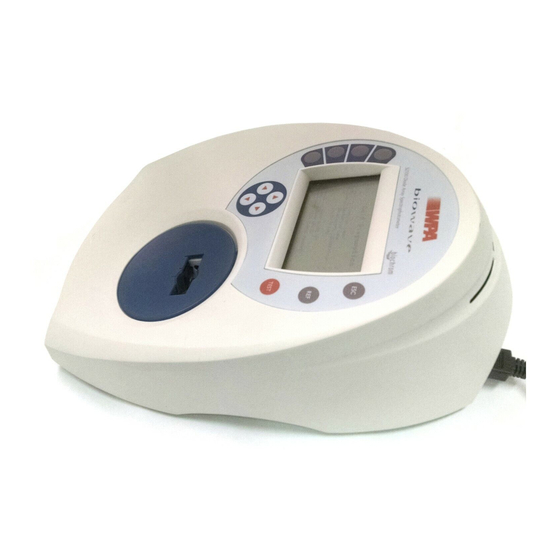
Page 7: Controls
Lightwave UV/Vis Diode Array Spectrophotometer 5 Controls Escape key - takes the user back one step or aborts current operation Reference key - zeros instrument Test key - makes a measurement across all wavelengths Function keys (1-4) - Arrow keys - select allow the Symbols... -
Page 8: Cuvette Chamber
Lightwave UV/Vis Diode Array Spectrophotometer 6 Cuvette Chamber Samples may be placed in a cuvette or 16 mm diameter tube. The cuvette holder has been designed to accommodate a variety of cuvette sizes in an accurate and repeatable manner. 40 mm 10mm Tubes to be pathlength... -
Page 9: Installation & Start-Up
Lightwave UV/Vis Diode Array Spectrophotometer 7 Installation & Start-up Unpack the Lightwave and ensure that you have received the following in good condition: - S2000 Lightwave Spectrophotometer Mains Lead Starter pack of 10 disposable UV cuvettes Instruction manual Warranty Card Place the unit on a level surface, insert the IEC cable in the rear socket and then connect to the electricity supply (90-250V 50/60Hz). - Page 10 Lightwave UV/Vis Diode Array Spectrophotometer Failure of one lamp will not affect the other lamp - so if the Deuterium lamp fails you can still make good visible measurements (380 to 825 nm). See Section 12 on Servicing & Maintenance Failure in Wavelength Calibration The wavelength calibration is performed by observing the key spectral data from the Deuterium lamp and ensuring that the peak remains in the correct...
-
Page 11: Measurement Of Cell Density
Lightwave UV/Vis Diode Array Spectrophotometer 8 Measurement of Cell Density Cell Density measurements are Turbidimetric in nature and as such are highly dependent on the optical design of the instrument used. Ideally calibration curves should be used for each species of bacteria studied, and the same type of spectrophotometer used for any series of experiments on a given strain. -
Page 12: General Operations
Lightwave UV/Vis Diode Array Spectrophotometer 9 General Operations 9.1 Referencing When R is displayed in the bottom left hand corner of the display, it is possible to Reference the instrument by pressing REF. The reference across all wavelengths will be held in the memory until the unit is switched off, or re-referenced. -
Page 13: Software Operation
Lightwave UV/Vis Diode Array Spectrophotometer 10 Software Operation 10.1 Repeat Last Operation This button returns the user to the last screen displayed when the instrument was switched off. This provides a short cut to the last test performed. 10.2 Make a measurement λ... -
Page 14: Single Measurement
Lightwave UV/Vis Diode Array Spectrophotometer 10.3.1 Single measurement This mode should be used when readout in Absorbance or %Transmission is required for a single wavelength. You can toggle between Abs and %T by pressing function key 1. To avoid accidental changes to the wavelength setting the arrow keys only become functional when “Set λ“... -
Page 15: Cell Density/Ratio
Lightwave UV/Vis Diode Array Spectrophotometer 10.4 Cell Density/Ratio This function key takes the user to a further screen allowing the option of cell density or ratio measurements. 10.4.1 Cell Density Measurement This function provides an auto-correction for use with cell cultures to compensate for the high turbidity of such samples. -
Page 16: Ratio Measurement
Lightwave UV/Vis Diode Array Spectrophotometer 10.4.2 Ratio Measurement Ratio measurement is used most commonly to measure the purity of DNA preparations. A value of between 1.7 and 2.0 generally indicates purity. The wavelength settings can be changed in a similar manner to the single measurement mode and are memorised until re-set. -
Page 17: Select A Method
Lightwave UV/Vis Diode Array Spectrophotometer Two cursors can be moved across the screen (using ←→) to identify the wavelength and reading at a particular point in the spectrum. Note: The spectrum is averaged. For exact Absorbances refer to Zoom Screen or Single Measurement. “Zoom”... -
Page 18: To Program A New Method (Or Re-Program An Existing Method)
Lightwave UV/Vis Diode Array Spectrophotometer 10.7 To Program a New Method (or re-program an existing method) Select “Program” using function key 2. The following screen is displayed. Programming a method is simple. To change each selection you need to do the following:- •... - Page 19 Lightwave UV/Vis Diode Array Spectrophotometer To assign a name (of up to 13 letters) position the cursor on the Name using the ↑↓ keys and then press function key 4 to “Change”. Using the arrow keys assign the name (the ←→ arrows move between digits and the ↑↓...
- Page 20 Lightwave UV/Vis Diode Array Spectrophotometer Display There is a choice of display. The Delta A/min function is only available if Kinetics is selected (this measures the change in Absorbance per minute, as calculated by least square analysis). If Concentration is selected, another screen displays two options •...
- Page 21 Lightwave UV/Vis Diode Array Spectrophotometer Non-linear calibration The software contains a curve-fitting program. This accepts up to 5 points and attempts to fit a polynomial of order equal to the number of points less one. E.g. for 5 points, the software will attempt to fit a 4th order polynomial. It is necessary to enter at least two points (3 points to give a curve), with the lower point defining the minimum value, and the upper point defining the maximum value.
- Page 22 Lightwave UV/Vis Diode Array Spectrophotometer • Highlight the standard to be entered (or amended) • Press function key 1 to change • Use the UP/DOWN arrows to change the values of each digit, and LEFT/RIGHT arrows to move between digits. •...
- Page 23 Lightwave UV/Vis Diode Array Spectrophotometer Kinetics The kinetics facility allows the user to run a series of measurements at programmed intervals. To program a method to include multiple measurements select:- Kinetics using the ←→ keys to highlight the Yes option. The following screen will be displayed:- Start Time This is the delay before the first measurement is made.
-
Page 24: Run A Method
Lightwave UV/Vis Diode Array Spectrophotometer Note: If running a long kinetics method, it is advisable to leave the unit on for at least 30 minutes to allow the lamps to fully stabilise, otherwise a slight long term drift will be apparent. 10.8 Run a Method The following screen should be displayed: Pressing REF will zero the instrument and clear the screen. -
Page 25: Using Bi-Directional Communications
Lightwave UV/Vis Diode Array Spectrophotometer To abort a run, press ESC. Values may be printed to a printer or to a PC. A maximum of 20 readings can be accommodated in the memory. 10.9 Using Bi-directional communications 1. Connect the Lightwave to a PC using “Hyperterminal” (see Section 11.1.2). -
Page 26: Printing
Lightwave UV/Vis Diode Array Spectrophotometer The communication settings are the same for PC and Printer, but have a different format. They are accessed from the “Set up instrument” then “Communications” buttons from the entry menu. Clicking on the “Device” function key will toggle between Printer and PC. RS232 settings are as follows. - Page 27 Lightwave UV/Vis Diode Array Spectrophotometer To avoid any possible damage, ensure that both printer and spectrophotometer are switched off prior to connection. There are 2 different print formats dependent upon which mode of operation has been selected. In the majority of cases the user will be asked to confirm the Sample Number, or revise.
-
Page 28: Connection To Pc
Lightwave UV/Vis Diode Array Spectrophotometer 11.1.2 Connection to PC The Lightwave is configured to be used with commonly available software for RS232 communications such as “terminal” (Windows 3.11 ) or “Hyperterminal” (Windows 95/98 ). These are usually located under Program Manager “Accessories" with your PC. After you have the data displayed on your VDU you can easily save the information and import it to other applications to store or analyse. - Page 29 Lightwave UV/Vis Diode Array Spectrophotometer Windows 95 or 98 (or NT users) Open HyperTerminal program under Program Manager “Accessories”. Double Click on icon “Hypertrm” You will be asked for a suitable name - e.g Lightwave and an icon. Once this is set up you can click on this icon and the settings will be loaded correctly.
- Page 30 Lightwave UV/Vis Diode Array Spectrophotometer Select the correct COM port (which will be used to receive the Lightwave data) under “Connect Using” and then OK. Now set up the COM port: - Set the settings as above then press OK. To capture data, select Transfer - Capture Text.
- Page 31 Lightwave UV/Vis Diode Array Spectrophotometer Pressing PRINT on the S2000 will send data to the PC (ensure that PC is selected under Communication). To End data transfer Select Transfer - Capture Text- Stop. The file can then be imported into EXCEL directly using the Import Wizard within MS Excel .
- Page 32 Lightwave UV/Vis Diode Array Spectrophotometer Select comma, then NEXT Select General, then FINISH. The data will then appear as indicated in the excel spreadsheet. To create a graph of the data (if scan data) use the graph facility in Excel. You will need to re-arrange the columns (wavelength first, Absorbance (or %T) second).
- Page 33 Lightwave UV/Vis Diode Array Spectrophotometer WPA has set up an Excel file (sample.xls) to import the data and display Spectra. This can be obtained from our sales office and e-mailed to you or put onto a disc. Alternatively the data can be imported into you own Excel file.
- Page 34 Lightwave UV/Vis Diode Array Spectrophotometer Once you have set these values click OK. You can save these settings using the file menu. Whenever you use the programme again you can open the saved file to retrieve the settings. Data output format is as follows: ASCII strings, comma de-limited.
-
Page 35: Set Time/Date
Lightwave UV/Vis Diode Array Spectrophotometer 11.3 Set Time/Date The time and date are available in the following formats: - Euro Format Time hh:mm (24 hour clock) Date dd/mm/yy US Format Time hh:mm (24 hour clock) Date mm/dd/yy Click on “Format” to toggle between the two formats. These are retained even if the unit is switched off. -
Page 36: Servicing And Maintenance
Lightwave UV/Vis Diode Array Spectrophotometer 12 Servicing and Maintenance The Lightwave has been designed to be extremely robust and require minimal servicing. The unit performs a series of self-diagnostic checks each time it is switched on to check the: • Lamp performance •... -
Page 37: Routine Maintenance
Lightwave UV/Vis Diode Array Spectrophotometer 12.2 Routine Maintenance Very little attention will be required, we nonetheless recommend the following: - Keep the instrument clean. Immediately wipe off any spilt liquids. Clean with a slightly damp cloth. Non-abrasive water based soap or detergent may be used. -
Page 38: Ce Marking
Lightwave UV/Vis Diode Array Spectrophotometer 13 CE Marking European Directives for Low Voltage and Electro Magnetic Compatibility ALL WPA INSTRUMENTS COMPLY WITH EUROPEAN DIRECTIVES FOR EMC AND LOW VOLTAGE SAFETY AND ARE ACCORDINGLY CE MARKED It should be noted that external equipment connected to inputs or outputs could increase the susceptibility of measurements to interference if placed in the maximum electric fields prescribed by the Standard. -
Page 39: Health & Safety Certificate And Declaration Of Decontamination Status
Lightwave UV/Vis Diode Array Spectrophotometer Health & Safety Certificate and Declaration of Decontamination Status Before an instrument can be accepted for repair, service or return to stock this form must be completed and returned to WPA showing that no hazard to health exists to WPA due to Physical, Chemical, Biological or Radioactive contamination of the unit.
Need help?
Do you have a question about the WPA Lightwave S2000 and is the answer not in the manual?
Questions and answers