Advertisement
Quick Links
Made in Vietnam
Model No: 111009
Destributed in the U.S.A by:
Restoration Hardware baby & child
11640 Harrel St. Suite B
Mira Loma, CA 91752
rh babyandc hild .com
Destributed in Canada by:
Restoration Hardware Canada, Inc.
1500-1055 West Georgia Street
Vanc ouver, British Columbia V6E4N7
WARNING:
instructions before assembling this
product. KEEP INSTRUCTIONS
FOR FUTURE USE.
CUSTOMER SERVICE
If you are missing parts or have any questions about this product, contact us first. You can also order parts by
writing to the address above. Include the product model number, color, and a brief description of the part. Call
1-800-762-1751.
CARE AND CLEANING
DO NOT scratch or chip the finish. DO NOT use abrasive chemicals for cleaning. Dust often using a soft, dry
cloth. Blot spills immediately and wipe with a clean, damp cloth. If the crib is to be stored, store in a cool, dry
place and carefully package all original hardware to protect from loss.
TOOLS AND INSTALLATION
Tools Necessary: Allen Key (included).
Note: It may be easier to assemble product with two people.
NOTE: When inserting bolts, turn clockwise until tight. Then loosen 1/2-3/4 of a turn. After crib is
completely assembled, return to each bolt and tighten. Use wax or soap on all bolts to facilitate assembly.
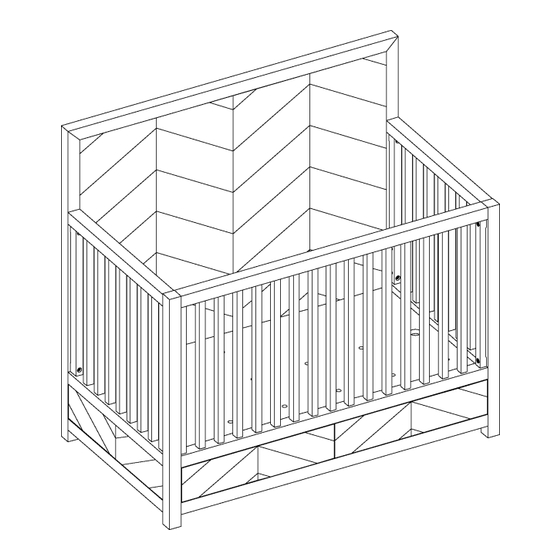
RHBABY&CHILD
Tanner Storage Conversion Crib
Read all
Page 1 of 14
V2.1
Advertisement

Related Manuals for RH Baby&child Tanner 111009


Summary of Contents for RH Baby&child Tanner 111009
- Page 1 V2.1 RHBABY&CHILD Tanner Storage Conversion Crib Made in Vietnam Model No: 111009 Destributed in the U.S.A by: Restoration Hardware baby & child 11640 Harrel St. Suite B Mira Loma, CA 91752 rh babyandc hild .com Destributed in Canada by: Restoration Hardware Canada, Inc. 1500-1055 West Georgia Street Vanc ouver, British Columbia V6E4N7 WARNING:...
- Page 3 V2.1 RHBABY&CHILD Tanner Storage Conversion Crib IMPORTANT SAFETY INFORMATION FOR CRIBS CAUTION: ANY MATTRESS USED IN THIS CRIB MUST BE AT LEAST 27 1/4 INCHES BY 51 5/8 INCHES WITH A THICKNESS NOT EXCEEDING 6 INCHES. WARNING ■ Do not use this crib if the enclosed or attached instructions cannot be strictly adhered to.
- Page 4 V2.1 RHBABY&CHILD Tanner Storage Conversion Crib IMPORTANT SAFETY INFORMATION FOR TODDLER & DAY BEDS A WARNING: ENTRAPMENT/STRANGULATION HAZARD Infants have died in toddler beds from entrapment and strangulation. Failure to follow these warnings and the assembly instructions could result in serious injury or death. NEVER use bed with children under 15 months.
-
Page 5: Parts Included
V2.1 RHBABY&CHILD Tanner Storage Conversion Crib PARTS INCLUDED ITEM DESCR IPTION QUANTITY A [1] HEADBOARD Pin Bolt B [1] FRONT RAIL 4 pcs. ¾"x2¼"x1 3/J6"h C [1] LEFT SIDE FRAME D [1] RIGHT SIDE FRAME Allen Nut 4 pcs. ¾•x½• E [1] MATTRESS PLATFORM F [1] DRAWER BOX Allen Bolt... - Page 6 V2.1 RHBABY&CHILD Tanner Storage Conversion Crib STEP 2: Put the Side Frames (C/D) on a flat surface with top down. (Note: Cover the floor with a soft surface, such as a blanket, to avoid damaging the finish of the crib.) Position the Drawer Box (F) with top down beside the Side Frame (C/D) and align the holes.
- Page 7 V2.1 RHBABY&CHILD Tanner Storage Conversion Crib STEP 3: Insert the Middle Leg (G) onto the assembled frame as shown in the sketch. �----� • � � Page 7 of 14...
- Page 8 V2.1 RHBABY&CHILD Tanner Storage Conversion Crib STEP4: Position the Headboard (A) between the assembled side frame and align the dowels & align the holes at the ends with holes on the side frames. Insert the Lock Washer (4) onto the Allen Bolt (3) and tighten using Allen Key (5). ¼...
- Page 9 V2.1 RHBABY&CHILD Tanner Storage Conversion Crib STEPS: Insert the Pin Bolts (1) to the side frames as shown in the sketch. There are three height adjustments for choice. Align the holes and position the Mattress Platform (E) onto the Pin Bolts. Note: Mattress platform is easily adjustable to varying heights by loosening and removing the Pin Bolt (1) from all four corners and reinserting into a different hole for a higher or lower level.
- Page 10 V2.1 RHBABY&CHILD Tanner Storage Conversion Crib STEP 6: Insert the Allen Nuts (2) and tighten using Allen Key (5). Set the Mattress Platform (E) to the desired height by adjusting the Pin Bolts (1). The Mattress Platform should be at its highest setting for newborns, then adjusted to the lower positions as the child grows and becomes mobile. Once the child is able to stand, the Mattress Platform should be at its lowest position.
- Page 11 V2.1 RHBABY&CHILD Tanner Storage Conversion Crib STEP 7: Repeat the step 3 to connect the Front Rail (B) as shown in the sketch. (3) 1k·x2¼· Allen Bolt= 4 pcs g� (4) Lock Washer = 4 pcs (5) Allen Key = 1 pc , - 7 ---j Page 11 of 14...
- Page 12 V2.1 RHBABY&CHILD Tanner Storage Conversion Crib STEP 8: Re-install the drawers. STEP 9: In order to convert the crib to a toddler bed, loosen all tightened bolts from side frames. Spread front of crib open enough to remove Front Rail (B) and to insert toddler rail (sold separately) between crib side frames. Note: If Mattress Platform (E) is not in the lowest position, unscrew Allen Nuts (2) and move it to the lowest position.
- Page 13 V2.1 RHBABY&CHILD Tanner Storage Conversion Crib STEP 10: Repeat step 3 to connect the toddler rail as shown in the sketch. When converting the crib to a toddler bed, the Allen Bolts (6) should be inserted in the upper holes of the side frames and tightened with the Allen Key (5). (6) 1/,6"...
- Page 14 V2.1 RHBABY&CHILD Tanner Storage Conversion Crib STEP 11: The crib can be converted to a full-size bed. Using the Headboard (A), attach a full size bed frame (sold separately) at the location shown. Insert the Flat Washer (9) and Small Lock Washer (8) onto the Allen Bolt (7) and tighten using Small Allen Key (10).
Need help?
Do you have a question about the Tanner 111009 and is the answer not in the manual?
Questions and answers