Ditel Kosmos Series Instruction Manual
Voltmeter / ammeter dc/ac trms
Hide thumbs
Also See for Kosmos Series:
- Instruction manual (56 pages) ,
- Manual (51 pages) ,
- User manual (31 pages)
Table of Contents
Advertisement
Quick Links
Advertisement
Table of Contents

Subscribe to Our Youtube Channel
Related Manuals for Ditel Kosmos Series


Summary of Contents for Ditel Kosmos Series
- Page 1 INSTRUCTIONS MANUAL VOLTMETER/ AMMETER DC/ AC (TRMS) MICRA-E...
-
Page 2: Table Of Contents
INDEX 1. OVERVIEW ............................. 4 1.1. Introduction to model MICRA-E ......................4 2. GETTING STARTED ..........................5 2.1. Power supply and connectors ......................9 2.2. Wiring recommendations ........................10 2.3. Instrument front panel / Description ....................11 3. INPUT PROGRAMMING ........................12 3.1. - Page 3 6. PROGRAMMING LOCK-OUT BY SOFTWARE ..................28 6.1. Security menu diagram ........................29 7. OUTPUT OPTIONS ..........................32 7.1. SETPOINTS OUTPUT ........................34 7.1.1. Introduction ......................... 34 7.1.2. Functioning description ......................35 7.1.3. Set up ..........................36 7.1.4. Wiring ..........................36 7.1.5.
-
Page 4: Overview
1. OVERVIEW 1.1 Introduction to model Micra E The MICRA-E model from the KOSMOS SERIE is a digital multifunction instrument which allows the user to program the input as a: - DC VOLTMETER - AC VOLTMETER (TRMS) - DC AMMETER - AC AMMETER (TRMS) The basic instrument is a soldered assembly composed of a main board, a tricolor programmable display and a power circuit. -
Page 5: Getting Started
Programming can also be done via PC with free software available in our website www.ditel.es provided that the ❑ serial option, RS2 ó RS4, has been installed. - Page 6 The figure below shows the locations of the different output options available. The 2RE, 4RE, 4OP y 4OPP options are alternative and only one of them can be installed in the M1 connector. The RS2 y RS4 options are also alternative and only one of them can be installed in the M2 connector. The NMA or NMV are also alternative and only one of them can be installed in the M3 connector.
- Page 7 How to get into programming mode? First, plug the instrument to the corresponding supply, automatically a display test will be done and after that the software version will be shown then the instrument will go to work mode. Second, press the key to enter into the programming mode, the indication "-Pro-"...
- Page 8 Accessing to programmed parameters Thanks to the tree structure, the programming routines allow to access to change one parameter without passing through the whole list of parameters. To advance through programming The progress through the programming routines is done by pressing key.
-
Page 9: Power Supply And Connectors
2.1 - Power Supply and connectors 2.1 - Alimentación y conectores WARNING: If not installed and used in accordance with these instructions, protection against hazards may be impaired. In order to guarantee the electromagnetic compatibility, the following guidelines should be kept in mind: Power supply wires may be routed separated from signal wires. -
Page 10: Wiring Recommendations
2.2 – WIRING OVERVIEW ATTENTION: MICRA-E INPUT WIRING SIGNAL Before connecting signal wires, the Signal and Input Range should be verified for proper position. CAUTION: Connect Orly one input signal range to the meter. Hazardous signal levels may be present on unused inputs. -
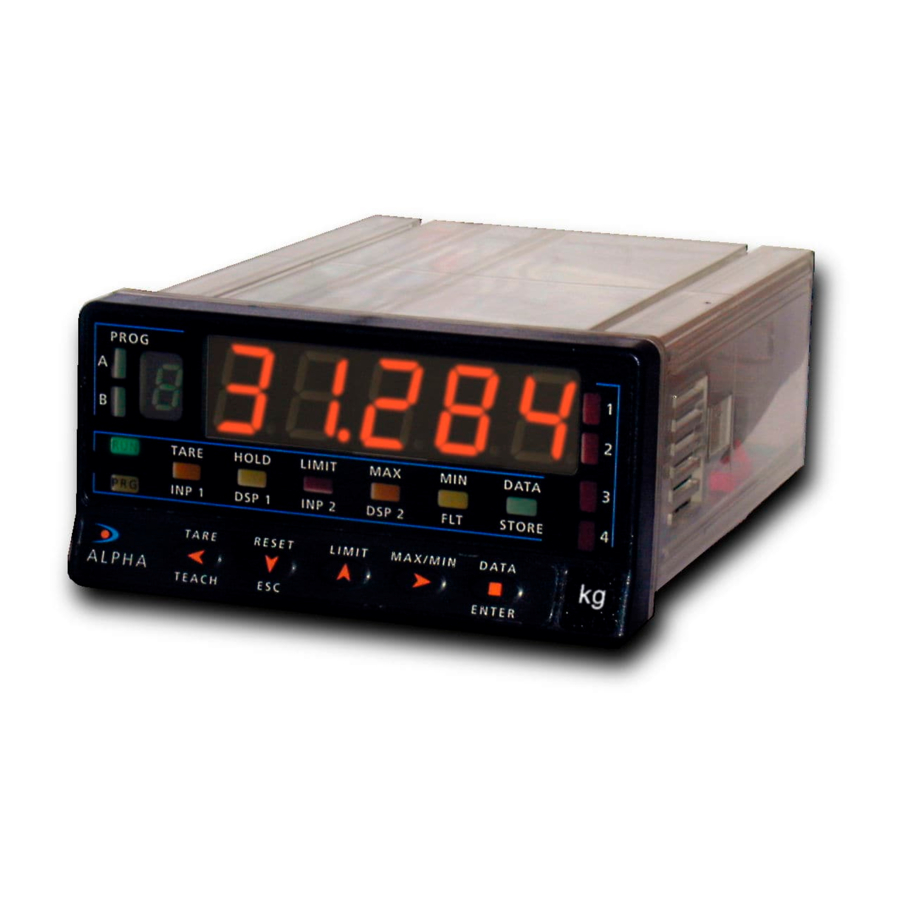
Page 11: Instrument Front Panel / Description
2.3 – Instrument front view TRMS PROG MAX/MIN DATA MICRA ENTER -Pro- Not active in Progamming mode AC measurement indication (TRMS) Not active in Progamming mode Displayed value corresponds to max. value Not active in Progamming mode Displayed value corresponds to min. value Indicates that you are in Programming mode Not active in Run mode Indicates SET 1 is being programmed... -
Page 12: Input Programming
3. INPUT PROGRAMMING The figure below shows the input configuration menu (CnInP). Divided into four submenus, each one corresponding to the programming of the different types of input: Volt dc, Volt ac, Amp dc, Amp ac. Once the type of signal has been selected you have then to select the range. -
Page 13: Dc/ Ac Voltage Input Wiring
3.1 DC/ AC VOLTAGE INPUT WIRING (RANGES: 2, 20, 200, 600 V) Note: MAXIMUM TENSION APPLICABLE IS: 600 V DC/ AC If the input range is not superior to 2 V then specific input for 2 V can be used with wiring indicated in figure 2 Description CN2 1 2 3 4 5 1 2 3 4 5... -
Page 14: Or 5 Direct Amperes Input Wiring
3.2 1 or 5 DIRECT AMPERES INPUT WIRING Description CN2 1 2 3 4 5 PIN 1 = COMMON PIN 2 = SHUNT/ 2 V PIN 3 = 200 mA PIN 4 = 1A / 5A PIN 5 = 20/ 200/ 600 V Ammeter 1/ 5 A DC/ AC Read recommendations... -
Page 15: 200 Ma Input Wiring
3.3 200 mA INPUT WIRING Description CN2 1 2 3 4 5 PIN 1 = COMMON PIN 2 = SHUNT/ 2 V PIN 3 = 200 mA PIN 4 = 1A /5A PIN 5 = 20/ 200/ 600 V Ammeter 200 mA DC/ AC Read recommendations page 10... -
Page 16: Current Transformer /1 A Or /5 A Ac Wiring
3.3 200 mA INPUT WIRING Description CN2 1 2 3 4 5 PIN 1 = COMMON PIN 2 = SHUNT/ 2 V PIN 3 = 200 mA PIN 4 = 1A /5A PIN 5 = 20/ 200/ 600 V Ammeter 200 mA DC/ AC Read recommendations page 10... -
Page 17: Shunt 50/ 60/ 100 Mv Dc/ Ac Wiring
3.5 SHUNT 50/ 60/ 100 mV DC/ AC WIRING NOTE: we recommend braiding the cables used to wire the shunt to the instrument in order to avoid as much as posible to pick-up interferences. Description CN2 1 2 3 4 5 PIN 1 = COMMON PIN 2 = SHUNT/ 2 V PIN 3 = 200 mA... -
Page 18: Display Programming
4. DISPLAY PROGRAMMING CndSP ScAL tEAcH FILtP round briGH InP 1 InP 1 -oFF- -on- ±18.888 ±18.888 -Pro- -Pro- dSP 1 dSP 1 ±18888 ±18888 -HI- -Lo- ±188.88 ±188.88 InP 2 InP 2 -Pro- -Pro- ±18.888 ±18.888 dSP 2 dSP 2 NOTE: In the programming of the 600 V DC or V AC range, 600,0 is accepted as a ±188.88... -
Page 19: Scale
4.1. Scale Scaling consists of assigning a display value to each input signal value. With MICRA-E it is achieved by programming two Direct scale Reversed scale coordinates (input1, display1) and (input2, display2), between which is established a linear relation where to each input signal value corresponds a display value. -
Page 20: Display Configuration Menus Programming
4.1.1 Descripción menús configuración Display SCAL method The input and display values are programmed manually. This method can be used when the value of the signal supplied by the transducer at each points of the process is known. tEACH method The input values are introduced directly from the signal present in the input connector when each point is programmed. - Page 21 Filter P Filter of ponderated average. The value will be modified through the key. This parameter will set in reverse order the cut-off frequency of the low pass filter, getting the filter deactivated for 0 value. Round Will take each one of the values by pressing successively on the key.
-
Page 22: Functions By Keyboard And By Connector
5. KEYBOARD AND CONNECTOR FUNCTIONS 5.1 - – Keyboard functions Several functions can be controlled via keyboard that will produce different actions depending on the instrument operating mode: Mode -RUN-: MAX/MIN function Activated after pressing on the key. From the normal reading mode, a press shows the maximum value read by the instrument since the last time it has been switched on, unless a RESET MAX/MIN is done, the MAX led will light up. - Page 23 In -Prog- mode: 3s (RETURN TO FACTORY PROGRAMMING) Allows entering a code of access to the reset of the configuration parameters, this code is 74. When entering this code the instrument shows the LoAdIng dEFAuLt ConFIGurAtIon legend, following StorE, which means that they have been stored in the non volatile memory of the instrument.
-
Page 24: Functions By Connector
5.2 - Connector functions The connector CN3 provides 3 optocoupled inputs that can be operated from contacts logic levels supplied by an external electronic system. Three different functions may be then added to the functions available from the front panel keys. -
Page 25: Logical Functions Diagram
5.2.1 – Logic functions diagram LoGIn Inp-1 Inp-2 Inp-3 -Pro- -Pro- -Pro- 5.2.2 - Table of programmable functions • Nº: Number to select the function by software. • Function: Function name. • Description: Description and characteristics of the function. • Activation by: Falling edge: the function is activated applying a falling edge to the corresponding pin with respect to common. - Page 26 LOGIC FUNCTIONS TABLE Nº Function Description Activation by Deactivated None None Deactivated None None Deactivated None None PEAK Displays the peak value. (MAX.) Low level VALLEY Displays the valley value. (MIN) Low level RESET Perform a reset of the peak or the valley, depending on which is being Falling edge PEAK/VALLEY displayed.
-
Page 27: Functions Programming
5.2.3 - Programming the functions Once the user has acceded the menu of logic functions configuration, he can select, by pressing the key, a function among those of the table. If the user selects the logic functions 7, the instrument will display any of these 2 messages. -
Page 28: Programming Lock-Out By Software
6. PROGRAMMING LOCK OUT BY SOFTWARE The instrument is delivered with the programming locked out, giving access to all the programming levels. Once completed the instrument programming we recommend the following security measures be taken: Lock out the programming access to prevent from programmed parameters modifications. Lock out keyboard functions to prevent from accidental modifications. -
Page 29: Security Menu Diagram
Menus or submenus that can be locked out are: • Setpoint 1 configuration (SEt 1). • Setpoint 2 configuration (SEt 2). • Setpoint 3 configuration (SEt 3). • Setpoint 4 configuration (SEt 4). • Input configuration (InPut). • Scaling (SCAL). •... - Page 30 ENTER CodE 8888 =Code? LISt CHANG CoLor (param. list) totLC - - - - (Green) (Yellow) (Red) (Total lock.) ≠----? (Yellow) (Red) (Green) Page 31 Note: the color selection of the alarms is made in the setpoints menu (Page 38) StorE StorE...
- Page 31 0 allows its programming 1 locks the access to programming * Only appear if the corresponding options have been installed Page. 30 SPVAL SEt 1 rSout SEt 2 LoG in SEt 3 Anout SEt 4 StorE InPut dISP...
-
Page 32: Output Options
7. OUTPUT OPTIONS Optionally, model MICRA-E can incorporate one or several output options for control or communication: Communication options Serial RS232C Serial RS485 Control options Analog 4-20 mA Analog 0-10 V 2 Relays SPDT 8 A 4 Relays SPST 5 A 4 NPN outputs 4OPP 4 PNP outputs... - Page 33 The following figure shows the location ANALOG OUTPUT of the different outputs options. (NMA/ NMV) The 2RE, 4RE, 4OP y 4OPP options RS232C/ RS485 are alternative and only one of them OUTPUT OPTION can be placed into the connector M1. OUTPUT OPTION RELYS/ OPTOS The RS2 and RS4 options are also...
-
Page 34: Setpoints Output
7.1 –SETPOINTS OUTPUT 7.1.1 – Introduction An option of 2 or 4 SETPOINTS, programmable within the full display range, can be incorporated to the unit thus providing alarm and control capabilities by means of individual LED indicators and relay or transistor outputs. All the setpoints provide independently programmable value, time delay (in seconds), asymmetrical or symmetrical hysteresis (in counts of display) and selectable HI/LO acting. -
Page 35: Functioning Description
7.1.2 –Description of operation As programmed like independent setpoints, the alarm outputs activate when the display value reaches the user-programmed value. The independent alarms programming requires definition of the following basic parameters: a. HI/ LO ACTING MODE. In HI mode, the output activates when the display value exceeds the setpoint level and in LO mode, the output activates when the display value falls below the setpoint b. -
Page 36: Set Up
7.1.3 – Installation Lift out the electronics assembly from the case and use a screw-driver to push on the junctions between the case and the shadow areas to detach them from the case. See fig. The so performed orifice will allow any of the setpoints (2RE, 4RE, 4OP or 4OPP) board output connectors be brought out at the rear of the instrument. -
Page 37: Technical Specifications
Each output card is supplied with an adhesive label that indicates the wiring connections of each option. To help identifying each terminal, this label should be placed in the lower side of the meter case, beside the basic functions label. NOTE: In case that the outputs are used to drive inductive loads, it is recommended to add an RC network between the coil terminals (preferably) or between the relay contacts to limit electromagnetic effects. -
Page 38: Setpoints Menu Diagram
7.1. 6 Setpoints menu diagram The complete programming of one of the setpoints is showed here, it is valid for the rest of SEtP the setpoints. SEt 4 SEt 2 SEt 1 SEt 3 -off- -on- They can only be programmed if an 4RE, 4OP, 4OPP option has ±188.88 been installed or if the logic... -
Page 39: Direct Access To Programming Of Setpoints Value
7.1.7 – Direct access to the setpoints value programming If any of the options corresponding to the setpoints has been installed, it is possible to accede directly to the setpoints value without need to go through the programming menu just by pressing the key in PROG mode, as showed in diagram below, supposing that the card installed are 4RE, 4OP or 4OPP, if it is the 2RE card only Set1 y Set2 would appear. -
Page 40: Rs2/ Rs4 Output
KOSMOS instruments to a PC and whole programming, as well as to verify its communication’s hardware. Three communication modes are available; the ASCII mode uses a simple protocol compatible with several DITEL instruments. The ISO mode, in accordance with the ISO 1745 norm, allows a more effective communication in noisy environments as it checks the messages validity checking both transmission and reception. -
Page 41: Rs Output Menu Diagram
7.2.2 – RS output menu diagram rSout bAud trAnS 1200 4800 9600 19200 Prt 1 Prt 2 Prt 3 RS4? -Pro- Prt1= ASCII Prt2=ISO 1745 -Pro- Prt3=MODBUS -Pro- 1: dLY = 30 ms 2: dLY = 60 ms 3: dLY = 100 ms... - Page 42 ASCII PROTOCOL The Transmission format is: 1 START bit, 8 DATA bits, NO parity bit and 1 STOP bit. • MESSAGE FORMAT TO BE SENT A message sent to the instrument must be composed of the following sequence of ASCII characters: X ......
- Page 43 ISO 1745 PROTOCOL The transmission format is: 1 START bit, 7 DATA bits, 1 EVEN PARITY bit and 1 STOP bit. • MESSAGE FORMAT TO BE SENT The message format, as sent from the master device, must consist of the following sequence of characters: X ..
- Page 44 • MESSAGE FORMAT FROM INSTRUMENT The format of a message as sent from the instrument in response to a command from the master device is the following: 1. In case of commands that ask for transmission of a value (data request type): X ....
- Page 45 List of commands REQUEST OF DATA ASCII Information Peak value Valley value Display value Setpoint 1 value Setpoint 2 value Setpoint 3 value Setpoint 4 value Cards installed Returns: “04”: RS2 “05”: RS2, 2RE “06”: RS2, 4OP “08”: RS4 “09”: RS4, 2RE “0:”: RS4, 4 Setpoints(4RE, 4OP or 4OPP) “44”: NMA or NMV, RS2 “45”: NMA or NMV, RS2, 2RE...
- Page 46 MODIFICATION OF DATA ASCII Parameter Change the setpoint1 value in memory Change the setpoint2 value in memory Change the setpoint3 value in memory Change the setpoint4 value in memory COMMANDS ASCII Command Peak reset Valley reset...
-
Page 47: Analog Output
7.3 ANALOG OUTPUT 7.3.1 – Introduction Two ranges of analog output (0-10 V y 4-20 mA) can be incorporated to the MICRA E by means of an additional card, either the NMV card for voltage output or the NMA card for current output, which is installed on the meter's main board via plug-in connector M3, both cards, cannot be used simultaneously. -
Page 48: Wiring
7.3.3 – Connection Each output card is supplied with an adhesive label that indicates the wiring connections of each option (see fig.). To help identifying each terminal, this label should be placed in the lower side of the meter case, beside the basic functions label. -
Page 49: Technical Specifications
7.3.4 – Technical specifications CHARACTERISTICS NMA OUTPUT NMV OUTPUT RESOLUTION ..............13 BITS ..........13 BITS ACCURACY ............0.1% F.S. ±1BIT ........0.1% F.S. ±1BIT RESPONSE TIME ..............50 ms ............ 50 ms THERMAL DRIFT ............. 0.5 μA/ºC ..........0.2 mV/ºC MAXIMUM LOAD ............ -
Page 50: Warranty
The instruments are warranted against defective materials and workmanship for a period of five years from date of delivery. If a product appears to have a defect or fails during the normal use within the warranty period, please contact the distributor from which you purchased the product. This warranty does not apply to defects resulting from action of the buyer such as mishandling or improper interfacing. -
Page 51: Technical Specifications
TECHNICAL SPECIFICATIONS DC voltage Ranges Input AC voRtage Ranges Input Range Accuracy (*) Impedance Continuous ResoRution Range Accuracy (*) Impedance Continuous Resolution OverRoad Overload ±(0.3%R+0.3 mV) 75 kΩ 0.1 mV ±(0.05%R+0.3 mV) 100 kΩ 0.1 mV 20 V ±(0.05%R+3 mV) 1MΩ... - Page 52 DISPLAY FILTERS • Principal .... -19999/ 19999, 5 digits tricolor 14 mm Filter P • Cut-off frequency ......... 4Hz to 0.05Hz • Decimal point ........programmable • LEDs ......4 for functions and 4 for outputs • Slope ............ 20 dB/decade •...
-
Page 53: Ce Conformity
CE CONFORMITY To obtain the declaration of conformity corresponding to this model enter our website www.ditel.es where this document, the technical manual and other information of interest can be downloaded freely. Caution: Read the instructions manual to preserve safety protections... - Page 54 DISEÑOS Y TECNOLOGIA, S.A. Polígono Industrial Les Guixeres C/ Xarol 6 B 08915 BADALONA-SPAIN Tel: +34 - 93 339 47 58 Fax: +34 - 93 490 31 45 E-mail: dtl@ditel.es www.ditel.es...
Need help?
Do you have a question about the Kosmos Series and is the answer not in the manual?
Questions and answers