Table of Contents
Advertisement
Quick Links
Advertisement
Table of Contents

Related Manuals for GEPRC SMART16


Summary of Contents for GEPRC SMART16
- Page 1 SMART16 User Manual & Setup Guide V1.0...
-
Page 2: Table Of Contents
Contents Overview: ..............................3 Specification: ............................3 Features: .............................. 3 Warranty Policy: ............................5 PS: ................................5 Bind TBS NanoRX: ............................. 6 Bind AC900 Receiver: ..........................7 Bind ELRS Receiver: ........................... 8 Install Betaflight: ............................10 Install Drivers: ........................... 10 OpenTX Transmitter: .......................... -
Page 3: Overview
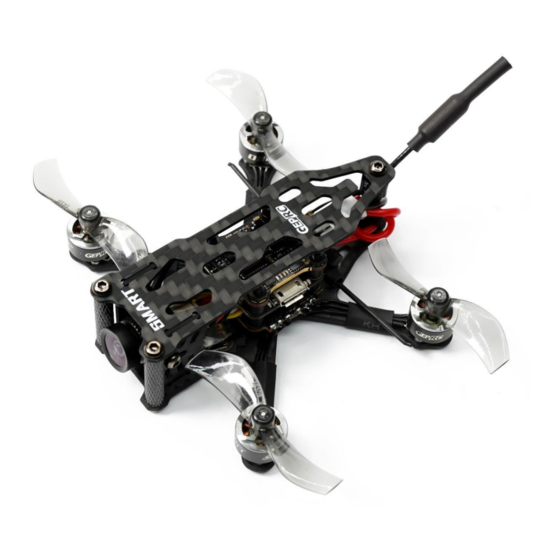
Overview: Introducing the new 1.6-inch GEPRC SMART16 mini-quadcopter, currently available in 5 versions: PNP, AC900 and TBS Nano, ELRS 915, ELRS 2.4G SMART 16 continues the consistent lightweight design concept of the Phantom series. The 1.5mm carbon fiber arm, with a 1mm top plate allows it to be lightweight and tough at the same time. - Page 4 efficiency. 7. Suitable for both freestyle and racing. 8. Includes a full set of high qualt 3D printed parts for superior flying experience. 4 / 18...
-
Page 5: Warranty Policy
Warranty Policy: 1. If the quadcopter is damaged or is having unknown issues, please contact GEPRC. We'll do our best to get this taken care of as quick as possible. 2. Any impact damage, product liquid damage, high temperature damage, or other artificial damage, not attributable to the quality of the product is not covered by warranty. -
Page 6: Bind Tbs Nanorx
Bind TBS NanoRX: 1. For Taranis X9D/X9D Plus/X9E and Taranis QX7, turn on the transmitter, go to the TOOLS – CROSSFIRE SETUP – XF Micro TX, and select Bind. 2. Turn on the receiver while holding the bind button on the receiver, release the button and see if the green light on and flashing. -
Page 7: Bind Ac900 Receiver
Bind AC900 Receiver: Before binding, update the firmware of the built-in module of the remote control to v1.1.3 (the built-in module firmware version of the remote controller needs to match with the receiver's firmware version, otherwise the receiver cannot be bound). Turn on the receiver while holding the bind button on the receiver, release the button and wait for the green light flash. -
Page 8: Bind Elrs Receiver
Bind ELRS Receiver: The binding methods for GEPRC ELRS 868mhz, ELRS 915MHz and ELRS 2.4G receivers are exactly the same. Turn the receiver on and off for three times (with an interval of 1 second), you'll be able to see continuous blue light double flashes on the receiver, indicating that the receiver has entered the binding mode. - Page 9 9 / 18...
-
Page 10: Install Betaflight
Install Betaflight: Although your quadcopter comes from the factory nearly completely ready to fly, you still need to install Betaflight to facilitate your subsequent use of Betaflight for debugging. Installation package download link: https://github.com/betaflight/betaflight-configurator/releases Open the web page, pull to the bottom, and select the appropriate installation package to download. -
Page 11: Opentx Transmitter
OpenTX Transmitter: The transmitter of OpenTX system needs to check the AUX channel. For Taranis X9D/X9D Plus/X9E and Taranis QX7, turn on the transmitter, go to the MENU – MIXES and view the current AUX channel settings. CH1-CH4 corresponds to four channels of rocker CH5(SF)AUX1(ARM)... - Page 12 You can name the aux channel, or set the toggle switches you want, exit and save it. 12 / 18...
-
Page 13: Irc Tramp (Analog)
IRC Tramp (Analog): Turn on the transmitter, THR middle, YAW left, PITCH up, enter the OSD menu. The PITCH moves the cursor up and down, and the ELE right to enter the next item. Now, save and exit. 13 / 18... - Page 14 Frequency table: 14 / 18...
-
Page 15: Install Propellers
Install Propellers: Although the propellers of SMART16 had already been installed in the factory, we strongly advise, that the direction of the propellers are checked before taking off. 15 / 18... -
Page 16: Install Battery
Install Battery: SMART16 uses 3D printed battery holders that can allow you to mount the batteries on top and below. 16 / 18... -
Page 17: Pre-Flight Check
Pre-flight check: In many cases, the cause of a crash is a lack of pre-flight check. For the sake of everyone’s safety, we suggest that you conduct a thorough check before every flight. The steps are as follows: 1. Turn on the transmitter and select the correct mode. Please confirm that the arming switch on the transmitter is in the “disarmed”... -
Page 18: Include
Include: 1 x SMART16 Quadcopter 2 x 1610-2 propellers (pairs) 2 x Battery strap M12x120mm 2 x Battery Silicone Pads 1 x Upper battery holder 1 x Lower battery holder 1 x Set of screws 1 x Screwdriver Contact: Website: https://geprc.com/...
Need help?
Do you have a question about the SMART16 and is the answer not in the manual?
Questions and answers