Table of Contents
Advertisement
Quick Links
Advertisement
Table of Contents

Related Manuals for GEPRC SMART35


Summary of Contents for GEPRC SMART35
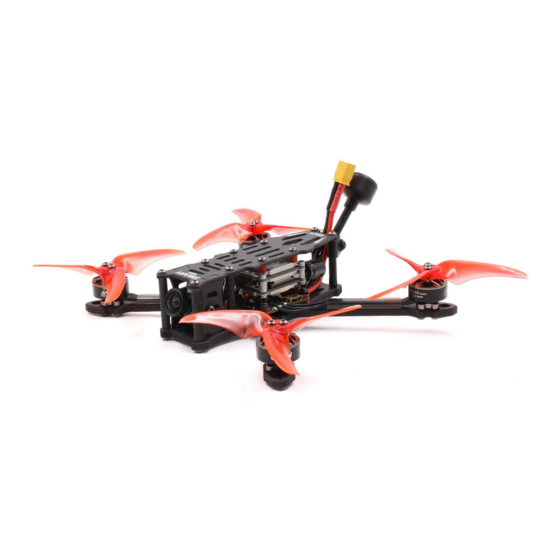
- Page 1 SMART35 User Manual & Setup Guide V1.0...
-
Page 2: Table Of Contents
Contents Overview: ........................... 3 Specification: ........................3 Features: ..........................3 Warranty Policy: ......................... 4 PS: ............................4 DJI Digital FPV System: ......................5 Bind TBS NanoRX: ........................6 Bind FrSky R-XSR: ........................7 Install Betaflight: ........................8 Install Drivers: ........................8 ARM(DJI Transmitter): ....................... -
Page 3: Overview
Overview: The 3.5-inch quadcopter newly designed by the GEPRC R&D team is now released. There are currently three versions, namely VISTA Polar/VISTA Nebula Nano/Analog. SMART35 is a small size, light weight, suitable for freestyle quadcopter. GEPRC 1404-3850KV motor and EMAX 3.5*2.8*3 propeller form a highly efficient power system. Using the latest GEP-F411-35A AIO FC system, combined with the VISTA Digiatl FPV system, the flying is stable and feels great.Flying time is 13 minutes by the 4S1100mAh LIPO battery. -
Page 4: Warranty Policy
Warranty Policy: 1. If Quadcopter is damaged or unknown issue,please contact GEPRC. We'll do our best to get this taken care of quickly for you. 2. Any impact damage, product liquid damage, high temperature burn or other artificial damage is not covered by warranty. -
Page 5: Dji Digital Fpv System
DJI Digital FPV System: 1. Turn the power of the FPV Goggles, DJI FPV Transmitter,and Quadcopter. Press the FPV Goggles bind button twice, and it will beep to indicate the binding state. Bind Button 2. Press the VISTA bind button,the indicator light turn red ,indicating that it is binding.Then the indicator light turns yellow, means the binding is successful,and the FPV Goggles will display the received picture. -
Page 6: Bind Tbs Nanorx
Bind TBS NanoRX: 1. For Taranis X9D/X9D Plus/X9E and Taranis QX7, turn on the transmitter, go to the TOOLS – CROSSFIRE SETUP – XF Micro TX ,and select Bind. 2. Turn on the receiver while holding the bind button on the receiver, release the button and the green LED on flash .and then holding the button for 8 second ,and release. -
Page 7: Bind Frsky R-Xsr
Bind FrSky R-XSR: 1. For Taranis X9D/X9D Plus/X9E and Taranis QX7, turn on the transmitter, go to the MENU – MODEL SETUP – PAGE 2, choose Internal RF, and select BIND. 2. Turn on the receiver while holding the bind button on the receiver, release the button and the bule,red,yellow LED on . -
Page 8: Install Betaflight
Install Betaflight: Although your Quadcopter comes from the factory nearly completely ready to fly, you still need to install betaflight to facilitate your subsequent use of betaflight for debugging. Installation package download address: https://github.com/betaflight/betaflight-configurator/releases Enter the web page, pull to the bottom, and select the appropriate installation package to download. -
Page 9: Arm(Dji Transmitter)
ARM(DJI Transmitter): With DJI FPV Transmitter, the toggle switch is set at the factory. The corresponding functions of each switch are as follows: SAAUX1(ARM) SBAUX2(MODES) SCAUX3(BEEPER) SDAUX4(Vacancy) DJI toggle switches are all three sections. If you move the Yellow cursor of the corresponding aux channel of the switch, the corresponding function will be turned on when you move to the set range. -
Page 10: Opentx Transmitter
OpenTX Transmitter: The transmitter of openTX system needs to check the AUX channel. For Taranis X9D/X9D Plus/X9E and Taranis Q X7, turn on the transmitter, go to the MENU –MIXS and view the current AUX channel settings. CH1-CH4 corresponds to four channels of rocker CH5(SF)AUX1(ARM)... - Page 11 You can name the aux channel, or set the toggle switches you want, and exit and save it. 11 / 17...
- Page 12 IRC Tramp(Analog): Turn on the transmitter,THR middle,YAW left,PITCH up,enter the OSD menu. The PITCH moves the cursor up and down, and the ELE right to enter the next item. Finally,save and exit. 12 / 17...
- Page 13 13 / 17...
-
Page 14: Install Silicone Pad,Landing Pad
Install Silicone Pad,Landing pad: 14 / 17... -
Page 15: Install Propellers, Battery Strap
Install Propellers, Battery strap: 15 / 17... -
Page 16: Pre-Flight Check
Pre-flight Check: In many cases, the cause of a Quadcopter crash is not checked before takeoff. For the sake of safety, we suggest that you check before every flight.The steps are as follows: 1. Turn on the transmitter and select the correct mode. Please confirm that the arming switch on the transmitter is in the “disarmed”position and throttle is all the way down;... -
Page 17: Include
Include: 1 x SMART 35 Quads 2 x EMAX3.5*2.8*3 Props(pairs) 8 x Foot pad 1 x The silicone pad 1 x L-shaped screwdriver 2 x Antenna protection tube 1 x 15*200mm Battery strap Contact: Website: https://geprc.com/ 17 / 17...
Need help?
Do you have a question about the SMART35 and is the answer not in the manual?
Questions and answers