Advertisement
Quick Links
Installation Safety Notes.....................................................................................................................2
Parts List.............................................................................................................................................4
Installation Instructions.......................................................................................................................6
Product Dimensions..........................................................................................................................11
B-Tech Contact Details.....................................................................................................................12
INSTALLATION TOOLS REQUIRED
13mm (1/2") spanner
or socket
B-TECH AUDIO VIDEO MOUNTS
BT8210
ULTRA-SLIM FLAT SCREEN WALL MOUNT
INSTALLATION GUIDE & PARTS LIST
This Pack Contains 1 Mount
PLEASE KEEP THIS FOR FUTURE REFERENCE
CONTENTS
Drill
Crosshead
screwdriver
www.btechavmounts.com
FEATURES
●
Designed for flat screens up to 55" (139cm) / 50kg (110lbs)
●
Suitable for Non-VESA fixings up to 440 x 400mm
●
Suitable for VESA mounting patterns:
75 x 75mm, 100 x 100mm, 200 x 100mm, 200 x 200mm,
200 x 300mm, 300 x 200mm, 300 x 300mm, 400 x 200mm,
400 x 300mm and 400 x 400mm
●
Post installation screen levelling at wall plate
●
Suitable for concrete / brick or stud walls up to 16"
●
Ultra-Slim profile design mounts screen
only 14mm (0.6") from wall
●
Simple 'hook on' installation with all mounting hardware included
10mm (7/16") masonry bit
or 6mm (1/4") wood bit
Pencil
Stud finder
(optional)
Advertisement

Related Manuals for B-Tech Mountlogic BT8210


Summary of Contents for B-Tech Mountlogic BT8210
-
Page 1: Table Of Contents
Installation Safety Notes........................2 Parts List.............................4 Installation Instructions........................6 Product Dimensions..........................11 B-Tech Contact Details........................12 INSTALLATION TOOLS REQUIRED Pencil 13mm (1/2") spanner Stud finder Drill 10mm (7/16") masonry bit Crosshead or socket (optional) screwdriver or 6mm (1/4") wood bit B-TECH AUDIO VIDEO MOUNTS www.btechavmounts.com... -
Page 2: Installation Safety Notes
Do not attempt to install this product until all instructions and warnings have been read and properly understood. Please keep these instructions for future reference. B-Tech International Limited, its distributors and dealers are not liable or responsible for damage or injury caused by improper installation, improper use or failure to observe these safety instructions. - Page 3 Niniejszy produkt musi być zamontowany na odpowiedniej powierzchni, a podczas użytkowania nie wolno przekraczać podanego maksymalnego obciążenia. A B-Tech International Ltd. recomenda que a instalação deste produto seja efectuada por um instalador de AV profissional ou outra pessoa devidamente habilitada. A B-Tech International Ltd. e os seus distribuidores e concessionários não são responsáveis por danos ou lesões causados por uma instalação incorrecta.
-
Page 4: Parts List
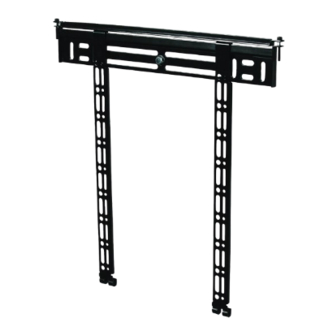
BT8210 PARTS LIST WALL PLATE & LOCKING BAR ASSEMBLY Suitable for loads up to 50kg (110lbs) - Page 5 PART NAME WALL PLATE INTERFACE ARM LOCKING BAR M5 x 35mm PIN HEX SECURITY SCREW SPRING FOAM PAD MAGNETIC SPIRIT LEVEL 4mm PIN HEX KEY (FOR PART 4) INTERFACE KIT M4 x 12mm SCREW M4 x 25mm SCREW M5 x 16mm SCREW M5 x 25mm SCREW M6 x 16mm SCREW M6 x 25mm SCREW...
-
Page 6: Installation Instructions
INSTALLATION INSTRUCTIONS Fix wall plate to the wall using one of the following methods. i. Brick / concrete walls. 10mm (7/16") masonry bit Use spirit level to level the wall plate... - Page 7 ii. Wood / stud walls. STUD FINDER (Optional) 16" 6mm (1/4") wood bit Use spirit level to level the wall plate...
- Page 8 Stick the foam pads to the back of the interface arms. Attach the interface arms to the back of the flat screen. Suitable for all VESA patterns up to 400 x 400mm FLAT SCREEN Use spacers on recess in flat screen & for extra space for cables. SCREW INTERFACE WASHER...
- Page 9 Hook the flat screen onto the wall plate. CAUTION: Please ensure interface arms hook onto wall plate and not the locking bar. FLAT SCREEN CAUTION: This may require two people.
- Page 10 Position screen then secure in place by tightening the locking bar screws (part 4). POSITION SCREEN - LATERAL ADJUSTMENT FLAT SCREEN...
-
Page 11: Product Dimensions
0.6" 440mm 17.3" WALL PLATE 495mm 19.5" 24mm 0.9" 144mm 233mm 5.7" 9.2" 303mm 11.9" 407mm 16" THESE INSTRUCTIONS ARE INTENDED AS A GUIDE ONLY AND B-TECH ACCEPTS NO LIABILITY FOR THE ACCURACY OF THE INFORMATION CONTAINED IN THIS DOCUMENT. -
Page 12: B-Tech Contact Details
©2010 Bennett Technologies Limited. All rights reserved. B-Tech Audio Video Mounts is a division of Bennett Technologies Limited. B-Tech, Better By Design & Mountlogic are registered trademarks of Bennett Technologies Limited. All other brands and product names are trademarks of their respective owners.
Need help?
Do you have a question about the Mountlogic BT8210 and is the answer not in the manual?
Questions and answers