Table of Contents
Advertisement
Quick Links
A Division of Snow Joe
, LLC
®
IMPORTANT!
Safety Instructions
All Operators Must Read These
Instructions Before Use
Any electrical appliance can be dangerous if used incorrectly.
Some of the safety precautions given in this manual apply
generally to many appliances. Other warnings are specific
to the use of this snow thrower. Keep this manual for future
reference.
General Safety WARNINGS!
You and any other operator of this snow thrower must read,
understand, and follow these instructions in their entirety, and
should reread them at the start of each snow season. Failure
to follow these instructions may result in ELECTRIC SHOCK,
FIRE, and/or serious PERSONAL INJURY.
Notice the personal safety alert symbol
manual to draw your attention to a WARNING given along
with the particular operating instruction. This means that
the operation requires special ATTENTION, CAUTION, and
AWARENESS.
1. Keep work area clean and well lit. Cluttered, dark areas
invite accidents.
2. Do not operate the snow thrower in an explosive
atmosphere, such as in the presence of flammable
liquids, gases, or dust. Electrical appliances create sparks
that may ignite the dust or fumes.
3. Keep children, pets, and bystanders away from the
work area. Be aware that the normal noise of the
machine when turned on may make it difficult for you to
hear approaching people. Spectators should wear safety
glasses and be kept a safe distance away from the work
area. Do not let spectators touch the snow thrower or the
extension cord.
4. Electrical plugs must match the outlet. Never modify
the plug in any way. Do not use any adapter plugs with
grounded appliances. Unmodified plugs and matching
outlets will reduce the risk of electric shock.
5. Avoid body contact with earthed or grounded surfaces
(i.e. upper and lower water pipes, radiators, ranges,
refrigerators, microwave ovens, and outer frames of
heating equipment). Take necessary precautions to avoid
electric shock. There is an increased risk of electric shock
if your body is earthed or grounded.
© 2016 by Snow Joe
, LLC
®
All rights reserved. Original instructions.
ELECTRIC SNOW THROWER
15-INCH | 11-AMP
Model SJ615E
m
used in this
1
6. Do not abuse the cord. Keep the cord away from heat,
oil, sharp edges, or moving parts. Never carry the snow
thrower by its cord or yank the cord to disconnect it from
the electrical outlet. Damaged or entangled cords increase
the risk of electric shock.
7. Replace or properly repair damaged cords. If the cord
becomes damaged in any manner while plugged into the
wall receptacle, immediately pull the extension cord plug
from the receptacle.
8. Contact with water while operating the snow thrower
can result in electric shock and serious bodily injury.
Do not use the snow thrower in damp or wet locations or
expose to rain. Do not handle the plug or the appliance
with wet hands or while standing in water.
m
9.
WARNING – Use outdoor extension cords marked
SW-A, SOW-A, STW-A, STOW-A, SJW-A, SJTW-A, or
SJTOW-A. These cords are rated for outdoor use and
reduce the risk of electric shock.
10. Turn off the power switch and disconnect the power
cable before making any adjustments to the unit and
before inspecting, servicing, changing accessories, or
cleaning the snow thrower. Follow the same procedure
if any other dangerous conditions are present during
operation. Any adjustments to the unit should be
performed after revolving parts inside the snow thrower
stop completely. Such preventative safety measures
reduce the risk of starting the power tool accidentally.
11. If you find the main power cable or the extension cable
damaged, please pull out the plug from the socket and
disconnect the power immediately. Repair the cable or
replace it if necessary.
12. When replacing any parts, you must strictly observe
the instructions and procedures described in this
operator's manual. Special care should be paid to any
rubber parts, since these parts may increase the engine
load and decrease its mechanical power if damaged.
13. Do not move or transport the snow thrower when the
plug is connected to the power socket and the switch
is turned on.
14. If, during use, you notice that the unit runs unstably
or hear abnormal sounds from the motor, stop the
machine, disconnect the power immediately and
contact an authorized Snow Joe
center.
SAVE THESE INSTRUCTIONS
Form No. SJ-SJ615E-880E-M
OPERATOR'S MANUAL
+ Sun Joe
service
®
®
Advertisement
Table of Contents

Related Manuals for SNOWJOE SJ615E


Summary of Contents for SNOWJOE SJ615E
- Page 1 ELECTRIC SNOW THROWER 15-INCH | 11-AMP Model SJ615E Form No. SJ-SJ615E-880E-M OPERATOR’S MANUAL A Division of Snow Joe , LLC ® IMPORTANT! 6. Do not abuse the cord. Keep the cord away from heat, oil, sharp edges, or moving parts. Never carry the snow...
-
Page 2: Electrical Safety
Electrical Safety 4. To prevent the appliance cord from disconnecting from the extension cord during operation, use the on-board cord 1. Ground fault circuit interrupter (GFCI) protection should restraint hook and/or make a knot with the two cords as be provided on the circuit(s) or outlet(s) to be used for shown in Table 1. - Page 3 7. If the snow thrower strikes any object, immediately • Noise control – When using the snow thrower, you must stop the snow thrower, then inspect for damage – respect local laws and regulations regarding noise control Repair any damage before restarting and operating the and environmental protection.
-
Page 4: Safety Symbols
Safety Symbols The following table describes safety symbols that may appear on this product. Read, understand, and follow all instructions on the machine before attempting to assemble and operate. Symbols Descriptions Symbols Descriptions READ THE OPERATOR'S MANUAL(S) – Read, understand, WARNING! Do not expose the and follow all instructions in the unit to rain or wet conditions. -
Page 5: Technical Data
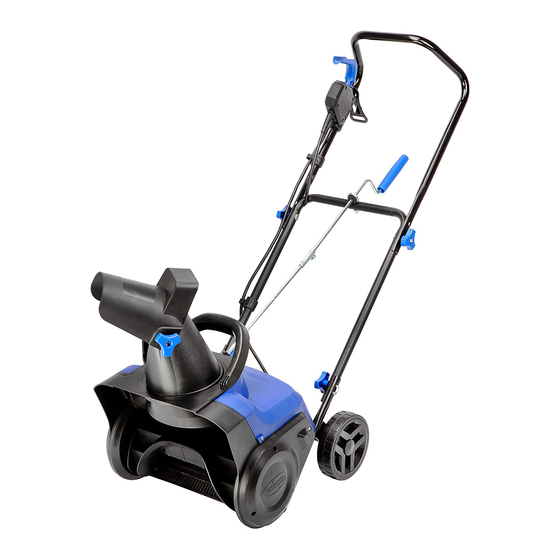
Know Your Electric Snow Thrower Read the owner’s manual and safety rules carefully before operating your electric snow thrower. Compare the illustration below to the actual unit in order to familiarize yourself with the location of the various controls and adjustments. Save this manual for future reference. -
Page 6: Carton Contents
Instead, contact the Snow Joe + Sun Joe customer ® ® service center at 1-866-SNOWJOE (1-866-766-9563) for assistance. Handle with care during assembly so that electrical 4. Secure the middle frame to the unit using 2 knobs and 2 wiring does not become damaged. - Page 7 Fig. 4 Fig. 7 Chute Crank Assembly Fig. 8 1. The cotter pin comes pre-assembled on the unit, as shown. Remove the cotter pin and proceed to step 2 (Fig. 5). Fig. 5 Cotter pin 3. Secure the crank rod in place and replace the cotter pin (Figs.
-
Page 8: Discharge Chute Assembly
Fig. 13 Fig. 10 Thumbscrew Discharge Chute Assembly 1. Position the chute deflector over the discharge chute and align them with the deflector bolts, washers and the deflector knobs (Fig. 14). 4. Slide the upper crank rod through the rubber ring located on the middle frame (Fig. -
Page 9: Operation
3. Turn the chute control crank clockwise to ensure the Fig. 18 discharge chute and deflector are in position. Operation NOTE: Before using this machine, make sure that the power source you will use complies with the specifications detailed in this manual. Before inserting the plug into the socket, verify that the snow thrower’s auger and rubber plates are firmly secured, and that the rubber plates are facing the correct direction. - Page 10 Moving the Machine and Plowing by pushing down on the handle to raise the scraper bar at the base of the unit above the pebbles or gravel. the Snow 11. For larger areas, a definite pattern of operation is required to thoroughly clean an area of snow.
-
Page 11: General Maintenance Tips
WARNING Fig. 21 Make sure that the chute deflector snaps and locks completely onto the discharge chute. An opening between the discharge chute and the chute deflector Chute crank may allow foreign objects to be picked up by the snow thrower and thrown in the direction of the operator causing serious bodily injury. • Do not advance the chute deflector too far Discharge forward causing an opening to appear between chute... -
Page 12: Side Cover
8. For the user's safety, worn or damaged parts must be replaced. Replace with original replacement parts only. Fig. 26 Parts from another snow thrower may not fit properly, causing an unsafe situation. Replacing the Plastic Auger NOTE: When replacing worn plastic plates, pay close attention to any different types of bolts and nuts and where they are Drive wheel positioned. -
Page 13: Replacing The Belt
Replacing the Scraper Bar 1. Open the left side plate by removing the 4 screws (Fig. 32). 1. The scraper bar is located at the base of the snow thrower beneath the rotor housing (Fig. 30). Fig. 32 Fig. 30 Scraper bar Screws 2. -
Page 14: Service And Support
(Fig. 35). If your Snow Joe SJ615E electric snow thrower requires ® Fig. 35 service or maintenance, please call the Snow Joe + Sun Joe ®... -
Page 15: Optional Accessories
NOTE: Accessories are subject to change without any obligation on the part of Snow Joe + Sun Joe to provide notice of such ® ® changes. Accessories can be ordered online at snowjoe.com or via phone by contacting the Snow Joe + Sun Joe customer ® ®... - Page 16 NOTES...
- Page 17 NOTES...
- Page 18 NOTES...
- Page 19 Service Department at 1-866-SNOWJOE (1-866-766-9563), by This Warranty is only valid if the Machine is used and maintained e-mailing us at help@snowjoe.com or by mailing in your yellow in accordance with the instructions, warnings and safeguards registration card. Failure to register your product purchase will not contained in the owner’s manual.
- Page 20 WARNING! This product or its power cord contains chemicals, including lead, known to the State of California to cause cancer and birth defects or other reproductive harm. Wash hands after handling. WARNING! Some dust created by power sanding, sawing, grinding, drilling, and other construction activities contains chemicals known [to the State of California] to cause cancer, birth defects, or other reproductive harm.
Need help?
Do you have a question about the SJ615E and is the answer not in the manual?
Questions and answers
Is there a fuse in the line of the Snowjoe15-inch 11-amp Electric Snow Blower? I have lost power to the motor, and it appears it could be a fuse. Please see the attached photo. Is the white coupler a fuse holder? If so, is it an 11 amp, and can I replace the fuse? Thank you,
Yes, the SNOWJOE SJ615E Electric Snow Blower has a fuse in the battery, but it is considered a downside. There is no clear information stating that the fuse can be easily replaced.
This answer is automatically generated
How much would a new electric motor cost for a Snowjoe15-inch 11-amp Electric Snow Blower? How to order?
FOLLOW-UP TO MY QUESION OF MARCH 4, 2025 Is there a fuse in the line of the Snowjoe15-inch 11-amp Electric Snow Blower? I have lost power to the motor, and it appears it could be a fuse. Please see the attached photo. Is the white coupler a fuse holder? If so, is it an 11 amp, and can I replace the fuse? Thank you,