Table of Contents
Advertisement
Quick Links
OPERATOR'S MANUAL
A Division of Snow Joe
, LLC
®
THANKS
OF A REMANUFACTURED PRODUCT.
To make sure you get the most out of
your product, be sure to register online at
ELECTRIC SNOW THROWER
R
18-INCH | 14.5-AMP | LED LIGHT
Model SJ619E-RM
FOR
snowjoe.com
to enjoy full product support.
YOUR
PASTE UPC LABEL HERE
Form No. SJ-SJ619E-RM-880E-V1
PURCHASE
Advertisement
Table of Contents

Related Manuals for SNOWJOE SJ619E-RM


Summary of Contents for SNOWJOE SJ619E-RM
- Page 1 18-INCH | 14.5-AMP | LED LIGHT OPERATOR’S MANUAL Model SJ619E-RM A Division of Snow Joe , LLC ® Form No. SJ-SJ619E-RM-880E-V1 THANKS YOUR PURCHASE OF A REMANUFACTURED PRODUCT. To make sure you get the most out of your product, be sure to register online at snowjoe.com...
-
Page 2: General Safety Warnings
OPERATOR’S MANUAL Model SJ619E-RM A Division of Snow Joe , LLC ® Form No. SJ-SJ619E-RM-880E-V1 IMPORTANT! 6. Do not abuse the cord. Keep the cord away from heat, oil, sharp edges, or moving parts. Never carry the snow Safety Instructions thrower by its cord or yank the cord to disconnect it from the electrical outlet. -
Page 3: Electrical Safety
SJTW-A 14-gauge 50-foot extension cord ® 4. Surfaces – This snow thrower is intended for use on with lighted end (Model PJEXT50-B). Visit snowjoe. paved surfaces. Do not use on gravel, stone, or other com to purchase this extension cord online or, to unpaved surfaces unless the snow thrower is adjusted for order by phone, call 1-866-SNOWJOE (1-866-766-9563). - Page 4 6. Body position – Maintain proper footing and balance • Hand-held operating position – Operation of the snow at all times. Place heels firmly on the ground and tightly thrower in the hand-held position is unsafe. grasp the handle bar. Watch for uneven surfaces and do • Abnormal operation – If you notice the snow thrower not overreach.
-
Page 5: Safety Symbols
Safety Symbols The following table describes safety symbols that may appear on this product. Read, understand, and follow all instructions on the machine before attempting to assemble and operate. Symbols Descriptions Symbols Descriptions READ THE OPERATOR'S MANUAL(S) – Read, understand, and follow all WARNING! Do not expose the unit instructions in the user manual(s) to rain or wet conditions. -
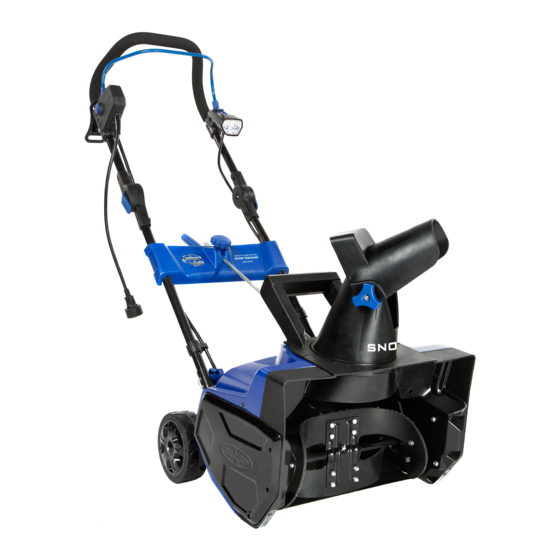
Page 6: Technical Data
Know Your Electric Snow Thrower Read the owner’s manual and safety rules carefully before operating your electric snow thrower. Compare the illustration below to the actual unit in order to familiarize yourself with the location of the various controls and adjustments. Save this manual for future reference. -
Page 7: Carton Contents
If any damage is seen or suspected, do not assemble. Instead, contact the Snow Joe + Sun Joe customer ® ® service center at 1-866-SNOWJOE (1-866-766-9563) for assistance. Handle with care during assembly so that electrical wiring does not become damaged. - Page 8 Chute Crank Assembly Fig. 7 1. Remove the cotter pin from the crank rod (Fig. 4). Fig. 4 Cotter pin 3. Secure the crank rod in place with the cotter pin (Figs. 8 – 9). 2. Install the crank rod through the center plate and insert Fig.
-
Page 9: Discharge Chute Assembly
Operation Discharge Chute Assembly 1. Position the chute deflector over the discharge chute and NOTE: Before using this machine, make sure that the power align the holes, placing the washer between the deflector source you will use complies with the specifications detailed and the chute (Fig. -
Page 10: Powering On/Off
4. Note that the snow thrower has a polarized male plug – 3. To power OFF, release the switch bar lever. one prong in the plug is slightly longer and wider than the Utilizing the LED Light other (Fig. 14). The extension cord female end should be likewise polarized so that the extension cord fits snugly 1. - Page 11 1. Keep the area of operation free of foreign objects that can become thrown by the rotor blades. Perform a thorough Fig. 18 inspection of the area since some objects may be hidden from view by surrounding snow. If the snow thrower hits an obstruction or picks up a foreign object during use, stop the snow thrower, disconnect the extension cord, remove the obstruction, and inspect the unit for damage.
-
Page 12: General Maintenance Tips
1. The discharge chute can be adjusted 180 degrees by rotating the chute crank. Rotate the chute control crank WARNING clockwise to move the discharge chute to the left and counterclockwise to move the chute to the right (Fig. 19). Make sure that the chute deflector snaps and locks completely onto the discharge chute. -
Page 13: Replacing The Belt
Replacing the Scraper Bar 8. For the user's safety, worn or damaged parts must be replaced. Replace with original replacement parts only. 1. The scraper bar is located at the base of the snow thrower Parts from another snow thrower may not fit properly, beneath the rotor housing (Fig. -
Page 14: Replacing The Pulley
2. Use your right hand to turn the rib side of the belt 4. Use your right hand to press the belt with the ribbed side up and pull upwards while turning the auger pulley down. While holding the belt down with your right hand, counterclockwise with your left hand. -
Page 15: Model + Serial Numbers
Cover loosely with a tarp for added protection. Service + Support If your Snow Joe SJ619E-RM electric snow thrower requires ® service or maintenance, please call the Snow Joe + Sun Joe ®... - Page 16 NOTE: Accessories are subject to change without any obligation on the part of Snow Joe + Sun Joe to provide notice of such ® ® changes. Accessories can be ordered online at snowjoe.com or via phone by contacting the Snow Joe + Sun Joe customer ® ®...
- Page 17 We’re here to help Monday through Friday from 9AM to 6PM EST. You can reach us at 1-866-SNOWJOE (1-866-766-9563), online EXCLUSIONS: at snowjoe.com, via email at help@snowjoe.com or tweet us • Wearing parts like belts, augers, chains and tines are @snowjoe.
- Page 18 WARNING! This product or its power cord contains chemicals, including lead, known to the State of California to cause cancer and birth defects or other reproductive harm. Wash hands after handling. For more information go to www.P65Warnings.ca.gov. WARNING! Some dust created by power sanding, sawing, grinding, drilling, and other construction activities contains chemicals known [to the State of California] to cause cancer, birth defects, or other reproductive harm.
Need help?
Do you have a question about the SJ619E-RM and is the answer not in the manual?
Questions and answers