Advertisement
CHILDHOOD STARTS HERE
The components of this gym can be combined with others to create different play sets.
Read this sheet and all instructions included with the different parts before assembly.
See the Instructions and Owner's Manual included in carton 63007-445 for important
Cartons for this Play Set:
1 63007-421
Lexington Gym Box 1 (Hardware)
1 63007-422
Lexington Gym Box 2
1 63007-423
Lexington Gym Box 3
1 63007-445
Lexington Roof (Hdwre & Instr.)
1 63008-221
Skybox 1 (Hdwre & Instr)
1 63008-222
Skybox 2
1 SC904-800Q Skybox Play Floor (Hdwre & Instr.)
1 SC910-800Q Lexington Play Floor (Hdwre & Instr.)
1 SJ926-810
Skybox Wood Roof (Hdwre & Instr.)
2 SM963-402
Dormer (Hdwre & Instr.)
1 63058-202
4 Position Swing Beam
1 63060-222
9ft Beam Legs & Brace (Hdwre & Instr.)
1 50546-777
3 Swings, 1 Trapeze
1 SD204-102Q Lexington Picnic Table (Hdwre & Instr.)
1 AH201-102Q Rock Climbing Wall (Hdwre & Instr.)
1 SH946-102
Access Ladder, 5ft
1 15166-400
10ft Super Wave Slide
1 63081-102
Ice Cream Stand (Hdwre & Instr.)
1 8400-202
Spiral Slide (Hardware)
1 63033-102
Spiral Slide Mount (Hdwre & Instr.)
1 AG943-400
Slide Handle (Hdwre & Instr.)
2 SM964-402
Gable Fans (Hdwre & Instr.)
1 AG942-400
Access Ladder Handles (Hdwre & Instr.)
© Copyright 2018, Creative Playthings
This is the best order of assembly to create this specific set.
safety information.
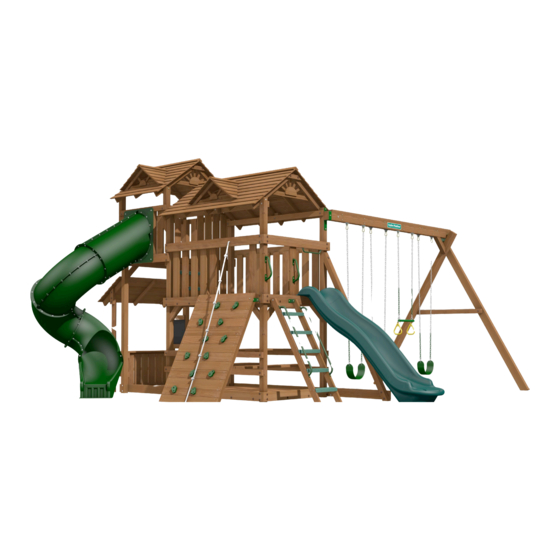
LEXI9WPP11
Lexington Premium Pack 11
• Start by assembling the Lexington tower. Instructions and hard-
ware are in the cartons noted at left.
• Wait to install the Access Ladder, Slide, and Wall Slats until after
the rest of the play set is complete.
• Lex step 2. Do not install the back Sandbox End. It will be re-
placed when installing the play floors.
• Lex step 7. Do not install the safety rail. It will be used on the
Picnic Table.
• Lex step 14. Do not install the back End Wall Support. It will not
be needed.
• Lex step 15. No Swing Mount is needed.
• Once the roof, roof supports, and ridge cap are installed, pro-
ceed with the Skybox tower.
• Skybox step 2. Omit the sandbox end under the gym. The floor
transition from the Skybox Play Floor will be used instead.
• Skybox step 11. Use the front posts from The Skybox Roof
(SJ926-810) in place of the post extensions.
• Skybox Step 17. On the side the Spiral Slide will mount, install
only the wall slat closest to the main tower. The gap will be filled
by the Spiral Slide.
Dimensions of assembled package:
21' 10" wide x 20' 4"deep x 12' 9" tall
LEXINGTON PREMIUM PACK 11
LEXI9WPP11-100 Rev A (03-18)
Advertisement
Table of Contents

Related Manuals for Creative Playthings Lexington Premium Pack 11


Summary of Contents for Creative Playthings Lexington Premium Pack 11
- Page 1 LEXI9WPP11 Lexington Premium Pack 11 CHILDHOOD STARTS HERE Dimensions of assembled package: 21' 10" wide x 20' 4"deep x 12' 9" tall The components of this gym can be combined with others to create different play sets. This is the best order of assembly to create this specific set.
- Page 2 • Double-check all fasteners are secure and all recessed hardware is covered by hole caps. • Install the slide mount and slide using the method shown in LEXINGTON PREMIUM PACK 11 Page 2 © Copyright 2018, Creative Playthings LEXI9WPP11-100 Rev A (03-18)
Need help?
Do you have a question about the Lexington Premium Pack 11 and is the answer not in the manual?
Questions and answers