EXFO FIP-400B User Manual
Hide thumbs
Also See for FIP-400B:
- User manual (103 pages) ,
- User manual (163 pages) ,
- User manual (111 pages)
Table of Contents
Advertisement
Quick Links
Advertisement
Table of Contents

Related Manuals for EXFO FIP-400B


Summary of Contents for EXFO FIP-400B
- Page 1 User Guide FIP-400B Fiber Inspection Probe and ConnectorMax2 Mobile (iOS)
- Page 2 EXFO Inc. (EXFO). Information provided by EXFO is believed to be accurate and reliable. However, no responsibility is assumed by EXFO for its use nor for any infringements of patents or other rights of third parties that may result from its use.
-
Page 3: Table Of Contents
Contents Contents Certification Information ......................v 1 Introducing the FIP-400B Fiber Inspection Probe and ConnectorMax2 Mobile ................1 Probe ............................2 Available Models ........................5 Probe Tips ..........................6 LED Indicators .........................6 ConnectorMax2 Mobile Software ..................9 Technical Specifications ......................10 Conventions ..........................11 2 Safety Information ..................13 Other Safety Symbols on Your Unit ..................15... - Page 4 Viewing Information About ConnectorMax2 Mobile ............113 Viewing Online Help ......................114 Transportation ........................115 7 Warranty ....................117 General Information ......................117 Liability ..........................118 Exclusions ...........................118 Certification ........................118 Service and Repairs ......................119 EXFO Service Centers Worldwide ..................120 A Fiber Inspection Probe Tip Compatibility Chart ........121 Index .......................125 FIP-400B...
-
Page 5: Certification Information
Electronic test and measurement equipment is exempt from FCC part 15, subpart B compliance in the United States of America and from ICES-003 compliance in Canada. However, EXFO Inc. makes reasonable efforts to ensure compliance to the applicable standards. The limits set by these standards are designed to provide reasonable protection against harmful interference when the equipment is operated in a commercial environment. - Page 6 This device does not contain any user-serviceable components. Any unauthorized product changes or modifications will invalidate warranty and all applicable regulatory certifications and approvals. FIP-400B...
- Page 7 Hereby, EXFO declares that the radio equipment type “Wideband Data Transmission” is in compliance with European Directive 2014/53/EU. The full text of the EU declaration of conformity is available at the following Internet address: www.exfo.com/library.
- Page 8 Certification Information Japanese Technical Conformity Mark for Radio Technical parameters: Standards: IEEE 802.11b/g/n Operation Frequency: 2412 ~ 2483.5 MHz Throughput: 150 Mbps, 1T1R 018-160052 viii FIP-400B...
-
Page 9: Introducing The Fip-400B Fiber Inspection Probe And Connectormax2 Mobile
Introducing the FIP-400B Fiber Inspection Probe and ConnectorMax2 Mobile The FIP-400B Fiber Inspection Probe is a portable video microscope used to inspect fiber ends. Unlike traditional microscopes, the FIP-400B facilitates the examination of patchcord connectors and also hard-to-reach connectors on the back of patch panels and bulkhead adapters. -
Page 10: Probe
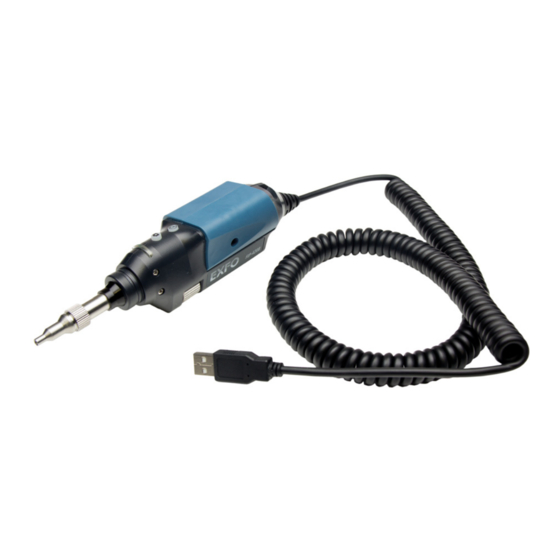
Introducing the FIP-400B Fiber Inspection Probe and ConnectorMax2 Mobile Probe Probe The FIP-400B is designed to be an intuitive, easy-to-use piece of equipment. This video microscope is used for inspecting fiber ends. Magnification control Battery LED Capture control Wi-Fi LED... - Page 11 Introducing the FIP-400B Fiber Inspection Probe and ConnectorMax2 Mobile Probe Magnification control MF-Ready probe with inspection tip and Battery LED removable nozzle Capture control Wi-Fi LED Status LED Micro USB adapter connector Retaining nut Inspection tip Battery compartment door Retaining nut...
- Page 12 Introducing the FIP-400B Fiber Inspection Probe and ConnectorMax2 Mobile Probe The battery LED indicates the charge status of the probe. See LED Indicators on page 6 for details. The Wi-Fi LED gives you information about the transmission process. ...
-
Page 13: Available Models
Introducing the FIP-400B Fiber Inspection Probe and ConnectorMax2 Mobile Available Models Available Models The features available for your probe are automatically detected when you connect it to your smart device. The table below shows which feature is available for each model. -
Page 14: Probe Tips
Introducing the FIP-400B Fiber Inspection Probe and ConnectorMax2 Mobile Probe Tips Probe Tips The FIP-400B comes with two interchangeable tips included in two different packages (UPC or APC). Additional models are also available. UPC package: FIPT-400-FC-SC: FC-SC Bulkhead tip ... - Page 15 Introducing the FIP-400B Fiber Inspection Probe and ConnectorMax2 Mobile LED Indicators Status LED Meaning Flashing blue Processing data Flashing red There is a problem with the probe. Follow the instructions on screen. The auto focus is in timeout ...
- Page 16 Introducing the FIP-400B Fiber Inspection Probe and ConnectorMax2 Mobile LED Indicators Battery LED Meaning Flashing blue USB connected, battery charging Blue USB connected, battery fully charged Battery error (only visible when connected to a USB cable) Flashing yellow USB connected, battery not charging...
-
Page 17: Connectormax2 Mobile Software
Introducing the FIP-400B Fiber Inspection Probe and ConnectorMax2 Mobile ConnectorMax2 Mobile Software ConnectorMax2 Mobile Software ConnectorMax2 Mobile is the application used to view the fiber inspections. You can also use specific test configurations and analyze the fibers automatically upon capturing a picture. -
Page 18: Technical Specifications
The icons on screen must match the icons on the movable part of the inspection tip. Name of the file resulting from the autonaming Technical Specifications To obtain this product’s technical specifications, visit the EXFO Web site at www.exfo.com. FIP-400B... -
Page 19: Conventions
Introducing the FIP-400B Fiber Inspection Probe and ConnectorMax2 Mobile Conventions Conventions Before using the product described in this guide, you should understand the following conventions: ARNING Indicates a potentially hazardous situation which, if not avoided, could result in death or serious injury. Do not proceed unless you understand and meet the required conditions. -
Page 21: Safety Information
ARNING Use only accessories designed for your unit and approved by EXFO. For a complete list of accessories available for your unit, refer to its technical specifications or contact EXFO. - Page 22 Other safety instructions relevant for your product are located throughout this documentation, depending on the action to perform. Make sure to read them carefully when they apply to your situation. AUTION Do not use the fiber probe outdoors in wet locations. FIP-400B...
-
Page 23: Other Safety Symbols On Your Unit
Safety Information Other Safety Symbols on Your Unit Other Safety Symbols on Your Unit One or more of the following symbols may also appear on your unit. Symbol Meaning Direct current Alternating current The unit is equipped with an earth (ground) terminal. The unit is equipped with a protective conductor terminal. -
Page 24: Electrical Safety Information
Use only the listed and certified AC adapter/charger provided by EXFO with your unit. It provides reinforced insulation between primary and secondary, and is suitably rated for the country where the unit is sold. - Page 25 Safety Information Electrical Safety Information Equipment Ratings Temperature Unit powered by batteries: -10 °C to 40 °C (14 °F to 104 °F) Operation Unit connected to USB adapter: 0 °C to 40 °C (32 °F to 104 °F) Storage Unit without batteries: -40 °C to 70 °C ...
-
Page 27: Setting Up Your Fiber Inspection Probe And Connectormax2 Mobile
Setting up Your Fiber Inspection Probe and ConnectorMax2 Mobile When you receive your wireless probe, and before you start working, you need to download the ConnectorMax2 Mobile application on your smart device. The application is available for smart devices supporting iOS 9.0 or higher, such as the iPhone 5s and iPad 2, or more recent models. -
Page 28: Connecting Or Disconnecting The Wireless Probe
To install ConnectorMax2 Mobile: 1. Ensure you have access to an Internet connection. 2. Tap the App Store icon. 3. In the App Store application, search for EXFO or ConnectorMax2 Mobile. 4. Follow the instructions on-screen. Once the ConnectorMax2 Mobile application is installed, you can now activate the wireless probe. - Page 29 Setting up Your Fiber Inspection Probe and ConnectorMax2 Mobile Connecting or Disconnecting the Wireless Probe You have to disconnect the probe first if you want to perform the following: Work with another probe Use the probe with another smart device ...
- Page 30 Setting up Your Fiber Inspection Probe and ConnectorMax2 Mobile Connecting or Disconnecting the Wireless Probe To disconnect the wireless probe: From the main window, tap FIP-400B...
-
Page 31: Changing The Fiber Inspection Probe Tip
Setting up Your Fiber Inspection Probe and ConnectorMax2 Mobile Changing the Fiber Inspection Probe Tip Changing the Fiber Inspection Probe Tip You can use various tips depending on the type of connector you are inspecting. For more information about tips you can use, see the Fiber Inspection Probe Tip Compatibility Chart on page 121, or contact your vendor for additional... -
Page 32: Changing The Fip Nozzle (Mf-Ready Probes Only)
Probe Tip Compatibility Chart on page 121, or contact your vendor for additional information. Inspection tip Removable nozzle MF-Ready probe MPORTANT To facilitate the installation process of all components, EXFO recommends to install the removable nozzle on the inspection tip first. FIP-400B... - Page 33 Setting up Your Fiber Inspection Probe and ConnectorMax2 Mobile Changing the FIP Nozzle (MF-Ready Probes Only) To install the removable nozzle and the inspection tip on the MF-Ready probe: 1. Depending on the patch panel you are inspecting, insert the removable nozzle on the metal rod of the inspection tip key up or key down (as written on the nozzle).
- Page 34 Note: If you cannot see the notch of the inspection tip, slide the movable part of the inspection tip with the trigger towards the nozzle. Removable nozzle MF-Ready probe Retaining nut Inspection tip (movable part) Trigger FIP-400B...
- Page 35 Setting up Your Fiber Inspection Probe and ConnectorMax2 Mobile Changing the FIP Nozzle (MF-Ready Probes Only) 5. Tighten the retaining nut clockwise. Retaining nut Inspection tip (movable part) You are now ready to perform a multifiber capture. To change the removable nozzle: 1.
- Page 36 The key of the nozzle, whether it is installed key up or key down, MUST BE aligned with the notch of the inspection tip. Otherwise, it will be impossible to perform an acquisition. 5. Retighten the retaining nut clockwise. Retaining nut FIP-400B...
- Page 37 Setting up Your Fiber Inspection Probe and ConnectorMax2 Mobile Changing the FIP Nozzle (MF-Ready Probes Only) To remove the inspection tip: 1. To expose the retaining nut, slide the movable part of the inspection tip, using the trigger, until it stops. Inspection tip (movable part) 2.
-
Page 38: Adjusting Brightness
Note: This feature is not available for FIP-425B and FIP-435B MF-Ready probes testing multifiber connectors. Once the probe is connected to a fiber, you can adjust brightness in order to better view the fiber under inspection. To adjust brightness: 1. In Live Video mode, touch the arrow. FIP-400B... - Page 39 Setting up Your Fiber Inspection Probe and ConnectorMax2 Mobile Adjusting Brightness 2. Deactivate the Auto Brightness feature and use the brightness slider to set the levels to suit your needs. Fiber Inspection Probe...
-
Page 40: Setting Up Identification
B), the connector ID, or the frame. To configure the identification: 1. From the main window, tap to access the Identification window. Note: You can also tap at the end of the Measurement Name row. 2. If necessary, select the Identification tab. FIP-400B... - Page 41 Setting up Your Fiber Inspection Probe and ConnectorMax2 Mobile Setting up Identification 3. Enter all the information as follows: 3a. Locate the row corresponding to the identifier that you want to modify. 3b. Tap on the line next to the identifier that you want to modify. Note: You can edit information either with the virtual keyboard or with the microphone.
-
Page 42: Setting Up The Incrementation
Fiber identifier, then Cable, then Location: Location 1, Cable 1, Fiber 1 Location 1, Cable 1, Fiber 2 Location 1, Cable 2, Fiber 1 Location 1, Cable 2, Fiber 2 and so forth. FIP-400B... - Page 43 Setting up Your Fiber Inspection Probe and ConnectorMax2 Mobile Setting up the Incrementation After a result is saved, you have to return to the Live Video mode so that the application prepares the next file name by incrementing (or decrementing) the suffix.
- Page 44 Setting up the Incrementation To configure the incrementation: 1. From the main window, tap to access the Identification window. Note: You can also tap at the end of the Measurement Name row. 2. If necessary, select the Increment tab. FIP-400B...
-
Page 45: Setting Up Autonaming
Setting up Your Fiber Inspection Probe and ConnectorMax2 Mobile Setting up Autonaming 3. Move the increments from the Inactive Increments to the Active Increments space by tapping . You can remove the identifiers by tapping . You can also move the identifiers, with the drag and drop gesture, from the Active Increments to the Inactive Increments space by tapping and holding Note: Only the identifiers with values are displayed. - Page 46 . You can remove the identifiers by tapping . You can also move the identifiers, with the drag and drop gesture, from the Active Identifiers to the Inactive Identifiers space by tapping and holding Note: Only the identifiers with values are displayed. FIP-400B...
- Page 47 Setting up Your Fiber Inspection Probe and ConnectorMax2 Mobile Setting up Autonaming 4. Under File Name Edition, you can customize the information displayed next to Custom file name. Note: You can edit information either with the virtual keyboard or with the microphone.
-
Page 48: Setting Up Auto Capture
This is known as the auto capture. Note: The auto capture is only possible in high magnification. To enable the auto capture: 1. In Live Video mode, touch the arrow. FIP-400B... - Page 49 Setting up Your Fiber Inspection Probe and ConnectorMax2 Mobile Setting up Auto Capture 2. Select the Auto capture feature by activating the button. Fiber Inspection Probe...
-
Page 50: Managing And Selecting Test Configurations
Note: Only the test configurations that are imported can be deleted. You can manage how the list of available test configurations looks when you access the edition mode. To select a test configuration: 1. From the main window, tap at the end of the Test Configuration row. FIP-400B... - Page 51 Setting up Your Fiber Inspection Probe and ConnectorMax2 Mobile Managing and Selecting Test Configurations 2. Select the test configuration you want to use in the list of available choices. A at the end of the row indicates the configuration is selected.
- Page 52 Setting up Your Fiber Inspection Probe and ConnectorMax2 Mobile Managing and Selecting Test Configurations To delete a test configuration: 1. From the main window, tap at the end of the Test Configuration row. 2. To enter the edition mode, in the Test Configuration window, tap FIP-400B...
- Page 53 Setting up Your Fiber Inspection Probe and ConnectorMax2 Mobile Managing and Selecting Test Configurations 3. Select the test configuration you want to delete and tap Indicates you are working in edition mode. Indicates a test configuration has been imported. Only these test configurations can be deleted.
- Page 54 Setting up Your Fiber Inspection Probe and ConnectorMax2 Mobile Managing and Selecting Test Configurations 4. Tap Delete. 5. When the application prompts you, tap Yes or No. 6. Tap to exit the edition mode. 7. Tap Done to return to the main window. FIP-400B...
- Page 55 Setting up Your Fiber Inspection Probe and ConnectorMax2 Mobile Managing and Selecting Test Configurations To import a test configuration: 1. From the main window, tap at the end of the Test Configuration row. 2. In the Test Configuration window, tap 3.
- Page 56 Setting up Your Fiber Inspection Probe and ConnectorMax2 Mobile Managing and Selecting Test Configurations To hide test configurations: 1. From the main window, tap at the end of the Test Configuration row. 2. To enter the edition mode, in the Test Configuration window, tap FIP-400B...
- Page 57 Setting up Your Fiber Inspection Probe and ConnectorMax2 Mobile Managing and Selecting Test Configurations 3. Select the test configuration you want to hide and tap Indicates you are working in edition mode. Fiber Inspection Probe...
- Page 58 Setting up Your Fiber Inspection Probe and ConnectorMax2 Mobile Managing and Selecting Test Configurations 4. Tap Hide. 5. Tap to exit the edition mode. 6. Tap Done to return to the main window. FIP-400B...
- Page 59 Setting up Your Fiber Inspection Probe and ConnectorMax2 Mobile Managing and Selecting Test Configurations To remove test configurations from the hidden list: 1. From the main window, tap at the end of the Test Configuration row. 2. To enter the edition mode, in the Test Configuration window, tap Fiber Inspection Probe...
- Page 60 Indicates you are working in edition mode. Indicates the test configuration has been hidden. 4. Tap to remove the test configuration from the hidden list. 5. Tap to exit the edition mode. 6. Tap Done to return to the main window. FIP-400B...
-
Page 61: Modifying The File Format
Setting up Your Fiber Inspection Probe and ConnectorMax2 Mobile Modifying the File Format Modifying the File Format The data that can be shared with third-party applications are measurement files (.cmax2) and images (.png). By default, you will be prompted to select the file format with which you want to work. - Page 62 Modifying the File Format 3. Under Sharing, tap Preferred file format. 4. Navigate through the preferred file format by scrolling through the words that are greyed. 5. Tap Done to confirm your choice. 6. Tap Done to return to the main window. FIP-400B...
-
Page 63: Stopping The Analysis Process On First Fail
Setting up Your Fiber Inspection Probe and ConnectorMax2 Mobile Stopping the Analysis Process on First Fail Stopping the Analysis Process on First Fail When inspecting multifiber connectors with an MF-Ready probe, you can choose to stop the analysis process as soon as the application detects a fail status on a fiber. - Page 64 Setting up Your Fiber Inspection Probe and ConnectorMax2 Mobile Stopping the Analysis Process on First Fail 3. Under Multifiber, activate the button next to the Stop analysis on first FAIL option. 4. Tap Done to return to the main window. FIP-400B...
-
Page 65: Restoring To Default Settings
Setting up Your Fiber Inspection Probe and ConnectorMax2 Mobile Restoring to Default Settings Restoring to Default Settings At any time, you can restore to default settings in your smart device. To restore to default settings: 1. From the main window, tap 2. - Page 66 Setting up Your Fiber Inspection Probe and ConnectorMax2 Mobile Restoring to Default Settings 3. Tap the Restore Default Settings button. 4. When the application prompts you, tap Yes or No. 5. Tap Done to return to the main window. FIP-400B...
-
Page 67: Inspecting Fiber Ends
Inspecting Fiber Ends (Single Fiber and Transceiver - Fiber Receptacles) When you connect the FIP-400B Fiber Inspection Probe to your smart device, you can view and inspect fiber ends right away. This direct viewing mode is known as the Live Video mode. - Page 68 Analysis will be more difficult with a yellow indicator, and impossible with a red indicator. A vertical black bar displays the peak focus level. For more information on analysis, see Analyzing Captures on page 83. FIP-400B...
- Page 69 Inspecting Fiber Ends Inspecting Fiber Ends (Single Fiber and Transceiver - Fiber Receptacles) To inspect fiber ends (single fibers and transceivers) in Live Video mode: 1. Install a probe tip (see Changing the Fiber Inspection Probe Tip on page 23 for details). 2.
- Page 70 Connector Type row. 5c. Select a connector type. Note: If you are using a probe which is not MF-Ready, the multifiber connector option is not displayed by default. 5d. Tap Done to return to the Test Configuration window. FIP-400B...
- Page 71 Inspecting Fiber Ends Inspecting Fiber Ends (Single Fiber and Transceiver - Fiber Receptacles) 6. To choose the type of connector tip you want to use, proceed as follows: 6a. Tap at the end of the Tip Type row. 6b. Select a tip type. 6c.
- Page 72 8b. If you have an FIP-425B, select the auto analysis and the auto centering by activating the button. If you have an FIP-435B, select the auto analysis, the auto centering, the auto focus, and the auto capture by activating the button. For more information, see Analyzing Captures on page 83. FIP-400B...
-
Page 73: Inspecting Multiple Fiber Ends (Mf-Ready Probes Only)
Inspecting Fiber Ends Inspecting Multiple Fiber Ends (MF-Ready Probes Only) 9. If the fiber end is dirty, remove it from the probe, clean it and reinspect it. 10. Once you are satisfied with the inspection, when in high magnification level, tap Press the Fiber Inspection Probe handset button. - Page 74 A vertical black bar displays the peak focus level. Single-row multifiber connector Dual-row multifiber connector For more information on analysis, see Analyzing Captures on page 83. FIP-400B...
- Page 75 Inspecting Fiber Ends Inspecting Multiple Fiber Ends (MF-Ready Probes Only) To inspect fiber ends (multiple fibers) in Live Video mode: 1. Install a removable nozzle on the MF-Ready probe (see Changing the FIP Nozzle (MF-Ready Probes Only) on page 24 for details). 2.
- Page 76 5d. Tap Done to return to the Test Configuration window. 6. To choose the connector subtype, proceed as follows: 6a. Tap at the end of the Connector Subtype row. 6b. Select a connector subtype. 6c. Tap Done to return to the Test Configuration window. FIP-400B...
- Page 77 Inspecting Fiber Ends Inspecting Multiple Fiber Ends (MF-Ready Probes Only) 7. To indicate if you have inserted the removable nozzle key up or key down, proceed as follows: 7a. Tap at the end of the Connector Key Orientation row. 7b. Select Key Up or Key Down. 7c.
- Page 78 9. In the Test Configuration window, tap the configuration you want to use for your inspection and tap Done to return in Live Video mode. Note: The test configuration list is updated according to the connector type you have selected. FIP-400B...
- Page 79 Inspecting Fiber Ends Inspecting Multiple Fiber Ends (MF-Ready Probes Only) 10. In Live Video mode, depending on the probe you are using, proceed as follows: 10a.Touch the arrow. 10b.If you have an FIP-425B, select the auto analysis by activating the button.
- Page 80 Press the Fiber Inspection Probe handset button. Note: If you are not satisfied with capture number one, you can take it again. When the first capture is done, the application automatically switches to . Tap to perform capture number one again. FIP-400B...
- Page 81 Inspecting Fiber Ends Inspecting Multiple Fiber Ends (MF-Ready Probes Only) 13. To perform the second capture, proceed as follows: 13a.Using the trigger, slide the movable part of the inspection tip at position 2 (halfway between position 1 and 3). Position 2 is illustrated with this icon on the MF-Ready probe.
- Page 82 14a.Using the trigger, slide the movable part of the inspection tip until it stops to hide the retaining nut. Inspection tip (movable part) 14b.Once you are satisfied with the inspection, tap Press the Fiber Inspection Probe handset button. When the last capture is performed, the analysis starts immediately. FIP-400B...
-
Page 83: Saving Files
Inspecting Fiber Ends Saving Files Saving Files You can save the acquisition files manually for future reference. You can also set ConnectorMax2 Mobile so that it saves the capture automatically only if the result is Pass, only if the result is Fail, or regardless of the status. - Page 84 Inspecting Fiber Ends Saving Files 2. In the Results tab, tap Note: To save a file manually, the Auto save feature in the Application Settings must be set to Never. FIP-400B...
- Page 85 Inspecting Fiber Ends Saving Files To save file automatically: 1. From the main window, tap 2. Select Application Settings. 3. Under Saving, tap on Auto save and navigate through the list by scrolling through the words that are greyed. 4. Tap Done to confirm your choice. 5.
-
Page 86: Managing Files
All saved measurements are available in Archive mode. You can also delete unwanted files. To share files, see Transferring Results With Third-Party Applications on page 93 for details. To open a file: 1. From the main window, select the Results tab. 2. Tap FIP-400B... - Page 87 Inspecting Fiber Ends Managing Files 3. In the Archive window, select Measurements. 4. Tap the selected file to open it. Fiber Inspection Probe...
- Page 88 Inspecting Fiber Ends Managing Files To delete a file: 1. From the main window, select the Results tab. 2. Tap FIP-400B...
- Page 89 Inspecting Fiber Ends Managing Files 3. In the Archive window, tap Measurements or Reports. 4. To enter the edition mode, in the Archive window, tap MPORTANT If you select files for deletion and you change your mind, ensure to unselect the files you want to keep. 5.
- Page 90 Indicates you are working in edition mode. Tap to select or unselect all files 7. When the application prompts you, tap OK or Cancel. 8. Tap to exit the edition mode. 9. Tap Done to exit the Archive window. FIP-400B...
-
Page 91: Analyzing Captures
Inspecting Fiber Ends Analyzing Captures Analyzing Captures With the capture analysis option, you can perform automated pass/fail analyses according to the criteria you have set. Depending on the fiber probe that you have, you may have access to the following features: Auto centering: displays the fiber in the middle of the image. - Page 92 It is enabled only in high magnification and with a good focus. The results are available as an image or in a detailed table. The Image shows the snapshot of what has been captured. You can see all the anomalies that have been detected. FIP-400B...
- Page 93 Inspecting Fiber Ends Analyzing Captures The overlay shows the status of the analysis, the status per zone, the analysis zones, any anomaly (defects, scratches) found on the fiber endface. The color of the circles shows the status of the analysis zone: Green: pass ...
- Page 94 To view the results (single fiber or transceiver): 1. In Live Video mode, tap 2. In the Results window, tap at the end of the Inspection Results row. 3. From the Inspection Results window, tap Done to return to the Results window. FIP-400B...
- Page 95 Inspecting Fiber Ends Analyzing Captures To view the results (multifiber connector): 1. Perform the three captures. See Inspecting Multiple Fiber Ends (MF-Ready Probes Only) on page 65 for details. 2. In the Results window, tap the number of the fiber you want to view. The color in the background indicates the global status of the connector.
- Page 96 Inspection Results row. 4. From the Inspection Results window, you can select another fiber you want to view by tapping on its number. Dual-row multifiber connector Single-row multifiber connector 5. Tap Done to return to the Results window. FIP-400B...
-
Page 97: Creating And Viewing Reports
Inspecting Fiber Ends Creating and Viewing Reports Creating and Viewing Reports You can create a report based on the current inspection and analysis results. This report can be saved in PDF. You can view the report as soon as it is generated, or you can select it in the Archive mode. - Page 98 2. If you want to generate a report, in the Results window, tap Note: To create a report manually, the Generate report on save feature in the Application Settings must be disabled. To activate automated report creation: 1. From the main window, tap 2. Select Application Settings. FIP-400B...
- Page 99 Inspecting Fiber Ends Creating and Viewing Reports 3. Activate the button next to the Generate report on save option. 4. Tap Done to return to the main window. To view an existing report: 1. If you do not want to view the report as soon as it is generated, in Live Video mode, tap the Results tab.
- Page 100 Inspecting Fiber Ends Creating and Viewing Reports 3. In Archive mode, tap Reports. 4. Tap the selected file to open it. 5. Tap Done to return to the Results tab. FIP-400B...
-
Page 101: Transferring Results With Third-Party Applications
Inspecting Fiber Ends Transferring Results With Third-Party Applications Transferring Results With Third-Party Applications Third-party applications are useful when you want to share measurement files with other users. The data that can be shared are measurement files (.cmax2) and images (.png). By default, you will be prompted to select the application with which you want to work. - Page 102 2. Ensure you are connected to a Wi-Fi network. 3. In Live Video mode, tap If you are using an MF-Ready probe and you are inspecting a multifiber connector, perform the three captures. See Inspecting Multiple Fiber Ends (MF-Ready Probes Only) on page 65 for details. FIP-400B...
- Page 103 Inspecting Fiber Ends Transferring Results With Third-Party Applications 4. In the Results tab, tap Note: To transfer a file, the Auto save feature in the Application Settings must be set to Always. 5. Select the type of file (.cmax2 or .png) you want to share. 6.
- Page 104 Transferring Results With Third-Party Applications To transfer one or more results from the Archive mode: 1. Ensure the Wi-Fi is activated on your smart device. 2. Ensure you are connected to a Wi-Fi network. 3. Tap the Results tab. 4. Tap FIP-400B...
- Page 105 Inspecting Fiber Ends Transferring Results With Third-Party Applications 5. In the Archive window, tap Measurements or Reports. 6. Tap 7. Select the measurement files you want to share. Fiber Inspection Probe...
- Page 106 9. Select the type of file (.cmax2 or .png) you want to share. Note: If you share a report, the type of file (PDF) is selected by default. 10. Select the third-party application you want to work with (Google Drive or Dropbox for example). 11. Follow the instructions on-screen. FIP-400B...
-
Page 107: Transferring Results Directly With Your Smart Device
Inspecting Fiber Ends Transferring Results Directly With Your Smart Device Transferring Results Directly With Your Smart Device If you do not want to transfer your files via third-party applications, you can transfer them directly with your smart device to a computer via iTunes. You can transfer many files at once when this method is used. -
Page 108: Updating The Firmware
Updating the Firmware Updating the Firmware The FIP-400B is designed to provide firmware updates whenever necessary. This allows you to benefit from the updates of your unit each time you use it. The firmware updates can be recommended or required. -
Page 109: Maintenance
Maintenance General Maintenance To help ensure long, trouble-free operation: Always inspect fiber-optic connectors before using them and clean them if necessary. Keep the unit free of dust. Clean the unit casing with a cloth slightly dampened with water. ... -
Page 110: Cleaning Lenses
Gently remove oil, fingerprints and grime from the lens surface, using a circular motion from the center outwards. Recycling and Disposal For complete recycling/disposal information, visit the EXFO Web site at www.exfo.com/recycle. FIP-400B... -
Page 111: Recharging The Battery (Fip-425B And Fip-435 Models Only)
AUTION Only charge the battery with the USB cable and adapter/charger provided by EXFO with your unit. You can purchase a new battery from EXFO. MPORTANT The battery is not charged at the factory. You must fully charge ... -
Page 112: Replacing The Battery (Fip-425B And Fip-435 Models Only)
Your unit uses a three-cell battery that has been especially designed for EXFO. For this reason, you can only replace it with a battery of the same type and model. The use of other batteries may damage your unit and compromise your safety. - Page 113 Maintenance Replacing the Battery (FIP-425B and FIP-435 Models Only) To replace the battery: 1. Turn off the probe. 2. Unplug any power cable. 3. Using a screwdriver, remove the two screws that are located on the side of the probe. Screws Battery compartment door 4.
- Page 114 5. Remove the battery. Wires Battery 6. Replace the battery, respecting the polarity (black, yellow, and red wires). 7. Close the battery compartment door. 8. Using a screwdriver, put the screws that you have removed at step 3 back in place. FIP-400B...
-
Page 115: Troubleshooting
Troubleshooting Solving Common Problems The table below presents common problems and their solutions. Problem Solution I cannot analyze an The image is not focused properly; use the focus knob on image the probe until the focus indicator displays the best value available. - Page 116 Ensure that the smart device is not in Safe Mode. If so, Mobile application icon restart the smart device. is not available in the list Ensure that the ConnectorMax2 Mobile application was of the applications installed from the current user account (not from another displayed. account). FIP-400B...
- Page 117 If the probe is connected via USB to a computer or EXFO platform and the ConnectorMax2 application is in use, disconnect the probe from the USB port and close ConnectorMax2 on the computer, then try to connect the probe again.
-
Page 118: Changing The File Contents
It increases significantly the file size. normal format: selected by default. To change the file contents: 1. From the main window, tap 2. Select Application Settings. FIP-400B... - Page 119 Troubleshooting Changing the File Contents 3. Under Multifiber, tap Preferred file contents. 4. Select Normal (Recommended) or Enhanced. 5. Tap Done to confirm your choice. 6. Tap Done to return to the main window. Fiber Inspection Probe...
-
Page 120: Contacting The Technical Support Group
Contacting the Technical Support Group To obtain after-sales service or technical support for this product, contact EXFO at one of the following numbers. The Technical Support Group is available to take your calls from Monday to Friday, 8:00 a.m. to 7:00 p.m. -
Page 121: Viewing Information About Connectormax2 Mobile
Troubleshooting Viewing Information About ConnectorMax2 Mobile Viewing Information About ConnectorMax2 Mobile You can view information about ConnectorMax2 Mobile such as the version number and different policies on your smart device. To view ConnectorMax2 Mobile information: 1. From the main window, tap 2. -
Page 122: Viewing Online Help
You can view the online help for ConnectorMax2 Mobile at any time. To view the online help: 1. From the main window, tap 2. Select Help. 3. Under Guides, select the document you want to view. 4. Tap Done to return to the main window. FIP-400B... -
Page 123: Transportation
Troubleshooting Transportation Transportation Maintain a temperature range within specifications when transporting the unit. Transportation damage can occur from improper handling. The following steps are recommended to minimize the possibility of damage: Pack the unit in its original packing material when shipping. ... -
Page 125: Warranty
Warranty General Information EXFO Inc. (EXFO) warrants this equipment against defects in material and workmanship for a period of one year from the date of original shipment. EXFO also warrants that this equipment will meet applicable specifications under normal use. -
Page 126: Liability
Liability Liability EXFO shall not be liable for damages resulting from the use of the product, nor shall be responsible for any failure in the performance of other items to which the product is connected or the operation of any system of which the product may be a part. -
Page 127: Service And Repairs
5. Return the equipment, prepaid, to the address given to you by support personnel. Be sure to write the RMA number on the shipping slip. EXFO will refuse and return any package that does not bear an RMA number. -
Page 128: Exfo Service Centers Worldwide
Fax: +86 (755) 2955 3101 Xintian Avenue, support.asia@exfo.com Fuyong, Bao’An District, Shenzhen, China, 518103 To view EXFO's network of partner-operated Certified Service Centers nearest you, please consult EXFO's corporate website for the complete list of service partners: http://www.exfo.com/support/services/instrument-services/ exfo-service-centers. FIP-400B... -
Page 129: A Fiber Inspection Probe Tip Compatibility Chart
Fiber Inspection Probe Tip Compatibility Chart With some tips that include lenses, and before performing an automatic focus, you must adjust the focus manually for the first inspection. Note: The tips for which the probe requires a manual focus before the first inspection are listed in the table below. - Page 130 149 mm, Extended FIPT-400-MU-L- MU tip for PC bulkhead adapter ODC 4 Pin Plug FIPT-400-ODC- (female) Guide tip 4PIN-P ODC Socket (male) FIPT-400-ODC-S ODC Universal FIPT-400-ODC-U Guide tip ODC 2 Pin Plug FIPT-400-ODC- (female) Guide tip 2PIN-P FIP-400B...
- Page 131 Fiber Inspection Probe Tip Compatibility Chart Connector Analysis Inspection Auto focus Auto Tip Description Tip Code (FIP-425B/ (all models) (FIP-435B) detection FIP-435B) (FIP-435B) D4 bulkhead FIPT-400-D4 adapter FIPT-400-U20M2 is FIPT-400-U20M2 for male ferule connector FIPT-400-Lemo for FIPT-400-Lemo bulkhead adapter OptiTap for APC FIPT-400-OTAP- bulkhead adapter LC for PC bulkhead FIPT-400-LC...
- Page 132 Use version B of the tip or higher. A manual focus is required for the first inspection. Only with a 125 μm ferrule. Contact your vendor for additional information regarding the most recent Fiber Inspection Probe tips that are not listed above. FIP-400B...
-
Page 133: Index
Index Index preview ..........37 tab ............38 # ..............35 available features............ 5 models ............. 5 3G, 4G LTE communications ....... 21 battery compartment door ....2, 3, 4, 105 activating features LED indicator....2, 3, 4, 6, 8, 103 auto analysis........ - Page 134 ............70 automatic method......... 90 endface..........85 manual method ........89 identifying by name ....... 34 current result, transferring ......94 file name custom configurations configuration ......... 38 deleting ..........44 preview ..........37 importing ..........47 customer service........119 FIP-400B...
- Page 135 Index files deleting ........... 78, 80 icon managing ..........78 battery status........9, 10 modifying contents......110 eye ............52 modifying format ........53 user preferences......... 9, 10 name decrementing......34, 75 identification name incrementing ......34, 75 feature ........... 32 naming ..........
- Page 136 60, 66 files............78 performing test configurations ........ 42 firmware update ........100 manual focus level ........121 first capture ........... 72 micro USB adapter connector..2, 3, 4, 103 second capture ........73 microphone........... 33, 39 third capture.......... 74 FIP-400B...
- Page 137 Index position displayed on inspection tip.... 73 removing preferred file format........53 configurations from the hidden list ..51 preview of the file name ......37 identifier .......... 37, 38 probe inspection tip ......... 29 battery compartment door ..2, 3, 4, 105 nozzle ............
- Page 138 ......... 94 tips files directly ........... 99 changing..........23 files from Archive mode......96 compatibility chart....... 121 shipping to EXFO ........119 types ............6 single fiber transceivers inspection ........59, 61 connector ..........61 viewing results........86 inspection ........
- Page 139 Index single fiber results........86 transceivers results ........ 86 virtual keyboard ........33, 39 warmup period ......... 5, 59, 65 warranty certification ......... 118 exclusions ..........118 general ..........117 liability..........118 null and void........117 watermark..........59, 65 Wi-Fi frequency band data ......
- Page 142 Tel.: 1 978 367-5600 · Fax: 1 978 367-5700 EXFO FINLAND Elektroniikkatie 2 FI-90590 Oulu, FINLAND Tel.: +358 (0) 403 010 300 · Fax: +358 (0) 8 564 5203 TOLL-FREE (USA and Canada) 1 800 663-3936 © 2017 EXFO Inc. All rights reserved. Printed in Canada (2017-07) ...
Need help?
Do you have a question about the FIP-400B and is the answer not in the manual?
Questions and answers
how do I turn off the geo location feature of this model scope...FIP-400B