
Related Manuals for NRS Healthcare P78269


Summary of Contents for NRS Healthcare P78269
- Page 1 INSTRUCTIONS FOR USE P78269 NRS Community Bed P78283 NRS Community Bed Low P78271 NRS Community Bed Plus P78295 NRS Community Bed Plus Low NRS Community Bed & Community Bed Plus...
- Page 2 All rights reserved. Republication, duplication or modifi cation in whole or in part is prohibited without prior written permission from NRS Healthcare. Trademarks are identifi ed by ™ and ®. All trademarks are owned by or licensed to NRS Healthcare or its subsidiaries unless otherwise noted.
-
Page 3: Table Of Contents
UI CONTENTS INTRODUCTION ...........................5 1.1 Groups of People Mentioned in this Manual .................5 SAFETY ..............................5 2.1 Safety Warning Symbols .......................5 2.2 Safety Instructions .........................5 INTENDED USE ............................6 PRODUCT OVERVIEW .........................7 4.1 Label Locations ..........................8 UNPACKING ............................9 ASSEMBLY FOR TRANSPORT ......................9 ASSEMBLY OF BED FRAME FOR USE ....................12 7.1 Connect the Head End Mattress Platform to the Head End Panel. - Page 4 11.12 End Panel Covers (P81920) ......................24 11.13 Mattresses ..........................24 12 CLEANING AND DISINFECTING .......................24 12.1 General information ........................24 12.2 Cleaning the Bed .........................25 12.3 Disinfecting the Bed ........................25 13 INSPECTION AND MAINTENANCE ....................26 13.1 Inspections by the Care Provider ....................26 13.2 Basic fault-fi...
-
Page 5: Introduction
NRS Healthcare shall not be liable for any 1.1.1 Owner damage or injury caused by failure to follow the proper instructions in this user The owner (for example: suppliers of medical manual. -
Page 6: Intended Use
GENERAL WARNINGS INTENDED USE Do not exceed the maximum user weight The bed is intended to provide care for users within or safe working load (refer to Section 3). the following environments: • Application Environment 3: Nursing Home Nursing beds are classifi ed as active Class 1 medical devices. -
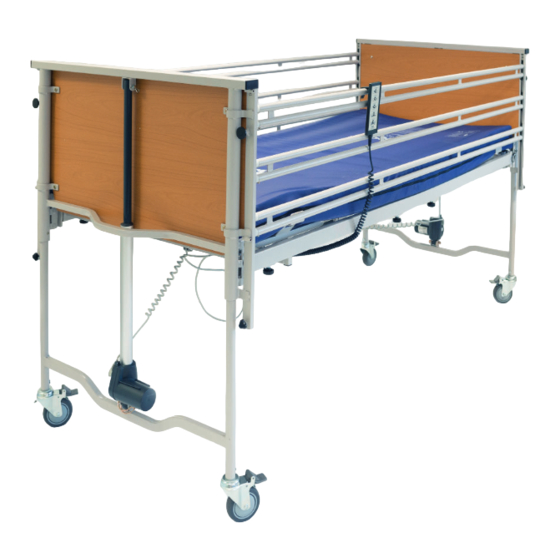
Page 7: Product Overview
PRODUCT OVERVIEW The bed is supplied unassembled comprising the following parts and assemblies: Head End Panel (A) Foot End Mattress Platform (D) The head end panel comprises the head end The foot end mattress platform comprises the frame, hi-lo actuator, side rail channels (1) and mattress platform frame, platform extension rail, castors (2). -
Page 8: Label Locations
4.1 Label Locations Foot Section Foot End Warning: Incompatible MATTRESSES can create HAZARDS. Read instructions for use. P78269 - Community Bed NRS Healthcare, Sherwood House Class 1 Medical Device Cartwright Way, Forest Business Park U in: 100-240V ~ max 2.5A 50/60Hz IPX4 Bardon Hill Coalville, Leics, LE67 1UB, UK Int: 10%, max. -
Page 9: Unpacking
Electrical System ASSEMBLY FOR TRANSPORT The electrical operating system comprises: This section is for beds being supplied by a local authority community equipment store • Electronic control box with connection cables only. For bed assembly instructions please refer and mains power cable to Section 7. - Page 10 Unscrew the hand-wheels to release the Hook the transport brackets onto the head end transport brackets. panel brackets (lower pins) and secure with the retaining pins on both sides. Lock the foot end panel castors (refer to Section 10.3). Make sure the retaining pins are fully inserted and the assemblies secured.
- Page 11 Re-tighten the hand-wheels on both sides. Wrap and secure the electrical cables around the foot end mattress platform. 12. Slot the mattress platform connectors on to the transport bracket. Make sure the transport assembly is fully secure before attempting to move. 13.
-
Page 12: Assembly Of Bed Frame For Use
ASSEMBLY OF BED FRAME FOR USE The bed must only be assembled by trained specialised personnel. Each mattress platform must correspond with the correct end panel. Please check the item labels for confi rmation. Incorrectly connected parts will cause the handset to malfunction. The bed must be disassembled from the transport brackets before assembly. -
Page 13: Assemble The Mattress Platforms
Lock the foot end castors (refer to Section Loosen the hand-wheels fully on the head 10.3). end mattress platform by turning them anti- clockwise on both sides. Remove the retaining pins from foot end panel mounting brackets on both sides. Hook the foot end mattress platform frame to the head end panel mounting brackets, then reinsert the retaining pins to secure. -
Page 14: Fit The Mattress Retainers
Make sure the cables have not been damaged or become tangled during installation. Make sure all cables are free of moving parts before use. 7.5 Fit the Mattress Retainers Plastic mattress retainers must be fi tted before fi tting the mattress. •... -
Page 15: Fitting The Mattress Platform Extension Plate
Undo the bed extension hand-wheels at the When the mattress platform extension plate foot end of the bed on both sides. has been removed, replace the locking pins into the storage bracket. Unlock the foot end castors (refer to Section 10.3). -
Page 16: Fitting And Removing The Optional Side Rails
Push the foot end panel into the mattress Insert the plastic side rail carriages into the side rail channels, taking care not to snag the platform as far as it will go (refer to Section wires. 7.6). The extending section of the side rail must Re-tighten the hand-wheels fully. -
Page 17: Aluminium 3-Bar Side Rail (P80563)
8.2 Aluminium 3-Bar Side Rail (P80563) If the bed has been extended you must fi t the aluminium side rail extensions (P80575) before installation. While holding the side rail assembly in place, tighten the locking screws at both ends of the bed. - Page 18 Loosen the side rail hand-wheels all the way. < 60mm The gap between the side rail and the head end must be less than 60mm. Position the side rails so the locking lever knob is always at the foot end of the bed. Fully tighten both hand-wheels.
-
Page 19: Fitting The Mattress
FITTING THE MATTRESS If using side rails, the distance from the top of the uncompressed mattress to 9.1 Mattress Selection the top of the side rail should be at The NRS community bed has been designed least 220mm. to accommodate a standard 2000 x 900mm Check that all moving parts of the bed can mattress in 6”... -
Page 20: Bed Operations
10.1 Special safety warnings (Standard or Low). To avoid serious injury, make sure all Standard Bed Castors (P78269 & P78271) non-user personnel are clear of the bed. Make sure all user body parts are clear of entrapment hazards before making any bed adjustments. -
Page 21: Hand Control
10.4 Hand control 10.4.5 Reverse Trendelenburg The electric functions of the bed are activated Unlock the foot end castors on both sides with a 10 hand control. An optional 9 button before operating this function (refer to handset can be purchased (P81221) which Section 10.3). -
Page 22: Adjusting The Calf Angle
10.5 Adjusting the Calf Angle 10.6 Raise the Side Rails (3-Bar Steel & 3-Bar Aluminium) Calf angle adjustment is only available on the NRS Community Bed Plus models The operation of the 3-bar steel and 3-bar (P78271 & P78295). aluminium side rails are the same. The following steps show the aluminium 3-bar Raise the Leg-rest side rails as an example. -
Page 23: Raise The 3/4 Folding Side Rails
Gently lower the side rail. 11 ACCESSORIES Repeat steps 1 and 2 for the other end of the 11.1 Use of accessories side rail. NRS can supply various accessories for use with 10.8 Raise the 3/4 Folding Side Rails this bed. We do not recommend the use of third party spares or accessories (excluding mattresses) as this can cause serious... -
Page 24: Lifting Pole (P80599)
Refer to the user instructions supplied with for installation and use. 11.13 Mattresses NRS Healthcare can supply a number of foam and The grab handle must be installed before fi tting the dynamic mattresses suitable for the bed. side rails. -
Page 25: Cleaning The Bed
Identify the item with a “faulty” sign and make sure the bed cannot be used. Report the faulty item the owner of the bed immediately. Failure to follow these safety instructions can lead to serious damage to the bed. 12.2 Cleaning the Bed Do not use high pressure water or steam cleaning. -
Page 26: Inspection And Maintenance
13 INSPECTION AND MAINTENANCE This product is subject to wear and tear during use. To ensure its safe operation, regular inspections should be carried out by the care provider and inspections and maintenance by the product owner at the intervals shown below. This list indicates the minimum recommended level of inspection and maintenance. -
Page 27: Inspections And Maintenance By The Owner
13.3 Inspections and maintenance by the Owner The owner must thoroughly clean, disinfect and inspect the bed before re-use to a new user, or annually (whichever comes fi rst). If any faults are found that cannot be rectifi ed, the bed must be withdrawn from use. Disconnect the mains supply before carrying out any electrical repairs. -
Page 28: Specifications
15 SPECIFICATIONS Community Community Community Community Model: Bed Plus Bed Low Bed Plus Product Code: P78269 P78283 P78271 P78295 Safe Working Load (SWL) 220kg / 34 Stone Maximum User Weight 180kg / 28 Stone Overall length 2245mm Overall length (extended) -
Page 29: Symbols Used
Actuators Linak LA27 Series Input Voltage 24V (Max 5.0A) Rating 6000N Ingress Protection IPX4 Duty Cycle 10%, max 2 min / 18 min Operating Speed 4.5-5.5mm/s 16.2 Symbols Used Manufacturer Serial Number Refer to Instructions Type BF Applied Part. Waste Electrical and Insulation Class II, Type Applied parts are: Electronic Equipment... -
Page 30: Product Disposal
Northern Ireland BT27 5QB Tel: Customer Services: 0345 121 8111 Email: customerservice@nrshealthcare.co.uk NRS Healthcare is a leading supplier of community equipment and daily living aids. Please visit one of our websites to view our full range of products: www.healthcarepro.co.uk or www.completecareshop.co.uk...
Need help?
Do you have a question about the P78269 and is the answer not in the manual?
Questions and answers