Advertisement
Quick Links
Before assembly
•
We recommend that time is taken to read the
instructions before starting assembly, then
follow the easy step by step guide.
The instruction sheet is only a guide to
the assembly. Certain items may not be
shown to scale.
•
Check all components prior to assembly
•
This product should be assembled by no
less than two people.
•
Never attempt to erect the assembly in
high winds.
•
Drill components where indicated.
•
Some of the components may have sharp
edges wear protective work gloves while
handling components.
No.
Components
1
Large floor panel
2
Small floor panel
3
Back and side panel
4
Small back panel
5
Window side panel
6
Right-hand front panel
7
Right-hand doors
8
Left-hand front panel
9
Left-hand doors
10
Door header panel
11
Shiplap door header board
12
Right triangular roof panel
13
Rectangular roof panel
14
Left triangular roof panel
15
Roof centre block
16
Inside roof cover
(615x140mm)
17
Capping
(645x140mm)
18
Coverstrips
(1920x48x12mm)
19
Long angled felt batten
(right)
20
Long angle felt batten
(left)
21
Short angle felt batten
(right)
22
Short angle felt batten
(left)
23
Short bargeboard
(835x40x12mm)
24
Long bargeboard
(1325x40x12mm)
25
Door weather strips
(1760x40x12mm)
26
Door beading strips
(1775x9x9mm)
27
Door glazing
(284 x 306mm)
28
Side window glazing
(193 x 304mm)
29
Front window glazing
(200 x 304mm)
30
Large side roof felt
(2.31 x 1m)
31
Small side roof felt
(0.9 x 0.46m)
32
Large front/back roof felt
(2.9 x 1m)
33
Small front/back roof felt
(1.4 x 0.46m)
34
Acorn finials
No.
Fixing Kit
35
Tower bolts
36
Tower bolt mounting block
37
Door handles
38
Metal handle bar
39
Door lock kit
40
63mm screws
41
50mm screws
42
38mm screws
43
32mm screws
44
25mm screws
45
30mm black countersunk screws
46
25mm brass screws
47
19mm round head screws
48
Washers
49
40mm nails
50
20mm nails
51
25mm panel pins
52
10mm felt nails
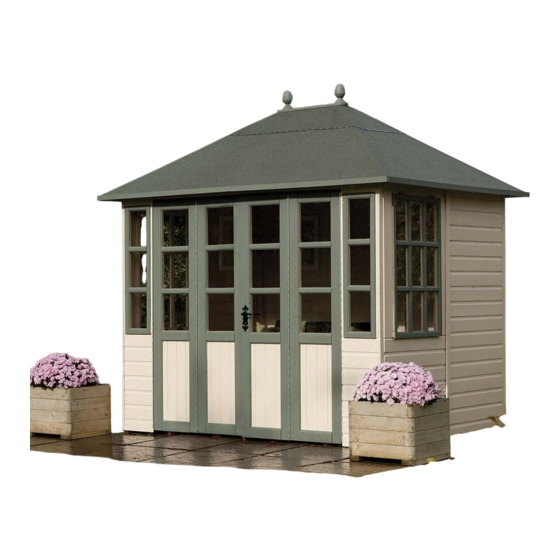
Chatsworth Summerhouse
Assembly Instructions
x 2
Caution
Drill
This product
contains glass.
Wear protective
work gloves while
Gloves
handling these
components.
Recommended tools
for assembly
•
Power drill/screwdriver
•
Cross head drill bit
Qty.
•
3mm diameter drill bit
2
•
8mm diameter drill bit
1
•
12mm diameter drill bit
4
•
Hammer
•
1
Sharp knife
•
2
Spirit level
•
1
Silicon sealant
•
1
Step ladder
1
1
2
2
4
2
4
1
1
1
8
3
3
15
1
1
2
6
3
2
12
18
6
2
2
2
2
2
8
Qty.
6
3
2
1
1
34
94
12
12
86
8
4
30
4
54
7
10
276
200
Dimensions
Overall external
Height = 2670mm
Width = 2650mm
Depth = 2190mm
Footprint
Width = 2340mm
Depth = 1870mm
Min. base area
Width = 2440mm
Depth = 1970mm
30
32
34
17
29
28
16
38
39
37
21
22
23
9
5
26
2
25
6
35
36
English SS132K
31
14
13
20
27
4
1
33
12
19
24
10
11
3
18
Advertisement

Related Manuals for Rowlinson Garden Products Chatsworth Summerhouse


Summary of Contents for Rowlinson Garden Products Chatsworth Summerhouse
- Page 1 Chatsworth Summerhouse English SS132K Assembly Instructions Before assembly • We recommend that time is taken to read the instructions before starting assembly, then follow the easy step by step guide. The instruction sheet is only a guide to the assembly. Certain items may not be Caution shown to scale.
-
Page 2: Important Note
50mm 50mm or similar bearers (These are not supplied in the kit). Rowlinson Garden Products recommend using pressure treated bearers with all buildings on any type of base. 2. Glazing Working on one at a time, lay the doors and window panels on the ground. Carefully prise off the beading strips from the window frame. When all beading is removed, it is recommended that a waterproof sealant is applied around the edge of each piece of glazing before fitting. - Page 3 4. Door header panel Interlock the two door header panels and secure together using 8 x 63mm screws as shown. Position the header panel on top of the font panels. Drill 2 x 8mm holes in each front panel top frame then fix the header panel to the front panels using 2 x 50mm screws and washers per front panel. do not over tighten these screws at this stage. Position the two shiplap door header boards as shown, ensuring that the tongue of the front panel cladding is fitted into the the groove of the door header boards.
- Page 4 6. Roof panels As shown below construct a side roof section using a right and a left triangular roof panel. screw together using 2 x 50mm screws. Assemble a second side roof section in the same way. Create the front roof section using a right and left triangular roof panel and a rectangular roof panel as shown below using 4 x 50mm screws. Assemble a second section in the same way for the back.
- Page 5 9. Secure roof to walls Secure the roof to the walls using 8 x 50mm screws along each long edge and 6 x 50mm screws along each short edge. Screw through the roof panels into the top frame of the walls. Cross section of wall Overhead view 50mm...
- Page 6 11. Door weatherstrips and beading To the right-hand door position a weatherstrip over the join between the two doors and secure in place to the inner door only using 4 x 38mm screws. Position a second weatherstrip in the same position on the left-hand door and secure in the same way to the inner door only. The third weatherstrip is positioned on the left hand door so that it overlaps the edge of the outer door, secure in place with 4 x 38mm screws.
- Page 7 13. Coverstrips Fit a cover strip into each corner, attach using 3 x 40mm nails per strip. The four remaining coverstrips are to cover the joins between panels, two on the back and one on each side. Secure each strip using 3 x 40mm nails. 40mm 40mm 40mm...
- Page 8 If the building is to sit on soil or grass it MUST be erected on pressure treated wooden 50mm x 50mm or similar bearers (These are not supplied in the kit). Rowlinson Garden Products recommend using pressure treated bearers with all buildings on any type of base.
Need help?
Do you have a question about the Chatsworth Summerhouse and is the answer not in the manual?
Questions and answers