Table of Contents
Advertisement
Available languages
Available languages
Quick Links
Table à induction professionnel
INDUC-STONE
Gamme buffet - Maintien au chaud
Guide d'utiliiattion
de votre tpptreili à induction
Chère cliente, cher client,
Nous vous félicitons pour l'achat de ce produit de la gamme
ADVENTYS .
Il a été fabriqué selon les connaissances les plus récentes et avec des éléments
électriques et électroniques modernes et sûrs.
Avant d'utiliser cet appareil, prenez le temps de lire ce guide d'utilisation.
Nous vous remercions de votre confiance.
FX00657-A
Advertisement
Table of Contents

Related Manuals for Adventys INDUC STONE


Summary of Contents for Adventys INDUC STONE
- Page 1 à induction Chère cliente, cher client, Nous vous félicitons pour l'achat de ce produit de la gamme ADVENTYS . Il a été fabriqué selon les connaissances les plus récentes et avec des éléments électriques et électroniques modernes et sûrs.
-
Page 2: Table Of Contents
Sommtire Informations techniques Déclaration de conformité et déchets Contenu de l’emballage Intégration du produit Intégrttion de lit commtnde 7-10 Mise en service Première mise en route Utiliser votre appareil en toute sécurité Comment fonctionne votre appareil 14-16 Casserolerie recommandée Comment préserver et entretenir votre appareil Petites pannes et remèdes Garantie Tout au long de la notice, ce symbole:... -
Page 3: Informations Techniques
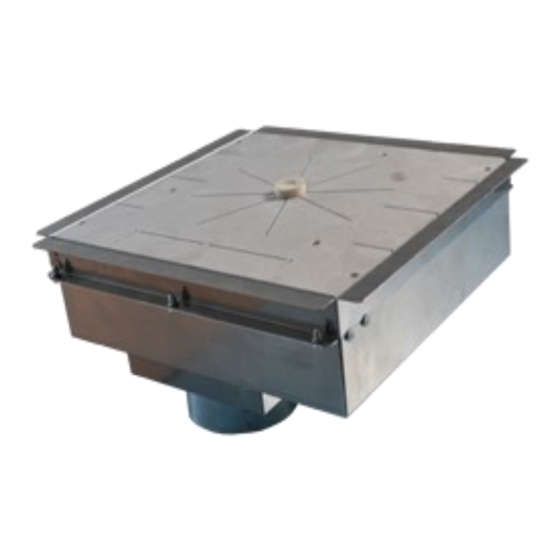
Informttiona techniquea Modèlie: Z1IC UC STONE / INDUC-STONE Appareil de maintien au chaud à induction Nom: INOX Mttéritux: De 650W Puiaatnce: Monophasé 230V +/-10% 50Hz Réaetu éliectrique: 3A Max Courtnt : Commande déporté avec clavier à 4 touches capacitives + minuterie Commtnde : Dimenaiona Produit aoua plitn: L 340 X P 340 X H 173mm... -
Page 4: Contenu De L'emballage
Contenu de li’embtlilitge: Une commande Veraion 1 Un spacer ADVENTYS Veraion 2 Le Kit Préctution d’inattlilittion: 1) Veililiez t litiaaer une diattnce entre lie bord du plitn de trtvtili et lie bord du KIT d’tu moina 20mm tinai qu’entre 2 KIT. -
Page 5: Intégration Du Produit
Intégrttion du produit Inattlilittion ptr colilitge N°: Action: N°: Action: N°: Action: Déballage Désolidarisation cadre Séparation cadre Vérifier que le produit correspond Dévisser les vis selon indications. à la vue ci-dessous. N°: Action: N°: Action: N°: Action: Nettoyage du cadre et du support Déposer un cordon de colle sur Plaquer le cadre sur le support de collage... - Page 6 Intégrttion du produit Inattlilittion ptr enctatrement N°: Action: N°: Action: N°: Action: Déballage Effectuer la découpe Installer le kit dans la découpe Vérifier que le produit corresponde 310 x 326 mm à la vue ci-dessous. N°: Action: N°: Action: N°: Action: Recouvrir le kit par le plan de travail 05 Raccordement arriver d'air...
-
Page 7: Intégrttion De Lit Commtnde
Intégrttion de lit commtnde Veraion 1 Clitvier de commtnde 3 touchea : enctatrement tvec ctdre inox Il est nécessaire de réaliser une découpe de 198 x 68 mm dans votre plan de travail. Encastrer votre commande dans la découpe du plan de travail. (Pour une meilleur étanchéité... - Page 8 Intégrttion de lit commtnde Veraion 1 Clitvier de commtnde 4 touchea : monttge en enctatrement Il est nécessaire de réaliser une découpe de 162 x 46 mm dans votre plan de travail. Encastrer votre commande dans le découpe du plan de travail. (Pour une meilleure étanchéité...
- Page 9 Intégrttion de lit commtnde Veraion 1 Clitvier de commtnde 4 touchea : monttge en tffleurement Installation de la commande 4 touches par intégration en affleurement Réalisez ce décaissé dans votre plan de travail...
- Page 10 Raccordement électrique entre la commande et le générateur maître Relier le bandeau de commande à l’appareil maître: le câble clavier d’une longueur de 2m doit relier le bandeau de commande à l’Induc Stone maître. Raccorder les conducteur BLEU/ MARRON sur la borne NEUTRE du réseau secteur.
-
Page 11: Mise En Service
Miae en aervice Air Chaud Air Frais Utiliser un matériau pour le dessus du meuble validé par ADVENTYS Épaisseur du matériau maximum 20mm Identifier le centre du foyer par un dispositif de votre choix. Toujours positionner le spacer entre le dessus et le « chafing dish »... -
Page 12: Première Mise En Route
Appareil exclusivement destiné à être utilisé avec un dispositif permettant une fonction de maintient au chaud d’aliments sous un plan de travail type Granite ou autres (Vtliidéa prétlitbliement ptr ADVENTYS). Pour un fonctionnement optimal, l’utilisateur doit impérativement utilisé le spacer et le positionner... -
Page 13: Utiliser Votre Appareil En Toute Sécurité
Principe de l’induction A la mise en marche de l’appareil, dès qu’un niveau de puissance est sélectionné, les circuits électroniques produisent des courants induits dans le fond du récipient qui restitue inst antanément la chaleur produite aux aliments. La cuisson s’effectue prttiquement atna perte d'énergie avec un rendement énergétique très élevé. -
Page 14: Comment Fonctionne Votre Appareil
Commtnde déportée VERSION 1 Réglitge (-) On/Off Réglitge (+) Dimensions encastrement commande : 198x68mm ise en marche de l’appareil Appuyer sur la touche MARCHE / ARRET pour mettre en route le produit. La valeur "0" s'affiche sur l'afficheur indicateur du niveau de puissance ou de température. Aucune puissance n'est en- core envoyée à... - Page 15 Commtnde déportée Mise en marche de l’appareil Appuyer sur la touche MARCHE / ARRET pour mettre en route le produit. La valeur "0" s'affiche sur l'afficheur indicateur du niveau de puissance ou de température. Aucune puissance n'est encore envoyée à ce stade. Appuyer ensuite sur une des touches (+) Niveau, afin d'envoyer la puissance dans la casserole.
- Page 16 Réglage de la température Loraqu’une ctaaerolie compttiblie tvec lit technoliogie induction eat poaée aur lie foyer, l’afficheur indique de manière permanente le niveau de réglage. Le niveau affiché est niveau de température compris entre 1 et 20. Il est à tout moment possible d’appuyer sur les touches (+) ou (-) NIVEAU pour augmenter ou diminuer le niveau de réglage température.
-
Page 17: Casserolerie Recommandée
Votre tpptreili de cuiaaon à induction eat ctptblie • Récipienta en inox adaptés à l’induction. de reconntître lit pliuptrt dea récipienta. La plupart des récipients inox conviennent s’ils répondent au test récipient. Teat récipient : poser votre récipient sur le foyer de cuisson et positionner un niveau de température : •... -
Page 18: Comment Préserver Et Entretenir Votre Appareil
Comment préaerver et entretenir votre tpptreili Nettoyer environ toutes les semaines à l'eau savonneuse lie filitre placé sous votre appareil (ou au lave- vaisselle). Le remettre bien sec avant toute nouvelle utilisation. Ce filtre protège votre appareil des poussières et des graisses. Votre appareil se nettoie facilement, pour vous aider voici quelques conseils : TYPES DE SALISSURES COMMENT PROCEDER... -
Page 19: Petites Pannes Et Remèdes
Petitea ptnnea et remèdea Voua tvez un doute aur lie bon fonctionnement de votre tpptreili ignifie pas panne. liea cta, vérifiez liea pointa auivtnta : VOUS CONSTATEZ QUE … LES CAUSES POSSIBLES QUE FAUT-IL FAIRE ? A lit miae en aervice un affichage Fonctionnement normal. -
Page 20: Garantie
Gtrtntie Pour bénéficier de la garantie sur votre table, n’oubliez pas de garder une preuve de la date d’achat. Toute modification ou intervention de type perçage, soudage, sertissage, clinchage, etc., n'est pas autorisée et entraînera la perte de la garantie constructeur. Toute intervention ayant pour origine une installation ou une utilisation non conforme aux prescriptions de cette notice ne sera pas acceptée au titre de la garantie constructeur et celle-ci sera définitivement suspendue. - Page 21 Uaer’a guide For your induction hob Dear Customer, We would like to congratulate you on the purchase of your ADVENTYS product. This one has been manufactured according to the very latest developments, using modern, safe electrical and electronic components. Please take the time to read this user’s guide before using this appliance.
- Page 22 Contenta Technical information Declaration of Compliance Content of packaging Precaution of installation Product integration 25-26 Control panel integration 27-30 First used 31-32 Using your hob safety Operating instruction 34-36 Cookware recomended How to maintain and care for your hob 37-38 Small problems and their remedies Garantee Throughout this guide: this simbol...
- Page 23 Technictli apecificttiona Z1IC UC STONE / INDUC-STONE Modeli: Ntme: Keep warm Integrated induction hob Mttéritlia: Stainless steel and EZ Power: 650W Eliectricity auppliy: single phase 230V +/-10% 50Hz Current: 3A Max Controlia 4 Capacitive touches and timer Dimenaiona of tppliitnce integrtted W 340 X D 340 X H 173 mm Dimenaiona of tppliitnce buit-in W 376 X D 376 X H 173 mm...
- Page 24 Contenta of the ptcktging: Control panel Veraion 1 Veraion 2 One ADVENTYS spacer Induction Kit Prectution of inattlilittion: 1) Stty up hta to lietve t diattnce between the edge of the counter top tnd the edge of the KIT of tt lietat 20mm ta welili ta between 2 KITS.
- Page 25 Product Integrttion Inattlilittion by gliuing N°: Action: N°: Action: N°: Action: Unpacking Uncoupling frame Separate the frame Check that the product matches the Unscrew the screws according to indications. product below N°: Action: N°: Action: N°: Action: Cleaning of the frame and the support Apply silicone - glue along frame Stick the frame on the support By resting strongly to crush the glue...
- Page 26 Product Integrttion Inattlilittion by embedding N°: Action: N°: Action: N°: Action: Unpacking realize a cut in dimensions Install the kit in the cut Check that the product matches the 310 x 326 mm product below N°: Action: N°: Action: N°: Action: Cover the kit by the work plan Air supply connection...
- Page 27 Controli ptneli inattlilittion Veraion 1 3 touchea controli ptneli with attinlieaa ateeli frtme : Option 1 : Builit-in integrttion : Realize a cut out of : 162 x 46 mm and put directly the control into the cut out. Drop your remote control into the counter. (To improve the waterproofness, it is recommended to add a silicone joint under the glass).
- Page 28 Controli ptneli inattlilittion Veraion 2 4 touchea controli ptneli - Builit-in integrttion Il est nécessaire de réaliser une découpe de 162 x 46 mm dans votre plan de travail. Drop your remote control into the counter. (To improve the waterproofness, it is recommended to add a silicone joint under the glass).
- Page 29 Controli ptneli inattlilittion Veraion 1 4 touchea controli ptneli - Integrtted inattlilittion Realize a cut out of : 176 x 62mm. You will have to create a fixation between the control and your struc-ture. Depth 62 mm. Add the ailiicone aetli ta on the drtwing: Siliicone aetli...
- Page 30 Electrical connection between the control panel and the master generetor Connect the control panel to the master device: the key- board cable, 2m long, must connect the control panel to the master Induc Stone. Connect the BLUE/ BROWN wire on NEUTRAL of the electric socket.
- Page 31 Firat uaed Hot air fresh air Use a material for the top of the work plan validated by ADVENTYS Material thickness maximum 20mm Identify the center of the home by a device of your choice. Always position the spacer between the top and the " chafing dish "...
- Page 32 Appliance exclusively for use with a device function keeps warm food under a worktop Granite or other types (Validated by ADVENTYS previously). The user owes necessarily used the spacer and to position him between the element to be warmed and...
- Page 33 The induction principle After the appliance is switched on and a power level is se- lected, electronic circuits produce induced currents in the base of the pan which instantly transmits the heat produced to the foodstuffs. Cooking takes place with prtctictliliy no energy lioaa with a very high energy output.
- Page 34 Remote controls Setting (-) VERSION 1 On/Off Setting (+) Control panel cut out dimensions: 198x68mm Switch On the device Press the « ON/OFF » touch to switch on the device. The value « 0 » displays on the indicator of power. Still no power is sent at that point. Press either the LEVEL touches (+) to send power to the pan.
- Page 35 VERSION 2 Switch On the device Press the « ON/OFF » touch to switch on the device. The value « 0 » displays on the indi-cator of power. Still no power is sent at that point. Press either the LEVEL touches (+) to send power to the pan. The power display indicates the temperature level set into the pan.
- Page 36 Temperature setting Place an induction-friendly pan on the spacer to start using the product. The indicates the level of regulation. Make sure the pan is not empty. If the spacer is not used the product didn’t work well and the temperature could be false.
- Page 37 Your induction hob ia tblie to recognize the • tliuminium ptna with apecitli btaea. mtjority of ptna tnd recipienta. Teating t ptn: place the pan on the cooking • NOTE zone with a temperature level set : if indicttor Pans made from glass, ceramic material, clay, attya on, your pan is compttiblie, if it fltahea, aluminium (without special pan base), and your pan hta not been recogniaed tnd ctnnot be...
- Page 38 How to mtinttin tnd ctre for your hob Clean approximately every week with soapy water the filter placed under your device (or put it in the dishwasher). Put it back very dry before any use. This filter protects your device from dust and fats. Your device ia clietned etailiy, to helip you, here ia aome tdvice: Type of apota How to proceed...
- Page 39 Smtlili probliema tnd their remediea If you think thtt your hob ia not functioning correctliy ..this does not necessarily mean that a fault has occurred. Pli e tae verify the foliliowing in tlili ctaea : YOU NOTICE THAT ... POSSIBLE CAUSES WHAT YOU CAN DO When putting into service, a bright...
- Page 40 Any modification such as drilling, welding, criimping, clinching, etc., is not permitted and is not covered by the manufacturer’s warrenty. Any wrong modification or installation, which does not respect ADVENTYS’ standards, is not covered by the manufacturer’s warranty and will be permanently suspended.
Need help?
Do you have a question about the INDUC STONE and is the answer not in the manual?
Questions and answers