
Related Manuals for Ancona B428


Summary of Contents for Ancona B428
- Page 1 MODEL B428 28 in. IMPORTANT SAFETY INSTRUCTIONS Carefully read the following important information regarding installation safety and maintenance. Keep these instructions for future reference. 8/12/201 MAAN-1305-0...
-
Page 2: Important Safety Notice
IMPORTANT SAFETY NOTICE READ AND SAVE THESE INSTRUCTIONS READ ALL INSTRUCTIONS BEFORE INSTALLING AND OPERATING THIS APPLIANCE The installation in this manual is intended for qualified installers, service technicians or persons ● with similar qualified background. Installation and electrical wiring must be done by qualified professionals and in accordance with all applicable codes and standards, including fire-rated construction. - Page 4 Vent/Damper Mounting Screws Vent/Damper Mounting Screws (4pcs)
-
Page 5: Venting Requirements
VENTING REQUIREMENTS: HEIGHT & CLEARANCE: ent system m st terminate to the o tside oof or side wall . O NO terminate the vent system in an attic or other enclosed area. O NO cm la ndry-type wall caps. se metal al min m vent only. igid metal al min m vent is recommended. - Page 10 Installations ( refer to Page 4 for parts): NOTE: Use threaded drywall anchors only when mounting the hood on sheet rock. Mounting the hood on wall studs or lumbars is highly recommended. For consumer safety reasons, mounting screws and anchors have not been supplied with this range hood.
-
Page 11: Safety Warning
INSTALLATION: Step 4: Installing the hood • • Step 5: Venting • • • SAFETY WARNING: Risk of electrical shock. This range hood must be properly grounded. Make sure this is done by a qualified electrician in accordance with all applicable national and local electrical codes. - Page 12 INSTALLATION: Step 6: Finishing installation To install the filters follow the following steps...
-
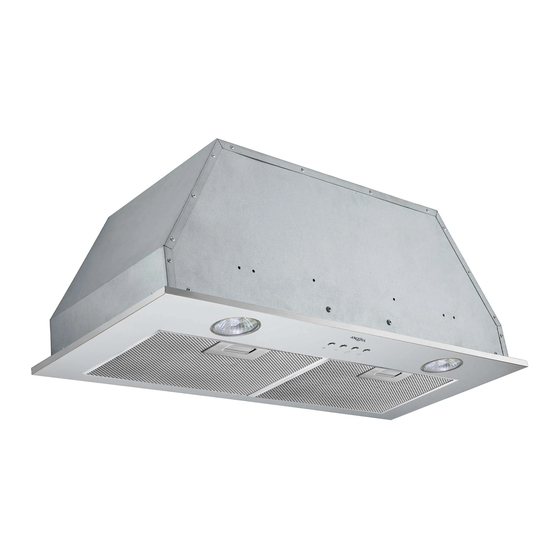
Page 13: Control Panel Operation
CONTROL PANEL OPERATION: Volume Volume Timer Light down... - Page 14 Fig #6 Metal racket ocket Lightbulb Fig #7 2 ntryway Socket for bulb prongs Bulb with prongs This range hood uses halogen bulbs: 20W 120V Type GU-10 Steps to change the light bulbs: Removing old lightbulbs • Make sure the range hood is unplugged or turn OFF the electrical breaker. Remove the two aluminum mesh filters. •...
- Page 15 MEASUREMENTS AND DIAGRAMS:...
-
Page 16: Troubleshooting
TROUBLE SHOOTING: 1) If the range hood or halogen light does not heck if the range hood has been pl gged in operate after installation: make sure that all power has been turned back ON,fused not blown and all electrical wiring are properly connected. -
Page 18: Specifications
SPECIFICATIONS: Body Design Stainless Steel 120V / 60Hz (USA & Canada standard) cULus certified Power Rating General Input Power 250 W Motor Input Power 210 W Ampere 2.2 A Levels Of Speed Control 3 Levels Airflow (L/M/H) 420 CFM Noise Level (L/M/H) Number Of Motors Single Motor Motor Type... - Page 19 Grid Motor Blower Impeller...
- Page 20 USE AND CARE INFORMATION: Operations: • Read and understand all instructions and warnings in this anual before operating the appliance Save these instructions for future reference • Always leave safety grills and filters in place Without these co ponents, operating fans could catch on to hair, fingers and loose clothing •...
Need help?
Do you have a question about the B428 and is the answer not in the manual?
Questions and answers