Table of Contents
Advertisement
Quick Links
Advertisement
Table of Contents

Related Manuals for 2Wire HomePortal 1000HW


Summary of Contents for 2Wire HomePortal 1000HW
- Page 1 I n s t a l l a t i o n G u i d e f o r M o d e l 1 0 0 0 S W...
- Page 2 OR OTHER INFORMATION CONTAINED HEREIN OR THE USE THEREOF. 2Wire, Inc. reserves the right to make any modification to this manual or the information contained herein at any time without notice. The software described herein is governed by the terms of a separate user license agreement.
-
Page 3: Table Of Contents
Install the 2Wire Gateway USB driver — Windows PC ....... . - Page 4 2Wire Wireless USB Adapter ........
-
Page 5: Networking Technology Overview
Networking Technology Overview A home network consists of two or more computers that have been connected so they can “talk” with each other. Individual users can now connect to Web servers worldwide through the Internet, a global computer network. A home network enables computer users in a household to share one Internet connection, share files without trading disks, and share peripherals such as printers and external drives. -
Page 6: Wireless
(Ethernet, HomePNA, or USB) network. HomePortal The 2Wire HomePortal residential gateway makes it possible to create a home network using any of the above technologies. By enabling you to connect the computers in your home, the HomePortal provides you with all the benefits of networking, including the ability to share one Internet connection among all the computers and computer users in your household. -
Page 7: Step 1: Getting Started
Internet sharing and security capabilities. For more information on the HomePortal firewall, see Technical Support at www.2Wire.com. If you have any of the following (or similar) applications installed on your computers, remove or disable them according to the manufacturer’s instructions before proceeding. -
Page 8: Step 2: Connect Your First Computer To The Homeportal
Requires: A computer with an 802.11b wireless network adapter installed.* Wireless adapters are purchased separately from the HomePortal. * If you use a 2Wire wireless adapter (PC card or USB adapter) for wireless networking, the HomePortal Setup Wizard software automatically configures it to communicate with the HomePortal during setup, but you will need to install a driver. -
Page 9: Ethernet Connection
Ethernet Connection Requires a computer with an Ethernet port Connect the provided AC power adapter from the HomePortal’s port to an electrical outlet. POWER The green light on the front of the HomePortal should come on. POWER Connect the provided with the HomePortal from the port on the yellow Ethernet cable ETHERNET... -
Page 10: Usb Connection
USB Connection Requires a computer with an available USB port. See note below for exceptions. Note: Only one Windows or Macintosh computer can be directly connected to the HomePortal using the USB connection. HomePortal USB connectivity is NOT available for Macintosh OS earlier than 8.6, Mac OS 10.0, Mac OS 10.1, Windows 95, Window 95 OSR2, or Windows NT. -
Page 11: Install The 2Wire Gateway Usb Driver - Windows Pc
Install the 2Wire Gateway USB driver — Windows PC Before installing your HomePortal software, you must install the 2Wire Gateway USB driver on your computer. The following screens show the installation under Windows XP and may vary somewhat on Windows 98, Windows ME, and Windows 2000. -
Page 12: Install The 2Wire Gateway Usb Driver - Macintosh
Install the 2Wire Gateway USB driver — Macintosh Before installing your HomePortal software, you must install the 2Wire Gateway USB driver on your computer. The following screens show the installation under Macintosh OS 10.2 and may vary somewhat on Macintosh OS 8.6 to 9.X. -
Page 13: Check Your Connections
Verify that is selected Ethernet Adaptor (en1) in the Show field. If it is not, select it from the pull-down menu. When the New Port Detected message displays, click Click to complete your installation. Save Note: Your Macintosh computer automatically assigns the name "(en1)" to the HomePortal USB port. If your computer has more than one Ethernet-type network device installed, the USB port may be named "(en2)"... -
Page 14: Home Phoneline Networking (Homepna) Connection
HomePNA. If your computer does not have a HomePNA port, you will need to install a PCI HomePNA adapter or an external HomePNA adapter. The HomePNA adapter shown above is a 2Wire PC Port Phoneline Adapter. Connect the provided AC power adapter from the HomePortal’s port to an electrical outlet. -
Page 15: Network With Ethernet Hub Or Switch
Network with Ethernet Hub or Switch Requires an Ethernet hub or switch and a computer with an Ethernet port Note: The HomePortal has an auto-crossover port. You do not need to use a special crossover cable or make any changes to the configuration of your HomePortal, Ethernet hub, or switch. The HomePortal will establish the type of port needed during setup. -
Page 16: Wireless Connection
See Appendix A for detailed installation instructions. If you are NOT using a 2Wire wireless adapter, you will need to manually configure your adapter of choice to communicate with the HomePortal BEFORE installing the HomePortal software. See Appendix B for detailed configuration instructions. -
Page 17: Step 3: Install The Homeportal Software
Step Install the HomePortal Software Before installing the HomePortal software, it is very important that you disable any conflicting applications such as firewall and file- and printer-sharing applications See Step 1, “Getting Started.” Installing the HomePortal Setup Wizard on Windows PCs Note: Close all programs before running the HomePortal Setup Wizard. -
Page 18: Installing The Homeportal Setup Wizard On Macintosh Computers
Note: Close all programs before running the HomePortal Setup Wizard. Place the HomePortal Setup Wizard CD in the CD-ROM drive of your computer. Double-click on the 2Wire icon. Double-click the 2Wire install icon and click Continue Click to copy the HomePortal software to a folder called... -
Page 19: Step 4: Add Computers To The Network
Requires a computer with an 802.11b wireless network adapter installed.* Wireless adapters are purchased separately from the HomePortal. * If you use a 2Wire wireless adapter (PC card or USB adapter) for wireless networking, the HomePortal Setup Wizard software automatically configures it to communicate with the HomePortal during setup, but you will need to install the driver. -
Page 20: Usb Connection
USB Connection Requires a computer with an available USB port. See note below for exceptions. Note: Only one Windows or Macintosh computer can be directly connected to the HomePortal using the USB connection. HomePortal USB connectivity is NOT available for Macintosh OS earlier than 8.6, Mac OS 10.0, Mac OS 10.1, Windows 95, Window 95 OSR2, or Windows NT. -
Page 21: Home Phoneline Networking (Homepna) Connection
HomePNA network adapters can be found in the individual adapter package (if purchased separately) or on your HomePortal Setup Wizard CD (if included with your HomePortal). The HomePNA adapter shown in this example is a 2Wire PC Port Phoneline Adapter. Install the HomePNA adapter according to the manufacturer’s instructions. -
Page 22: Wireless Connection
See Appendix A for detailed installation instructions. If you are NOT using a 2Wire wireless adapter, you will need to manually configure your adapter of choice to communicate with the HomePortal BEFORE installing the HomePortal software. See Appendix B for detailed configuration instructions. -
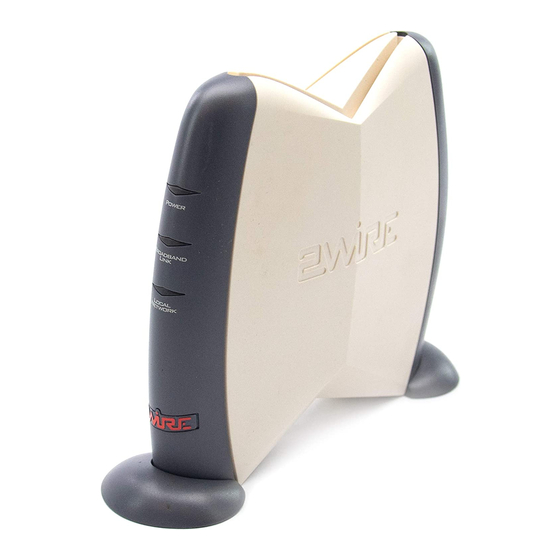
Page 23: The Homeportal Indicator Lights
The HomePortal Indicator Lights HomePortal indicator and status lights The HomePortal has three indicator lights that can be used to diagnose installation and connection problems. The following tables describe how to interpret the , and POWER BROADBAND LINK LOCAL lights. NETWORK Power light Operating state... -
Page 24: Diagnosing Connection Problems
If the problem you are having is not covered here or in the 2Wire online Help system, or if the suggestions provided do not solve the problem, call the Technical Support number provided with your HomePortal. -
Page 25: Appendix A: 2Wire Wireless Adapter Installation
2Wire Wireless Adapter Installation 2Wire Wireless PC Card The Wireless PC Card is a wireless network card that fits into any standard PC Card Type II slot. A standard Ethernet card requires a cable connection to a hub or a patch panel. Using the Wireless PC Card, you have the same connectivity without the wires. -
Page 26: 2Wire Wireless Usb Adapter
2Wire Wireless USB Adapter The Wireless USB Adapter is a wireless networking device that is connected to a USB port on your computer using a USB cable. Using the Wireless USB Adapter, you can communicate with one or more computers that are equipped with wireless adapters. Where a standard Ethernet card requires a cable connection to a hub or a patch panel, wireless networking provides the same connectivity without the wires. -
Page 27: Wireless Adapter Driver Installation
Wireless Adapter Driver Installation Installing Drivers For Windows 98SE Power on your computer. The Add New Hardware Wizard opens. Click Next continue. When the next window opens, select Search for a better driver for your device , and click (Recommended) Next Insert the HomePortal Setup Wizard CD into your CD-ROM drive, uncheck... -
Page 28: Installing Drivers For Windows Me
Windows locates the best driver for your device. Click to continue. Next After the drivers are copied, click Finish When the System Setting Change window opens, click to reboot your computer and complete the installation. Installing Drivers For Windows ME Power on your computer and insert the HomePortal Setup Wizard CD into your CD- ROM drive. -
Page 29: Installing Drivers For Windows 2000
After the driver files are copied, click Finish When the System Settings Change window opens, click to reboot your computer and complete the installation. Installing Drivers For Windows 2000 Power on your computer and insert the HomePortal Setup Wizard CD into your CD- ROM drive. - Page 30 When the Locate Driver Files window opens, deselect the checkbox, Floppy disk drives select the checkbox, and click CD-ROM Next When the Driver Files Search Results window opens, click Next Click to complete the installation. Finish...
-
Page 31: Installing Drivers For Windows Xp
Installing Drivers For Windows XP Power on your computer and insert the HomePortal Setup Wizard CD into your CD-ROM drive. When the Found New Hardware Wizard window opens, select Install the software and click automatically (Recommended) to continue. Next The drivers are installed. Click to complete the installation. -
Page 32: Appendix B: Third-Party Wireless Adapter Configuration
Appendix Third-party Wireless Adapter Configuration After your 802.11b wireless adapter is installed in your computer, you must configure it to communicate with the HomePortal. This section describes how to configure a variety of third-party wireless Ethernet (IEEE 802.11b) adapters to operate with the HomePortal: Agere ORiNOCO PC Card - Silver or Gold Page 29 Cisco Aironet 340 Series 11Mbps Wireless LAN Adapter... -
Page 33: Agere Orinoco Pc Card - Silver Or Gold
Agere ORiNOCO PC Card - Silver or Gold Consult the documentation provided with your wireless adapter to install the Agere ORiNOCO PC Card - Silver or Gold, then follow these steps: From the Start menu, select Programs > ORiNOCO > Client Manager The ORiNOCO Client Manager screen appears. - Page 34 Configuration screen appears. In the Network Name field, enter the word “ ” followed by the last three digits of 2WIRE your HomePortal serial number, located on the bottom of your HomePortal. This is the Wireless Network Name. The Wireless Network Name is case-sensitive, so it is important that you enter the word “...
-
Page 35: Cisco Aironet
In the TCP/IP Behavior field, check the Renew checkbox. IP Address when selecting this profile Click . The following screen appears. Finish Click Cisco Aironet Consult the documentation provided with your wireless adapter to install the Cisco Aironet adapter, then follow these steps: Double-click the Aironet Client Utility icon on your desktop. - Page 36 Name field, enter a client name. The client name identifies your PC. In the SSID1 field, enter the word “ ” 2WIRE followed by the last three digits of your HomePortal serial number. This is the Wireless Network Name. The Wireless Network Name is case-sensitive, so it is important that you enter the word “...
-
Page 37: D-Link Air Dwl-650
Click . The Profile Manager screen appears. Your profile name should now appear in the second line of the Profile Management field, indicating that your Cisco adapter is properly configured. Click D-Link Air DWL-650 Consult the documentation provided with your wireless adapter to install the D-Link Air DWL-650, then follow these steps: From the Start menu, select Programs >... - Page 38 In the Mode field, enter Infrastructure In the SSID field, enter the word “ ” 2WIRE followed by the last three digits of your HomePortal serial number. This is the Wireless Network Name. The Wireless Network Name is case-sensitive, so it is important that you enter the word “...
-
Page 39: Apple Airport Card
In the AirPort Network panel, click the Choose pull-down menu. Network Select your wireless network name. Your wireless network name is “ ” followed by 2WIRE the last three digits of your HomePortal serial number, located on the bottom of your HomePortal. -
Page 40: Other Wireless Ethernet Adapters
Set the wireless network name. The wireless network name of your HomePortal is in all capital 2WIRE letters, followed by the last three digit of the HomePortal serial number located on the bottom of your HomePortal. For example, if the last three digits of your HomePortal serial number are 102, your HomePortal network name would be 2WIRE102. - Page 41 Available networks your wireless access point. The wireless access point displays as “ in all capital letters, 2WIRE” followed by the last three digits of the HomePortal serial number (located on the bottom of your HomePortal). In the...
-
Page 42: Declaration Of Conformity
If trouble is experienced with this equipment, please contact the store, reseller, or agent from whom the product was purchased. Repair of this equipment should be made only by the 2Wire Service Center or a 2Wire authorized agent. -
Page 43: Limited Hardware Warranty
Return the product to the place of purchase. If 2Wire Customer Support determines that the product may be defective, they will issue you an RMA number to place on the outer package of the product. 2Wire cannot accept any product without an RMA number on the package. - Page 44 5100-000178-001 Rev A...
Need help?
Do you have a question about the HomePortal 1000HW and is the answer not in the manual?
Questions and answers