Table of Contents
Advertisement
Quick Links
Advertisement
Table of Contents

Related Manuals for Fly Products MAX 100


Summary of Contents for Fly Products MAX 100
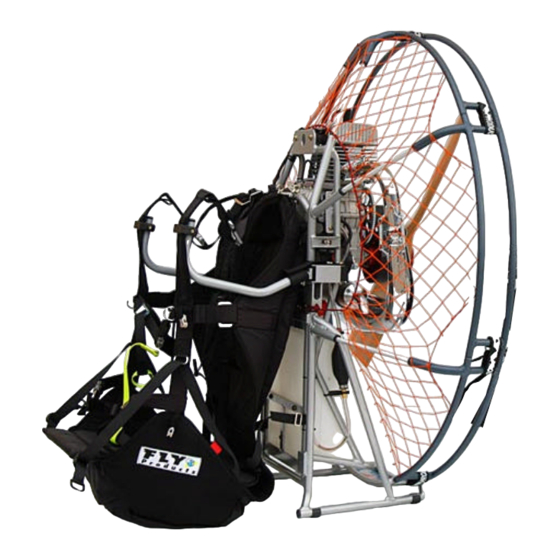
- Page 1 MAX 100 and MAX 130...
- Page 2 Chapter Description INTRODUCTION GENERAL INFORMATION UNPACKING AND ASSEMBLING YOUR “MAX” PREPARING YOUR FIRST FLIGHT FLYING YOUR NEW “MAX” OPTIONAL ACCESSORIES PACKING YOUR “MAX” FOR TRAVEL MAINTENANCE TROUBLESHOOTING SPECIFICATION AND PERFORMANCE 10.0 MISCELLANEOUS ___________________________________________________________________________ FLY Products © Copyright di s.r.l. Pagina...
-
Page 3: Introduction And General Information
WARNING provides supplemental information to help clarify an area where personal injury or death could occur from negligence. Disregarding a warning” could result in serious injury or death. ___________________________________________________________________________ FLY Products © Copyright di s.r.l. Pagina... - Page 4 VER . 2.0 Features of your new "MAX" MAX is Fly Products latest design built for easy and compact transportation using a new fully detachable frame. With a new cage construction, incorporating a simple to use attachment method, the Max is truly compact.
-
Page 5: Frame Assembly
VER . 2.0 UNPACKING AND ASSEMBLING “MAX” Frame assembly Frame assembly and disassembly is very fast and easy. The outer frame consists of six parts, and they are held together by the velcro straps. ___________________________________________________________________________ FLY Products © Copyright di s.r.l. Pagina... - Page 6 For an easy and correct assembly proceed in the following order: Hold down the lower base frame with a foot and let the engine’s frame descend into the four inserts Base connection Assembling outer frames ___________________________________________________________________________ FLY Products © Copyright di s.r.l. Pagina...
- Page 7 Mount the cage into the upper supports Upper side connection Attach the velcro straps. Once the frame is properly connected, it is best to immediately attach the velcro straps NOTE! When finished, check all velcro straps Attachments. ___________________________________________________________________________ FLY Products © Copyright di s.r.l. Pagina...
-
Page 8: Harness Mounting
CAUTION – Close the carabiners immediately in order to avoid forgetting them later. Insert the two distance bars into their frame seats ___________________________________________________________________________ FLY Products © Copyright di s.r.l. Pagina... - Page 9 Next, attach the two bottom harness straps Fasten these belts securely as shown in close up detail. Do this for the left and right sides. Leave these straps at their loosest setting for now, we’ll adjust them later. ___________________________________________________________________________ FLY Products © Copyright di s.r.l. Pagina...
- Page 10 LATERAL MOVEMENT OF DISTANCE BARS. The distance bars allow a lateral movement which is useful for the pilot to enter easily into the harness. Low connections ___________________________________________________________________________ FLY Products © Copyright di s.r.l. Pagina...
- Page 11 MAX OWNER’S MANUAL VER . 2.0 ___________________________________________________________________________ FLY Products © Copyright di s.r.l. Pagina...
- Page 12 MAX OWNER’S MANUAL VER . 2.0 Fitting of the air box on the Max 100 ___________________________________________________________________________ FLY Products © Copyright di s.r.l. Pagina...
-
Page 13: Prop Mounting
A more practical “field method” of torquing is to tighten the bolts snuggly and evenly, but not enough to begin to crush the wood of the prop. mounting the prop, the red arrow indicate the direction of propeller rotation. ___________________________________________________________________________ FLY Products © Copyright di s.r.l. Pagina... -
Page 14: Spark Plug
FLIGHT Fuel and Oil FLY PRODUCTS recommends the use of a premium unleaded automotive gasoline of 92 octane or higher, and the use of premium synthetic 2-cycle oil. Mix fresh gas and oil before each flying session. Store your fuel/oil mixture in an approved, sealed container. Dispose of fuel/oil mixture that is older than 72 hours. -
Page 15: Before Starting The Engine
Not only can it severely injure you or bystanders, even small items like dirt can inflict significant damage to the prop Starting and stopping engine Stopping the engine Before of proceed it's better to learn the function of the handgrip : ___________________________________________________________________________ FLY Products © Copyright di s.r.l. Pagina... - Page 16 Now that we’ve covered stopping the motor, let’s start the engine! Lower down the lever of choke. Pump the mixture through the appropriate manual blower until complete filling of the tank, carburetor ___________________________________________________________________________ FLY Products © Copyright di s.r.l. Pagina...
- Page 17 It's very important that immediately after landing, or when the equipment is not in use on the ground, to turn the secure key to the OFF position to avoid an accidental starting of the engine with unpredictable results! ___________________________________________________________________________ FLY Products © Copyright di s.r.l. Pagina...
-
Page 18: Carburetor Adjusting
No damage is done if the setting is too rich. Therefore, when in doubt, it is better to have carburation, at the maximum rpm, somewhat more on the rich side. ___________________________________________________________________________ FLY Products © Copyright di s.r.l. -
Page 19: Engine Break-In
For heavier pilots that require more Power to fly, it is recommended that 1 hour of non- flying break- in be completed before flying. Break- in is complete after 10 liters of fuel have been run through the engine. ___________________________________________________________________________ FLY Products © Copyright di s.r.l. Pagina... -
Page 20: Preflight Inspection
The following checklists are provided only as EXAMPLES. It is recommended to produce one tailored to your own needs, print it and laminate it, and carry it with you. Pre-Flight Checklist Example 1 ___________________________________________________________________________ FLY Products © Copyright di s.r.l. Pagina... - Page 21 Startup and Launch Brake lines/risers held correctly, no tangles Kickbar tucked out of way Engine run-up to correct RPM Kill switch working (briefly push) Look UP during run! Pre-Flight Checklist Example 2 ___________________________________________________________________________ FLY Products © Copyright di s.r.l. Pagina...
-
Page 22: Flights Under Special Conditions
FULL POWER CHECK, IDLE OK WIND, CHECK FOR CHANGE CHECK TRAFFIC CLEAR Flights under special conditions RAIN: In principle no flights under rainy conditions should become necessary. Anyway, every pilot may get ___________________________________________________________________________ FLY Products © Copyright di s.r.l. Pagina... -
Page 23: Dangerous Situation
If the brakes are held down, the canopy comes up over the pilot again. - Recovery Fully release the brakes within 3 seconds. If you release the brakes too slowly, the paraglider may spin. The spin stops automatically when the brakes are released completely ___________________________________________________________________________ FLY Products © Copyright di s.r.l. Pagina... -
Page 24: Optional Accessories
(front, left or right side), etc. For this reason, FLY PRODUCTS cannot make a generalized statement of what the best mounting configuration is for you. It is highly recommend that you seek assistance from your PPG instruc tor on the mounting of your reserve parachute. -
Page 25: Maintenance
Remove the cage in the inverse order as described before MAINTENANCE Periodic maintenance is required in order to keep your MAX in top operating condition. The following chart provides the suggested maintenance schedule. ___________________________________________________________________________ FLY Products © Copyright di s.r.l. Pagina... -
Page 26: Regular Checks Obligation
Remember… …that YOU are ultimately responsible for your motor and it’s proper care, FLY PRODUCTS and it’s dealers assume NO responsibility for any engine problem resulting from improper use! Before leaving the factory each motor has been tested for up to 30 minutes to insure that it is in proper running order and all FLY PRODUCTS units are guaranteed up to six months after purchase. -
Page 27: Maintenance Overview
Make a note on this summary table of all maintenance operation f o r a detailed maintenance overview refer. Operation Date check Inspector Remarks time (h) Operation Date Check Inspector Remarks time (h) ___________________________________________________________________________ FLY Products © Copyright di s.r.l. Pagina... - Page 28 Clean your MAX with clean water and a mild soap. Dust and dirt can be brushed off, or removed with water and mild soap. Grease and oil can be removed with a good water-based degreaser such as “Simple Green”. ___________________________________________________________________________ FLY Products © Copyright di s.r.l. Pagina...
-
Page 29: Prop Care
Repairs Minor repairs can be performed on the prop, cage, cage guard, and harness. Major repairs should be performed by a trained service technician, or by FLY PRODUCTS. Caution! Repairs to the harness or any stress-carrying areas of the MAX should only be performed by a certified parachute rigger. -
Page 30: Reduction Belt
? Clean the cage, harness, etc. so that it is free from dirt and/or oil. ? Cover the machine with a sheet or light cloth. ? Store in a clean, dry place ___________________________________________________________________________ FLY Products © Copyright di s.r.l. Pagina... -
Page 31: Diagnosing And Starting A Flooded Engine
Do not use a flooded engine procedure whereby you hold the throttle wide-open and then attempt to start the engine. If the engine were to start, the prop would rapidly spin to full RPM and damage or injury would most likely occur! Troubleshooting Chart ___________________________________________________________________________ FLY Products © Copyright di s.r.l. Pagina... - Page 32 Incorrect Idle Mixture adjustment See section 3.1 to run Prop out of balance See section 2.3 Excessive Check and tighten engine Vibration Loose fasteners mounting bolts, muffler bolts, prop bolts, etc. ___________________________________________________________________________ FLY Products © Copyright di s.r.l. Pagina...
-
Page 33: Specification And Performance Summary Chart
2-4 m/s with a DHV ½ wing Frame Aluminium, aircraft tubing Harness Rip-stop nylon Dry Weight 28 kg Fuel Tank Capacity 16 liters Estimated fuel duration 4-5 hours, with a 150lb pilot Maximum Pilot weight 180kg ___________________________________________________________________________ FLY Products © Copyright di s.r.l. Pagina... -
Page 34: Torque Specification Chart
Cylinder head bolts ( M8 ) Magnet fixing nut ( M12 ) Reduction cam locking screw ( M8 ) Primary pulley locking screw ( M12 ) Exhaust bolts ( M8 ) Propeller bolts ( M6 ) ___________________________________________________________________________ FLY Products © Copyright di s.r.l. Pagina... -
Page 35: Electric System
MAX OWNER’S MANUAL VER . 2.0 Electric system Following table shows the KOMPRESS ‘s electric connections ___________________________________________________________________________ FLY Products © Copyright di s.r.l. Pagina... - Page 36 MAX OWNER’S MANUAL VER . 2.0 Electric connections table - 12V. battery - Electric starter ___________________________________________________________________________ FLY Products © Copyright di s.r.l. Pagina...
-
Page 37: Obtaining Repair Parts
MAX OWNER’S MANUAL VER . 2.0 – Main switch - Relay – Battery charger – Handgrip plug – Stator - Low fuel level float - Spark coil 10.0 MISCELLANEOUS Obtaining Repair Parts ___________________________________________________________________________ FLY Products © Copyright di s.r.l. Pagina... - Page 38 MAX OWNER’S MANUAL VER . 2.0 To obtain repairs parts for your machine, call your FLY PRODUCTS local dealer or FLY PRODUCTS directly. ___________________________________________________________________________ FLY Products © Copyright di s.r.l. Pagina...
- Page 39 G24-17A Carburator fitting G24-46 Complete piston G24-17B Air filter fitting G24-46A Piston rings set G24-20 Header with ring-screw G24-47 Stator and flywheel G24-21 Laminar pack G24-50 Stator support G24-23 Electric starter G24-51 Pinion gear ___________________________________________________________________________ FLY Products © Copyright di s.r.l. Pagina...
-
Page 40: Warranty
VER . 2.0 Warranty FLY PRODUCTS will warrant their product to be free from defects in materials and workmanship for a period of six (12) months from the date of purchase. This warranty applies to the product in normal usage situations only. The dealer, from whom you purchased the product, or FLY PRODUCTS, will repair the product free-of-charge. - Page 41 MAX OWNER’S MANUAL VER . 2.0 ___________________________________________________________________________ FLY Products © Copyright di s.r.l. Pagina...
- Page 42 Internet info and upgrade www.flyproducts.com For information, more details and news see our internet site: www.dulv.de For safety information , data and rules you can visit the DULV website: FLY Products © s.r.l. Copyright by Via Perù 30 63013 GROTTAMMARE (AP) - ITALY tel./fax +39.735.632486...
Need help?
Do you have a question about the MAX 100 and is the answer not in the manual?
Questions and answers