Table of Contents
Advertisement
Quick Links
Advertisement
Table of Contents

Related Manuals for Digitus DC-71301


Summary of Contents for Digitus DC-71301
- Page 1 LCD KVM SWITCH DC-71301 / DC-71302 / DC-71401 USER MANUAL - 1 -...
-
Page 2: Lcd Monitor Specifications
LCD MONITOR SPECIFICATIONS Size 15 inch Screen Type Contrast 500:1 Brightness 250 cd/m View Angle 130° Resolution 1024x768@75Hz Response Time 12 ms Display Color 16.2 M OPERATION Keypad Define Power key: Use this key to turn on or off the LCD monitor. Menu key: Use this key to open the OSD menu or to return to a previous menu or to exit the OSD menu. - Page 3 OSD Control Function List 1. Color: Contrast Brighthess Color Adjust Color Temp.: 9300, 6500, 5800, 5RGB, USER Exit 2. Image Setting: Clock Phase Gamma Sharpness Exit 3. Position: H.Position V.Position Exit 4. OSD Menu: OSD H.Pos OSD V.Pos OSD Timer Exit 5.
-
Page 4: Brief Introduction
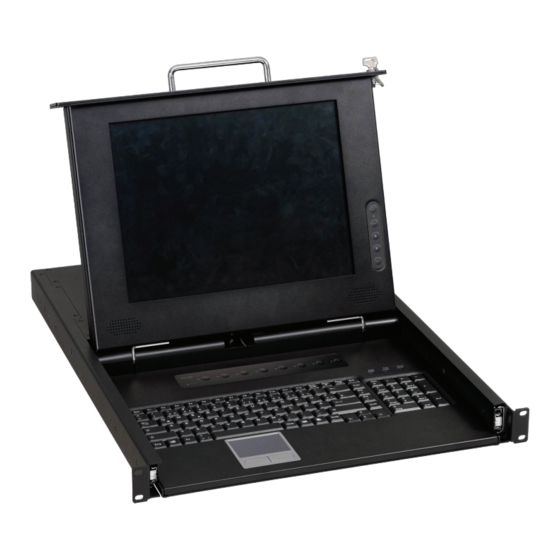
BRIEF INTRODUCTION The KVM Switch allows you to control several sets of personal computers by a keyboard, a mouse and a monitor. In the meantime, you just need to connect the cable and turn on the power to control up to 256 sets of personal computers without installing any additional interface card or software. -
Page 5: Equipment Requirements
FEATURES ‧ The keyboard, mouse and 15” LCD monitor were built-in on the KVM switch. ‧ Standalone machine controls up to 4/8/16 sets of PCs. ‧ Cascade controls 64/128/256 sets of PCs. ‧ Through OSD, you can use the hot key, mouse clicking and push button on front panel to switch PCs. -
Page 6: Specifications
SPECIFICATIONS DC-71301 DC-71302 DC-71401 3-in-1 Connecter HD-15 (Female) Monitor 15” TFT LCD Console Mouse Touch pad module Connector Keyboard Standard 104 keys Port Selection Keys on Front Panel Port LEDs Power Built-in Video Resolution 1024×768@75Hz Dimensions 600x447x48 mm Weight 12.2 Kg 12.25 Kg... - Page 7 CONFIGURATION DC-71301 Front View DC-71302 Front View DC-71401 Front View 1. Port Selection Switches Press the push button to directly switch to the corresponding PC. • In the cascade architecture, if the port is connected to KVM but not PC, then the push button will not respond.
- Page 8 DC-71301 Rear VIEW DC-71302 Rear VIEW DC-71401 Rear VIEW 1. CPU Port Install the cable connected to a PC here. 2. Update Port The port provides a firmware update function. 3. AC Power Jack The AC Power is applicable for 100~240VAC, 50Hz~60Hz 4.
-
Page 9: Installation
INSTALLATION Standalone 1. Make sure that the power switch at the rear panel of the KVM is OFF. Plug an end of the AC power cord into the KVM and the other end to an AC power supply. 2. Make sure to power off the PC and then install the 3-in-1 cable to each of the PC one by one. Note: If the ON-LINE LED (Green) of any port of a PC is on, then we recommend you to power off such PC (Turn off the power switch of the power supply of the PC or unplug the power cable of the PC) or wait till Step 4 to install that particular PC. - Page 10 Expansion 1、 PCs It is not necessary to power down the KVM or other computer connected to the KVM system. You only need to power off the desired PC and connect the PC to the CPU port of the KVM in parallel by the 3-in-1 cable, and then power on the PC.
- Page 11 Hot Key and Mouse Clicking Hot key and mouse clicking are applicable for switching a small section. You can select the SVS (Smart View Setting) from the OSD of the PC first (for a quick switch of PC) and use the keyboard (press the Ctrl key twice) or the mouse (press and hold the middle button while pressing the left or right button) to switch to the previous or next set of PC.
- Page 12 Switch Menu Master List 03-04:Mail Ser 4 LIST: MASTER NAME ● Admin ● Θ Press Enter ● Mail Group Ο Θ ● Peter ● Web Group Ο ● Data Group Ο Θ ↑↓: Move Space: Edit Esc: Exit F1: Smart View Enter: Switching F4: Auto Scan F9: System Setting...
- Page 13 PWR: It shows the status of power supply and indicates a normal power supply for the equipment (PC or KVM) connected to the CPU port. C# : It shows the channel number; the DC-71301 will display 01~04; the DC-71302 will display 01~08 and the DC-71401 will display 01~08; 09~16 (Since the screen cannot display all at a time, therefore you can use PgUp/PgDn to switch the pages).
- Page 14 System Setting Menu System Setting Channel Display Mode: Full Channel Display Time: 5 Sec Auto Scan Time: 5 Sec OSD Entry Hot Key: Number Lock Hot Key Switching: Mouse Clicking: Beeper Sound: Offline Skip: Manual OSD Language: English Security Level: None Console Lock Time: 5 Min...
- Page 15 F8: Restore Default Setting; Restore the factory default settings. Please note that all name lists will be cleared and the system settings are set to the default settings as shown in the table above. Esc: Exit; Exit the system setting and close the OSD. If you have made changes in this option, the system will ask whether or not you want to save the setting before the selected option is effective.
-
Page 16: Troubleshooting
TROUBLESHOOTING Confirm whether or not the cable is good and connected properly Q1 : What should we do if the keyboard has no response? A1a: Reboot the PC. A1b: For Auto Scan Mode, press [Esc] to exit. Q2 : What should we do if the mouse has no respond? A2a: Reboot the PC.
Need help?
Do you have a question about the DC-71301 and is the answer not in the manual?
Questions and answers