Advertisement
Quick Links
ASSEMBLY INSTRUCTIONS
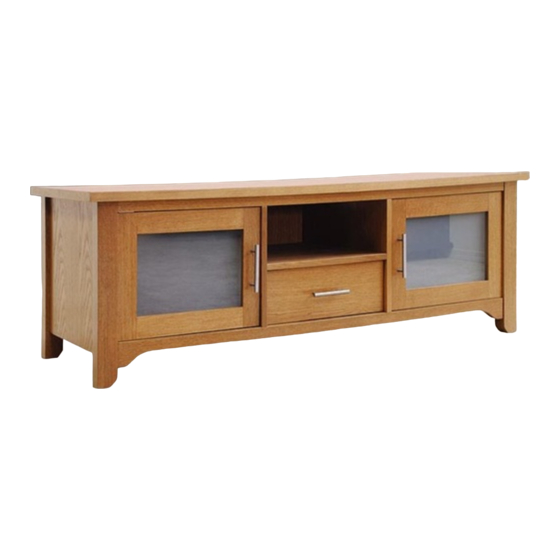
65" WIDE "CREDENZA" UNIT
TV STAND and AUDIO RACK COMBO
OVERALL DIMENSIONS: 20
EL-786:
Thank you for purchasing this Elite product.
You will need the following tools:
Phillips Head Screw Driver • Straight Blade Screw
Driver • Rubber Padded Hammer or Mallet
PARTS
1. Top Panel
2. Bottom Panel
3. Left Side Panel
4. Right Side Panel
5. Left Vertical Divider Panel
6. Right Vertical Divider Panel
7. Center Fixed Shelf
8. Glass Adjustable Shelf
(2 identical)
9. Back Panel
10. Bottom Front Rail
11. Glass Door with
Wooden Frame
(2 identical)
12. Center Drawer
13. Center Drawer Front
Hardware for unit assembly
B
25
A
25
Connecting
Camlocks
Bolts
Hardware for
W
Center Drawer
assembly
and Door
assembly
H1
4
H2
2" Machine
2-1/2" Machine
Screws for
Screws for
Door Handle
Drawer Handle
PLEASE CALL 1-800-ELITE-48. CUSTOMER SERVICE HOURS EASTERN TIME 8:45 AM - 4:45 PM M-F
/
/
3
1
" H x 65" W x 18
4
Oak Veneer
3
11
10
13
C 20
D
Wooden
1" Screws for
Dowels
Back Panel
Drawer Rails (1 Right and 1 Left)
J1
2
J2
2
1" Screws
5/8" Screws
for attaching
Drawer Front
attaching G1
PLEASE DO NOT RETURN UNIT TO STORE FOR PARTS & CUSTOMER SERVICE.
VISIT OUR WEBSITE AT: www.elite-inds.com
/
1
18
"
2
" D
2
1
8
5
7
2
12
15
E
10
F
Pins for
Adjustable
Glass Shelves
Plastic Covers
and
for Camlocks
Door Stops
2
8
K
for
1" Screws for
attaching G2
Page 1/8
8.16.07
65"
9
6
8
4
11
12
V
1
Adjustable
Leg
Z
4
L
CHROME
7/16" Screw for
Drawer Rails
G
8
Hinge Pairs
G1 is attached to Door.
G1
G2 is attached to Side Panel.
/
20
3
"
4
VX
4
5/8" Screws for
Adjustable Leg
3
Handle for Doors
& Center Drawer
4
G1 + G2
G2
Advertisement

Related Manuals for Elite Industries EL-786


Summary of Contents for Elite Industries EL-786
- Page 1 TV STAND and AUDIO RACK COMBO OVERALL DIMENSIONS: 20 " H x 65" W x 18 " D EL-786: Oak Veneer Thank you for purchasing this Elite product. You will need the following tools: Phillips Head Screw Driver • Straight Blade Screw Driver •...
- Page 2 CAMLOCK/CONNECTING BOLT IMPORTANT NOTES & CAUTIONS/WARNINGS PROCEDURE • Carefully read and follow these instructions for assembly. • Please handle parts carefully, some parts may be heavy and can have sharp edges – we recommend pos- Be sure to insert sibly using cloth protective gloves for extra protection. Camlocks with •...
- Page 3 VERTICAL DIVIDER PANEL B. Prepare INNER FACE PREPARATION NOTE: Each Vertical Insert 2 Connecting Divider Panel (5,6) has: Bolts (A) into inner holes • a FRONT edge as shown. • an INNER FACE (where Drawer (12) will rest) Insert 2 Dowels (C) into •...
- Page 4 ATTACH BOTTOM PANEL TO VERTICAL DIVIDERS, BOTTOM FRONT RAIL AND SIDE PANELS Align dowels of Right and Left Vertical Divider Panels with holes of Bottom Panel (2). Align Connecting Bolts of Bottom Panel with Camlocks of Right and Left Vertical Divider Panels.
- Page 5 SET ADJUSTABLE LEG Before turning unit upright, compare the height of the Metal Adjustable Adjust the height of Leg to the 4 outer legs, measuring from the leg bottom to the under- the Metal Adjustable side of Panel 2. Adjust the height of the leg by turning the lower Leg by turning the part by hand.
- Page 6 ATTACH DRAWER FRONT AND HANDLE NOTE: It is very important to attach the Drawer Attach the Drawer Handle (L) using Front BEFORE attaching Drawer Handle. 2 Machine Screws (H2). Screws Attach Drawer Front (13) are threaded through the back side using 2 Screws J1.
- Page 7 ADD DOOR STOPS Use the 2 remain- INSERT GLASS SHELVES ing Shelf Pins as Door Stops by Position Shelf Pins (E) inserting into at desired height. small top holes on Right and Left Carefully position Vertical Divider Glass Shelves (8) Panels.
-
Page 8: Important Notice
Distributed by: Elite Industries, 77 Gould Street • Bayonne, NJ 07002, Tel.: 201-436-1120 • Fax: 201-436-6960 Elite Industries ensures complete satisfaction with this product. In the event of missing or damaged parts call toll free, Customer service hours: 8:45-4:45, Monday-Friday, EST., 1-800-ELITE-48...
Need help?
Do you have a question about the EL-786 and is the answer not in the manual?
Questions and answers