Table of Contents

Subscribe to Our Youtube Channel
Related Manuals for KROHNE OPTISYS SLM 2100


Summary of Contents for KROHNE OPTISYS SLM 2100
- Page 1 OPTISYS SLM 2100 OPTISYS SLM 2100 OPTISYS SLM 2100 OPTISYS SLM 2100 Handbook Handbook Handbook Handbook Sludge level meter Software Revision: 01.00.01 Original handbook © KROHNE 03/2014 - 4002737302 - MA OPTISYS SLM 2100 R02 en...
- Page 2 All rights reserved. It is prohibited to reproduce this documentation, or any part thereof, without the prior written authorisation of KROHNE Messtechnik GmbH. Subject to change without notice. Copyright 2014 by KROHNE Messtechnik GmbH - Ludwig-Krohne-Str. 5 - 47058 Duisburg (Germany) www.krohne.com 03/2014 - 4002737302 - MA OPTISYS SLM 2100 R02 en...
-
Page 3: Table Of Contents
4.10 Description and properties of the relays ..............33 4.10.1 Connection of the relays ..................... 33 4.11 Electrical connection of the external pump..............35 4.12 Protection category ...................... 35 03/2014 - 4002737302 - MA OPTISYS SLM 2100 R02 en www.krohne.com... - Page 4 6.5.2 Form (for copying) to accompany a returned device............66 6.6 Disposal .......................... 66 7 Technical data 7.1 Measuring principle......................67 7.2 Technical data......................... 68 7.3 Dimensions ........................72 8 Notes www.krohne.com 03/2014 - 4002737302 - MA OPTISYS SLM 2100 R02 en...
-
Page 5: Safety Instructions
However, the design of the OPTISYS SLM 2100 makes it possible to use it in other applications where reliable monitoring of interface or stratification in suspensions is necessary. -
Page 6: Certifications
• Directive on the restriction of the use of certain hazardous substances in electrical and electronic equipment in accordance with directive 2011/65/EU The manufacturer certifies successful testing of the product by applying the CE marking. www.krohne.com 03/2014 - 4002737302 - MA OPTISYS SLM 2100 R02 en... -
Page 7: Safety Instructions From The Manufacturer
The manufacturer reserves the right to alter the content of its documents, including this disclaimer in any way, at any time, for any reason, without prior notification, and will not be liable in any way for possible consequences of such changes. 03/2014 - 4002737302 - MA OPTISYS SLM 2100 R02 en www.krohne.com... -
Page 8: Product Liability And Warranty
This document is provided to help you establish operating conditions, which will permit safe and efficient use of this device. Special considerations and precautions are also described in the document, which appear in the form of underneath icons. www.krohne.com 03/2014 - 4002737302 - MA OPTISYS SLM 2100 R02 en... -
Page 9: Warnings And Symbols Used
In general, devices from the manufacturer may only be installed, commissioned, operated and maintained by properly trained and authorized personnel. This document is provided to help you establish operating conditions, which will permit safe and efficient use of this device. 03/2014 - 4002737302 - MA OPTISYS SLM 2100 R02 en www.krohne.com... -
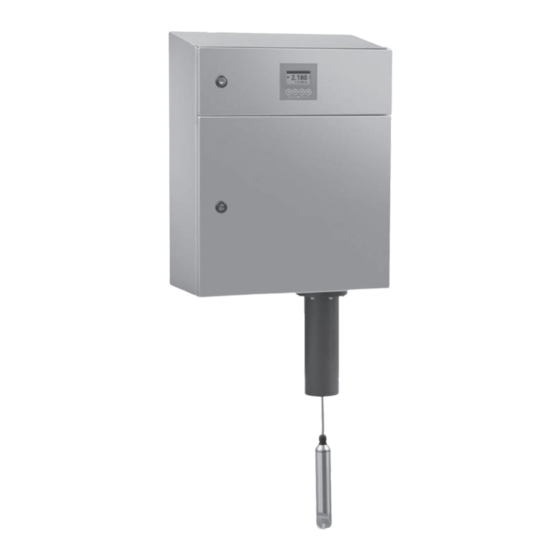
Page 10: Device Description
2 Brackets for round / rectangular handrail 3 Handrail mounting frame 4 Mounting accessories 5 Documentation 6 Key for cable drum lock and key for electronic compartment lock 7 Cleaning unit (optional) www.krohne.com 03/2014 - 4002737302 - MA OPTISYS SLM 2100 R02 en... -
Page 11: Device Description
GDC (general device concept), which means a common HMI to all KROHNE GDC instruments is provided. The keyboard consists of four membrane keys and the display is a LCD graphic display with a resolution of 128 x 64 Pixel. - Page 12 Cleaning unit (optional) The cleaning unit, mounted under the device, consist of a valve and a spraying system to keep the sensor and cable free of deposits ensuring low maintenance efforts of OPTISYS SLM 2100. www.krohne.com 03/2014 - 4002737302 - MA OPTISYS SLM 2100 R02 en...
-
Page 13: Nameplate
4 Power supply data 5 Observe the operation and installation instruction 6 Protection category 7 Order code / TAG no. 8 Production order / Serial number 9 Device name 03/2014 - 4002737302 - MA OPTISYS SLM 2100 R02 en www.krohne.com... -
Page 14: Installation
Due to the weight above 20 kg / 44.1 lbs please lift and carry the device only with two persons or use approbiate lifting equipment and if the surfaces of the device are wet, please use gloves for lifting. www.krohne.com 03/2014 - 4002737302 - MA OPTISYS SLM 2100 R02 en... -
Page 15: Installation Order
7 Calibration of the sludge level meter Calibration (for detailed information refer to on page 55). INFORMATION! For decommissioning of the device please repeat the steps above in reverse order. 03/2014 - 4002737302 - MA OPTISYS SLM 2100 R02 en www.krohne.com... -
Page 16: Mounting Of The Sludge Level Meter
Step 1: Assembling of the mounting frame • Assemble the two brackets and two crossbar braces with the help of bolts, nuts and washers according to the following drawing. Figure 3-1: Mounting frame www.krohne.com 03/2014 - 4002737302 - MA OPTISYS SLM 2100 R02 en... - Page 17 • Please make sure that the meter is mounted in such a height that display and keyboard are at eye level. • Remove the sensor transportation protection to prevent blocking of the sensor. Figure 3-3: Mounting device on handrail 03/2014 - 4002737302 - MA OPTISYS SLM 2100 R02 en www.krohne.com...
-
Page 18: Typical Measuring Point
Figure 3-4: Adjusting frame 3.4 Typical measuring point Figure 3-5: Typical measuring points 1 OPTISYS SLM 2100 with brackets for round handrail on vertical post 2 OPTISYS SLM 2100 with brackets for rectangular handrail 3 OPTISYS SLM 2100 with brackets for round handrail 4 Handrail www.krohne.com... -
Page 19: Installing The Cleaning Unit (Optional)
OPTISYS SLM 2100 3.5 Installing the cleaning unit (optional) The cleaning unit consist of a water connection, an OPTISYS SLM 2100 controlled valve and the spraying unit to clean the cable and the sensor. If installing a device containing a cleaning unit, keep a safety area around the sensor garage free from electrical device or water sensitive parts, as outlined in the following drawing. -
Page 20: Installation Of The Water Hose
Figure 3-7: Fixing points water hose 1 Water hose 2 Fixing points www.krohne.com 03/2014 - 4002737302 - MA OPTISYS SLM 2100 R02 en... -
Page 21: Electrical Connections
Load resistance Power Nominal internal voltage int, nom External voltage Terminal voltage Volt alternated current Control input Process control system Switch (normally open) Switch (normally closed) Light-emitting diode Relay 03/2014 - 4002737302 - MA OPTISYS SLM 2100 R02 en www.krohne.com... -
Page 22: Description Of Electrical Symbols
Internal DC voltage source Controlled internal current source in the device Switch, NO contact or similar Input, galvanically insulated PTC resistance Symbol for LED Symbol for the protection switch www.krohne.com 03/2014 - 4002737302 - MA OPTISYS SLM 2100 R02 en... -
Page 23: Important Device-Specific Notes On Electrical Connection
INFORMATION! Assembly materials and tools are not part of the delivery. Use the assembly materials and tools in compliance with the applicable occupational health and safety directives. 03/2014 - 4002737302 - MA OPTISYS SLM 2100 R02 en www.krohne.com... -
Page 24: Overview Cable Connections
Figure 4-1: Overview cable connections 1 4 x M20 cable feedthroughs 2 Cable guides 3 Main board with connector blocks www.krohne.com 03/2014 - 4002737302 - MA OPTISYS SLM 2100 R02 en... -
Page 25: Overview Of The Terminal Compartment
1 Power connections 2 Motor, heater and fan connection block 3 Cleaning connection block 4 Relais connection block 5 External connection block 6 Output connection block 7 Control inputs connection block 03/2014 - 4002737302 - MA OPTISYS SLM 2100 R02 en www.krohne.com... -
Page 26: Connecting The Power Supply
Before you start to connect the power supply cables, note the following drawing with the function of the terminals: Figure 4-3: Connecting power supply 1 L1...L3 (live) 2 Neutral 3 Protective earth (PE) www.krohne.com 03/2014 - 4002737302 - MA OPTISYS SLM 2100 R02 en... -
Page 27: Description And Properties Of The Outputs And The Input
Profile mode • Current output A: The output range is calculated automatically by the OPTISYS SLM 2100 according to the parameters filled in the extended setup (dimensions). • Current output B: The output range of current channel B must be define in the I/O menu of the device. -
Page 28: Control Input (Active)
In case CI 1 / 2 is set to external trigger mode the sampling cycle will start as soon as the external contact is closed. www.krohne.com 03/2014 - 4002737302 - MA OPTISYS SLM 2100 R02 en... -
Page 29: Connection Of The Outputs And The Input
Active operating mode: the signal converter supplies the power for operation (activation) of • the subsequent devices, observe max. operating data. Terminals that are not used must not have any conductive connection to other electrically • conductive parts. 03/2014 - 4002737302 - MA OPTISYS SLM 2100 R02 en www.krohne.com... -
Page 30: Current Output (Active)
2 Current output B INFORMATION! The correct connection of the current outputs takes place with the help of shielded signal cables which are approved for the rated current and voltage. www.krohne.com 03/2014 - 4002737302 - MA OPTISYS SLM 2100 R02 en... -
Page 31: Electrical Connection Of Control Inputs
. The outer insulation should be removed 30-50 mm / 1.18"- / 0.00077 square inch and the 1.97". The minimum cross section of the wires is 0.5 mm maximum is 1.5 mm / 0.0023 square inch. 03/2014 - 4002737302 - MA OPTISYS SLM 2100 R02 en www.krohne.com... - Page 32 • Close both compartment doors. INFORMATION! In order to assure proper sealing of the cable feedthrough only cables with a minimum and maximum diameter of 6-12 mm / 0.24-0.47 inch. www.krohne.com 03/2014 - 4002737302 - MA OPTISYS SLM 2100 R02 en...
-
Page 33: Description And Properties Of The Relays
/ 0.0039 square inch. INFORMATION! In order to assure proper sealing of the cable feedthrough only cables with a minimum and maximum diameter of 6-12 mm / 0.24-0.47 inch. 03/2014 - 4002737302 - MA OPTISYS SLM 2100 R02 en www.krohne.com... - Page 34 • Connect the shield to one side only e.g. on PCS (process control system) side. • Tighten the screw connection of the cable entries securely. • Seal all cable entries that are not needed with a plug. • Close both compartment doors. www.krohne.com 03/2014 - 4002737302 - MA OPTISYS SLM 2100 R02 en...
-
Page 35: Electrical Connection Of The External Pump
DANGER! Never connect an external water pump directly to the OPTISYS SLM 2100 connector K3, the output connector is only specified as a control output for a motor protection. An external pump can be controlled by connecting K3 to a motor protection. -
Page 36: Operation
• Selection of the measuring mode • Definition of fluff and blanket concentration • Setting of start signal / rake guard switch • Input of extended settings • Calibration of concentration measurement (if necessary) www.krohne.com 03/2014 - 4002737302 - MA OPTISYS SLM 2100 R02 en... -
Page 37: Switching On The Power
The display shows 000 as values. If this is the first time the device is switched on, it needs to be configured as described in the following chapters. Figure 5-1: The previous drawing shows the measured value after successful start-up 03/2014 - 4002737302 - MA OPTISYS SLM 2100 R02 en www.krohne.com... -
Page 38: Operating Elements
No function manually and press key for 2.5 seconds (display shows "keep key pressed" and countdown) and release it after further 2.5 seconds (display shows "release key now" and countdown) www.krohne.com 03/2014 - 4002737302 - MA OPTISYS SLM 2100 R02 en... -
Page 39: Measuring Page
Pressing ↑ will bring you to the status page. If profile mode is applied, a second measuring page can be choosen, presenting the profile of the measurement as bar plot. 03/2014 - 4002737302 - MA OPTISYS SLM 2100 R02 en www.krohne.com... -
Page 40: Navigating Through The Menus
("quick setup") or choose another main menu with the help of ↑ or ↓ and enter it by pressing >. You are in the submenu level. The display always looks as follows: www.krohne.com 03/2014 - 4002737302 - MA OPTISYS SLM 2100 R02 en... - Page 41 • If you want to return to the main menu level and save your input, press ^ one or more times depending on the level you are (pressing ^ results in moving one level upwards until you reach the main menu level). 03/2014 - 4002737302 - MA OPTISYS SLM 2100 R02 en www.krohne.com...
- Page 42 ^ one or more times to return to the main menu. • If you want to return to the next higher level without saving the input, press > and ↑ to the same time. www.krohne.com 03/2014 - 4002737302 - MA OPTISYS SLM 2100 R02 en...
- Page 43 6 Permissible value range (for numerical values) 7 Currently set value, unit or function that you can change (always appears with highlighted background) 8 Current selected parameter 9 Factory setting of parameter (non-alterable) 03/2014 - 4002737302 - MA OPTISYS SLM 2100 R02 en www.krohne.com...
-
Page 44: Menu Mode Structure
C5.1 device info C5.2 display C5.3 special functions D service: D service: This menu is password protected and contains functions to be used by service D service: D service: personnel only. www.krohne.com 03/2014 - 4002737302 - MA OPTISYS SLM 2100 R02 en... -
Page 45: Function Tables
B2.3 Actual sensor This menu shows the actual temperature of the sensor. temperature B2.4 B2.4 Electronic temperature This menu shows the actual temperature of the main board. B2.4 B2.4 03/2014 - 4002737302 - MA OPTISYS SLM 2100 R02 en www.krohne.com... -
Page 46: Menu C, Setup
C1.10.2 Temperature This function allows to define the temperature unit. Options: °C, °F, K C1.10.3 Concentration This function allows to define the concentration unit. Options: g/l, mg/l www.krohne.com 03/2014 - 4002737302 - MA OPTISYS SLM 2100 R02 en... - Page 47 C3.4). C3.4.1 Mode This function allows to define the different modes of the corresponding control input. Options: • • rake guard • trigger input 03/2014 - 4002737302 - MA OPTISYS SLM 2100 R02 en www.krohne.com...
- Page 48 This functions can define if the limit switch is set as above or below the threshold value (This menu is displayed only if limit switch is selected in C3.7.1). www.krohne.com 03/2014 - 4002737302 - MA OPTISYS SLM 2100 R02 en...
- Page 49 In this menu a the number of cleaning cycles can be set; Range: 0…99 C4.5.6 External pump This menu defines if the external pump is controlled by the relays K3 (Choose "yes" or "no"). 03/2014 - 4002737302 - MA OPTISYS SLM 2100 R02 en www.krohne.com...
- Page 50 This function allows to define and activate a password for the access to the setup menu. Options: XXXX (if you enter four digits in the range of 0001...9999, then the password protection is enabled) / 0000 (password protection disabled) www.krohne.com 03/2014 - 4002737302 - MA OPTISYS SLM 2100 R02 en...
-
Page 51: Functions In Detail
10 Floating sludge: Floating sludge: sludge which floats on the surface. To avoid wrong measurements the blind zone has to be set below Floating sludge: Floating sludge: the floating sludge. 03/2014 - 4002737302 - MA OPTISYS SLM 2100 R02 en www.krohne.com... -
Page 52: Measuring Function
(resp. 4 mA) is at the liquid surface. The height/depth height/depth height/depth ratio of the sensor is calculated in the following way: height/depth Height/depth = maximum immersion depth - blind zone - start position www.krohne.com 03/2014 - 4002737302 - MA OPTISYS SLM 2100 R02 en... -
Page 53: Definition Of Fluff And Blanket Concentration
1.5 start signal. For further information refer to on page 45. For information Electrical connection of control concerning the electrical connection of a limit switch refer to inputs on page 31. 03/2014 - 4002737302 - MA OPTISYS SLM 2100 R02 en www.krohne.com... -
Page 54: Timer / Start Signal
• Select the menu “Extended settings” and enter both values. • Optionally you can go to the option Rake height and enter the rake height rake height to the menu. rake height rake height www.krohne.com 03/2014 - 4002737302 - MA OPTISYS SLM 2100 R02 en... -
Page 55: Calibration
For calibrate conc. - Move the sensor into sludge layer to which the sensor shall be calibrated Press ^ ^ ^ ^ to get back in the submenu. 03/2014 - 4002737302 - MA OPTISYS SLM 2100 R02 en www.krohne.com... - Page 56 Press ^ ^ ^ ^ to enter the chosen menu. Press ^ ^ ^ ^ several time until you reach the measuring mode again. Choose yes yes to safe and confirm your selection. www.krohne.com 03/2014 - 4002737302 - MA OPTISYS SLM 2100 R02 en...
- Page 57 (g/l). The device automatically detects this failure and will report an application error message "sensor calibration" on the message screen. The error will remain until the sensor is correctly calibrated by the user. 03/2014 - 4002737302 - MA OPTISYS SLM 2100 R02 en www.krohne.com...
-
Page 58: Passwords
If the user does not press any key in a 5 minutes time frame and the device is not in the test mode, it automatically returns to the measuring mode (i.e. the display shows one or more measuring results). www.krohne.com 03/2014 - 4002737302 - MA OPTISYS SLM 2100 R02 en... -
Page 59: Status Messages And Diagnostic Information
NE64, VDI/VDE 2650 or NE107. The OPTISYS SLM 2100 provides a status log book which is capable of storing the occurrence as well as the disappearances of error of the classes: device failure, application failure and out of specification errors. -
Page 60: Error Category "Device Failure" (Bold "F")
F F F F sensor calibration Zero calibration was performed with higher Repeat calibration in correct order again turbidity than used for the calibration of the concentration. www.krohne.com 03/2014 - 4002737302 - MA OPTISYS SLM 2100 R02 en... -
Page 61: Error Category "Application Error" ( "F", Not Bold)
Check the limits of the 4…20 mA current concentration tracking mode for current channel B, outputs. If the maximum concentration is proportional to the measured exceeded please enter a larger value. concentration). 03/2014 - 4002737302 - MA OPTISYS SLM 2100 R02 en www.krohne.com... -
Page 62: Service
Check the lens for any buildup or film. If necessary, clean it with a suitable agent like water or isopropyl alcohol and a soft rag or a soft brush. www.krohne.com 03/2014 - 4002737302 - MA OPTISYS SLM 2100 R02 en... - Page 63 3. Clean the optical interface with damp soft cloth with isopropyl alcohol. 4. Close the pick-up arm carefully and make sure that the connection is closed. 5. Close the cable compartment door. 03/2014 - 4002737302 - MA OPTISYS SLM 2100 R02 en www.krohne.com...
-
Page 64: Cleaning Unit (Optional)
The menu item "cleaning cycle" is defining the number of passes of the sensor through the cleaning head. An external water pump can be controlled by the OPTISYS SLM 2100 when it is enabled in the menu item external pump. Each cleaning cycle the external pump is switched on when the water valve will be activated. -
Page 65: Spare Parts Availability
• such dangerous substances, to enclose a certificate with the device confirming that is safe to handle and stating the • product used. 03/2014 - 4002737302 - MA OPTISYS SLM 2100 R02 en www.krohne.com... -
Page 66: Form (For Copying) To Accompany A Returned Device
We hereby confirm that there is no risk to persons or the environment through any residual media contained in the device when it is returned. Date: Signature: Stamp: 6.6 Disposal CAUTION! Disposal must be carried out in accordance with legislation applicable in your country. www.krohne.com 03/2014 - 4002737302 - MA OPTISYS SLM 2100 R02 en... -
Page 67: Technical Data
The direct measuring principle excludes incorrect measurements due to echo returns from walls or separating zones as well as signal damping by fluff or floating sludge. Figure 7-1: Measuring principle 03/2014 - 4002737302 - MA OPTISYS SLM 2100 R02 en www.krohne.com... -
Page 68: Technical Data
2 pages - measuring page with measuring results and status page with status messages Menu mode variety of main and submenus that allows to customise the device Operating and display languages English and German www.krohne.com 03/2014 - 4002737302 - MA OPTISYS SLM 2100 R02 en... - Page 69 230 VAC (-15% / +10%) at 50 Hz (±10%) Power consumption 100 VA Power rating 150 VA (maximum) Internal fuse 1.6 A slow blow Cable feedthrough M20x1.5 PA 6-12 mm External fuse (recommended) Protection class Overvoltage catergory 03/2014 - 4002737302 - MA OPTISYS SLM 2100 R02 en www.krohne.com...
- Page 70 ≤ 550 Ω Relays Operating modes Relay 1 and 2: limit switch or status output Relay 3: pump protection ≤ 24 VDC/250VAC Operating data for all relays I ≤0.3 A www.krohne.com 03/2014 - 4002737302 - MA OPTISYS SLM 2100 R02 en...
- Page 71 RoHS Directive on the restriction of the use of certain hazardous substances in electrical and electronic equipment in accordance with directive 2011/65/EU 03/2014 - 4002737302 - MA OPTISYS SLM 2100 R02 en www.krohne.com...
-
Page 72: Dimensions
7.3 Dimensions Figure 7-2: Dimensions Dimensions [cm] Dimensions ["] Weight [kg] [lbs] 18.11 26.5 58.42 16.54 188.55 20.16 3.19 10.24 21.65 Ø 85 3.35 Ø 40 1.57 231.5 9.11 www.krohne.com 03/2014 - 4002737302 - MA OPTISYS SLM 2100 R02 en... -
Page 73: Notes
NOTES OPTISYS SLM 2100 03/2014 - 4002737302 - MA OPTISYS SLM 2100 R02 en www.krohne.com... - Page 74 NOTES OPTISYS SLM 2100 www.krohne.com 03/2014 - 4002737302 - MA OPTISYS SLM 2100 R02 en...
- Page 75 NOTES OPTISYS SLM 2100 03/2014 - 4002737302 - MA OPTISYS SLM 2100 R02 en www.krohne.com...
- Page 76 Measuring systems for the marine industry Head Office KROHNE Messtechnik GmbH Ludwig-Krohne-Str. 5 47058 Duisburg (Germany) Tel.:+49 203 301 0 Fax:+49 203 301 103 89 info@krohne.com The current list of all KROHNE contacts and addresses can be found at: www.krohne.com...
Need help?
Do you have a question about the OPTISYS SLM 2100 and is the answer not in the manual?
Questions and answers