Table of Contents
Advertisement
Quick Links
Original Operating Manual for Motor-
Powered Hybrid Fastener Driver Tools
PKT-8-PR100
PKT-8-PR100-LM
PKT-8-PR100-SET
PKT-8-PR100-SET4
PKT-8-PR100-LM-SET
PKT-8-PR100-LM-SET4
Warning: Please read the instructions and warnings for
this tool carefully before use. Failure to do so could
lead to serious injury.
PKT-8-RKP100
PKT-8-RKP100-LM
PKT-8-RKP100-SET
PKT-8-RKP100-SET4
PKT-8-RKP100-LM-SET
PKT-8-RKP100-LM-SET4
Advertisement
Table of Contents

Related Manuals for Prebena PKT-8-PR100


Summary of Contents for Prebena PKT-8-PR100
- Page 1 Original Operating Manual for Motor- Powered Hybrid Fastener Driver Tools PKT-8-PR100 PKT-8-RKP100 PKT-8-PR100-LM PKT-8-RKP100-LM PKT-8-PR100-SET PKT-8-RKP100-SET PKT-8-PR100-SET4 PKT-8-RKP100-SET4 PKT-8-PR100-LM-SET PKT-8-RKP100-LM-SET PKT-8-PR100-LM-SET4 PKT-8-RKP100-LM-SET4 Warning: Please read the instructions and warnings for this tool carefully before use. Failure to do so could...
-
Page 2: Table Of Contents
Table of contents Information about the manual ............4 Integral part of the fastener driving tool ......... 5 Other applicable documents ............6 Design features of the text ............. 6 Design features of warning notices ..........7 Design features of notices to material damage ......7 Definitions related to the tool ............ - Page 3 After operation ................56 Turning off the tool ..............56 Removing the rechargeable battery ..........57 Emptying the magazine ............... 57 Transport and storage ..............58 Packing the fastener driving tool ..........59 Transporting the fastener driving tool .......... 60 Storing the fastener driving tool ...........
-
Page 4: Information About The Manual
This operating manual will help you to use the following motor- powered fastener driving tools safely, economically and as intended: Tool type Equipment PKT-8-PR100 for paper-tape half head nails 34°, standard magazine with loading capacity for one nail strip, compressed air cartridge, without battery for paper-tape half head nails 34°, long magazine... -
Page 5: Integral Part Of The Fastener Driving Tool
Information about the manual Tool Equipment PKT-8-RKP100-SET for plastic and paper-tape round head nails 20°, standard magazine with loading capacity for one nail strip, compressed air cartridge, charger, rechargeable battery 5.5 Ah for plastic and paper-tape round head nails 20°, PKT-8-RKP100-SET4 standard magazine with loading capacity for one nail strip, compressed air cartridge, charger,... -
Page 6: Other Applicable Documents
Information about the manual Other applicable documents This manual includes the following documents: • Operating manual for cartridge KT-1000 • If the fastener driving tool was delivered with a rechargeable battery and charger: Operating manual for rechargeable battery and charger •... -
Page 7: Design Features Of Warning Notices
Information about the manual Design features of warning notices DANGER Notices with the word DANGER warn of a dangerous situation leading to death or serious injuries. WARNING Notices with the word WARNING warn of a dangerous situation that may possibly lead to death or serious injuries. -
Page 8: Definitions Related To The Tool
Information about the manual Definitions related to the tool Motor-powered hybrid fastener driving tools are referred to in this operating manual in shortened form as "fastener driving tools" or, when clear from the context, as "tools." Definition of the tool sides The sides of the fastener driving tool are defined as follows relative to the direction of motion of the nails: front: tool tip... -
Page 9: Safety
Safety Safety Failure to comply with the safety instructions in this operating manual may lead to serious accidents with severe or even fatal injuries. ▶ Make note of and follow all warnings and notices in this operating manual and on the fastener driving tool while working with the fastener driving tool. -
Page 10: Improper Use
Safety Improper use Any usage other than what is described here is improper and therefore contrary to the designated usage. The following types of usage in particular are classified as improper: • Operation by persons who do not know how to use fastener driving tools and the materials used with them •... - Page 11 Safety 2. Electrical safety Avoid body contact with earthed or grounded surfaces, such as pipes, radiators, ranges and refrigerators. There is increased risk of electric shock if your body is earthed or grounded. Do not expose power tools to rain or wet conditions. Water entering a power tool will increase the risk of electric shock.
- Page 12 Safety safety measures reduce the risk of starting the power tool accidentally. Store idle power tools out of the reach of children and do not allow persons unfamiliar with the power tool or these instructions to operate the power tool. Power tools are dangerous in the hands of untrained users.
- Page 13 Safety Follow all charging instructions and do not charge the battery pack or tool outside the temperature range specified in the instructions. Charging improperly or at temperatures outside the specified range may damage the battery and increase the risk of fire. 6.
- Page 14 Safety Preventing serious or fatal injuries Serious or fatal injuries possible if the fastener driving tool is used incorrectly. ▶ The nails have high penetrating power! Never point the fastener driving tool at yourself, other persons or animals. ▶ Always hold the tool while working by the insulated handle surfaces.
- Page 15 Safety Preventing risks of injury Injuries possible if the fastener driving tool is used incorrectly. ▶ Always keep the fastener driving tool in the transport case and where it is inaccessible for children and other unauthorized persons. ▶ Never operate or transport the fastener driving tool with the compressed air cartridge inserted.
- Page 16 Safety Preventing material damage Damage or malfunctions in the fastener driving tool possible if operated improperly. ▶ Never open the housing of the fastener driving tool. ▶ Do not use the fastener driving tool if it has been dropped or is damaged.
-
Page 17: Personnel Qualifications
Safety Personnel qualifications All persons who work with or on the fastener driving tool must have the following proficiencies and experience: • Proficiency in working with fastener driving tool • Ability to estimate the hazards associated with fastener driving tools and proficiency for averting these hazards •... - Page 18 Safety Blank safety device The fastener driving tool is equipped with a blank safety device. The blank safety device blocks the triggering mechanism when there are only 5–8 nails in the magazine. Information signs on the fastener driving tool The following mandatory signs are imprinted on the base of the fastener driving tool: Mandatory Meaning...
- Page 19 Safety The following symbol is attached to the front of the fastener driving tool: Pictograms Meaning Markings and warnings for tools with contact actuation capability. ▶ Do not leave your finger on the trigger when the device is picked up, moved between work areas and positions, or when walking, as leaving your finger on the trigger can lead to unintended operation.
-
Page 20: Personal Protective Equipment
Safety Personal protective equipment The fastener driving tool generates nails, compressed air and noise. ▶ Wear suitable personal protective equipment for all tasks with the fastener driving tool. ▶ Take note of and follow the regulations at the place where the tool is used when putting together the protective equipment. -
Page 21: Description
Description Description Scope of delivery The following parts are included in the scope of delivery of all fastener driving tools: • Fastener driving tool • Compressed air cartridge KT-1000 • Plastic transport case • This operating manual • Declaration of Conformity •... -
Page 22: Information On The Rating Plate
Description Information on the rating plate The rating plate is pasted onto the housing. It contains the following information: Manufacturer's specifications Type designation of the fastener driving tool Type designation of the nails used Power supply Notice regarding disposal National mark of conformity for Ukraine Made in Germany EAC marking The CE mark (the product meets the requirements of... -
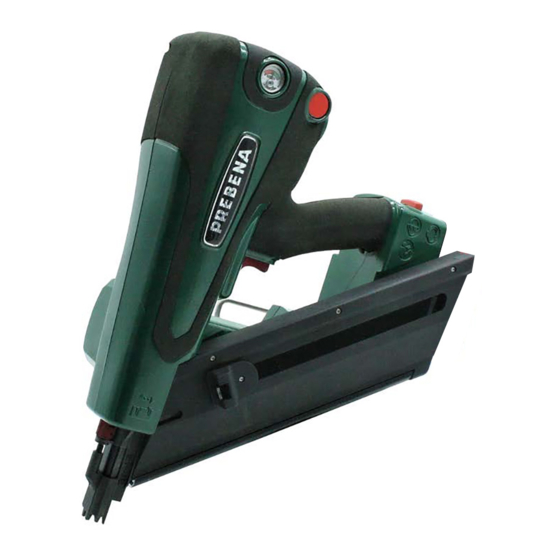
Page 23: Overview Of The Tool
Description Overview of the tool Overview of magazine Your fastener driving tool is equipped with one of the following magazines: • Short magazine for 1 strip of round head nails RKP/RK • Long magazine for 2 strips of round head nails RKP/RK •... - Page 24 Description Left side of the tool The figure shows the PKT-8-RKP100 tool with short magazine. Pressure indicator Venting button Handle Base Mandatory sign Battery Magazine (here: short, for round head nails) Triggering mechanism...
- Page 25 Description Pusher, with grooved pulling surfaces and metal tab for retainer Tool tip Triggering safety device with attached imprint protection Depth adjustment Depth adjustment pictogram Right side of the tool The figure shows the PKT-8-PR100LM tool with long magazine. Magazine (here: long, for half head nail) Padded area (3 areas)
- Page 26 Description Button for releasing the button Control panel Connecting thread for compressed air cartridge and protective plug Pictograms; Markings and warnings for tools with contact actuation capability. Triggering safety device without imprint protection Exhaust air opening for cooling Rating plate Air intake opening for cooling Crossbar hook Thumbscrew for fastening and releasing the magazine...
-
Page 27: Task And Function
Fastener driving tool PKT-8-RKP100 drives in round head nails 65- 100 mm long with a shaft diameter of 2.8–3.1 mm. Fastener driving tool PKT-8-PR100 drives in half head nails 65- 100 mm long with a shaft diameter of 2.8–3.1 mm. -
Page 28: Control Panel
Description Control panel Overview of the control panel Green LED: lit when the tool is turned on ON/OFF button Blue LED for triggering process (see page 46) Select button for triggering process Red LED: information about the operating state (see following see section) Button has no function for this tool If no LEDs are lit, the tool is turned off. - Page 29 Description Display of operating states The tool may indicate the following operating states: Lighting behavior of Operating state the red LED/signal tone Not lit The tool is ready for operation. Lit continuously; tool The battery charge is too low. The beeps at 1-second tool switches off after 10 seconds.
-
Page 30: Before Operation
Before operation Before operation Unpacking the fastener driving tool WARNING Danger of asphyxiation for children playing packaging films. ▶ Do not allow children to play with the packaging film. ▶ Keep the packaging material where it is inaccessible for children. ▶... - Page 31 Before operation Checking the triggering safety device The spring of the triggering safety device must not be damaged. To check the triggering safety device, follow these steps: ▶ Make certain the tool is turned off (no LEDs are lit, see also page 28).
-
Page 32: Filling With Compressed Air
Before operation Filling with compressed air Important information about compressed air cartridges The fastener driving tool may only be filled with the compressed air cartridge KT-1000 included with delivery. An empty cartridge may only be refilled by the manufacturer or using the manufacturer's PKT series compressors. - Page 33 Before operation • Transport and store the compressed air cartridge only in the original packaging or in the transport case of the fastener driving tool. • Remove the compressed air cartridge every time after the tool is filled. Do not transport the tool with the cartridge inserted. Unscrewing the protective plug The tool is delivered with a protective plug screwed into the thread for the compressed air cartridge.
- Page 34 Before operation Using a compressed air cartridge Screwing in the compressed air cartridge ▶ Check the condition of the fastener driving tool (see page 30). ▶ Take the protective cap off the cartridge. ▶ Check the screw connection on the tool and the thread of the compressed air cartridge for foreign objects and dirt.
- Page 35 Before operation Filling with compressed air ▶ Screw the thread of the compressed air cartridge clockwise into the thread on the tool (1) finger-tight until you hear a slight sound of compressed air emerging from the small cartridge valve. ✓ The tool can be heard filling for 1 to 2 seconds. On the pressure indicator (2) the pointer moves to the green range.
- Page 36 Before operation Screwing in the protective plug ▶ Screw the protective plug (1) back into the thread: The protective plug must always be inserted when the cartridge is not inserted. Checking the operating pressure ▶ Check the operating pressure on the pressure indicator (1): •...
-
Page 37: Fastening And Removing The Magazine
Before operation Fastening and removing the magazine The procedure is identical for all magazine types (see page 23). Fastening the magazine The magazine is fastened by the fastened elements: Red thumbscrew Clamping bolt on the tool Bolt seating (open oblong hole) on the magazine 2 pins on the magazine 2 pin openings next to the shot channel... - Page 38 Before operation To fasten the magazine in place, follow these steps: ▶ If necessary turn the thumbscrew (1) as far as it will go to the left. The clamping bolt moves outward. ▶ Place the bolt seating (3) on the magazine under the bolt (2) on the tool.
- Page 39 Before operation The magazine is moved outward and down and is released from the fastening (2). ▶ Now you can remove the magazine.
-
Page 40: Loading And Emptying The Magazine
Before operation Loading and emptying the magazine The procedure is identical for all magazine types (see page 23). Loading the magazine To fill the magazine with a nail strip, follow these steps: ▶ Hold the fastener driving tool with the tip pointing down. ▶... - Page 41 Before operation When the pusher has moved over the nail strip, the clamp (3) swings inward. ▶ Slowly let the pusher slide back ✓ The nail strip is clamped in place. The magazine is loaded.
- Page 42 Before operation Emptying the magazine To empty the magazine, follow these steps: ▶ Pull the pusher down on the grooves (1) while simultaneously pressing the tab (2) of the clamp (3): The clamp (3) swings outward and leaves the nail strip free. ▶...
-
Page 43: Attaching And Removing Rechargeable Batteries
Before operation Attaching and removing rechargeable batteries Fastener driving tools with an additional "SET" or "SET4" were delivered with a rechargeable battery and charger and the corresponding operating manual. The process for ordering batteries is accordingly not described in this operating manual. ▶... -
Page 44: Turning On The Tool
Before operation ✓ Then the battery can be pulled out towards the front. Turning on the tool The tool can only be turned on if the triggering mechanism and safety bar are not activated (in the original position). ▶ Turn on the tool by pressing the ON/OFF button (1) on the control panel for at least 2 seconds: ✓... - Page 45 Before operation ▶ Trigger the fastener driving tool. ▶ Check the following items: − Triggering occurs only when the triggering safety device is pressed in, in other words when the tool tip is firmly pressed against the wood. − For single triggering: The depressed triggering safety device and the trigger button must always be moved back to the original position to be triggered again.
-
Page 46: Operation
Operation Operation Selecting triggering process The fastener driving tool has two triggering processes: • Single triggering • Contact triggering With the tool turned on, select the triggering process on the control panel: Press "T" (1): Single The blue LED (3) is lit triggering continuously. -
Page 47: Adjusting The Insertion Depth
Operation In particular, you must not use the contact release with automatic reset release setting for the following purposes: - For applications such as closing boxes or crates and installing transport safety systems on trailers or trucks. ▶ In these cases, set the selector switch on the control panel to single release. - Page 48 Operation ▶ To reduce the insertion depth, turn the setting wheel (1) counter- clockwise. ▶ To increase the insertion depth, turn the setting wheel (1) clockwise. ▶ Check the setting on the imprinted pictogram (3) in the tool tip. Checking the insertion depth ▶...
-
Page 49: Using Imprint Protection
Operation Using imprint protection To protect decorative wood against damage, the fastener driving tool has imprint protection made of rubber for the triggering safety device. If imprint protection is not needed, it can be inserted in the holder (1) provided for it on the right side of the tool base: ▶... -
Page 50: Driving In Nails
Operation Driving in nails DANGER Very serious or fatal injuries possible due to electrical shock. ▶ Make certain before triggering that no power line, water line or gas line will be struck. WARNING Eye injuries and other injuries are possible during operation due to flying splinters. - Page 51 Operation WARNING Danger of injury due to nail driven in too deep, nail slipping or recoil. ▶ Use the fastener driving tool only for the material specified in this operating manual (see Designated use, page 9). ▶ Make certain the insertion depth is not greater than the thickness of the material.
- Page 52 Operation Triggering the fastener driving tool repeatedly WARNING Accidental triggering may result in severe or fatal injuries. ▶ Do not point the fastener driving tool at yourself, other people or animals. ▶ Do not leave your finger on the trigger when the device is picked up, moved between work areas and positions, or when walking, as leaving your finger on the trigger can lead to...
-
Page 53: Setting Down The Fastener Driving Tool
Operation Reloading nails The magazine has a blank safety device. This prevents you from being able to trigger the fastener driving tool if there are only 5–8 nails in the magazine. ▶ Load new nail strips (see page 40). Setting down the fastener driving tool The fastener driving tool has a specified resting position. -
Page 54: Using The Crossbar Hook
Operation Using the crossbar hook The fastener driving tool has a crossbar hook (chevron hook) by which you can briefly fasten the tool to a roof batten or similar object. The crossbar hook is located on the bottom of the fastener driving tool. - Page 55 Operation ✓ The tool can be heard venting.
-
Page 56: After Operation
After operation After operation WARNING Accidental triggering may result in severe or fatal injuries. ▶ Do not point the fastener driving tool at yourself, other people or animals. ▶ Turn off the tool after operation is complete and empty the magazine. After operation or extended interruptions in operation, carry out the steps described below. -
Page 57: Removing The Rechargeable Battery
After operation Removing the rechargeable battery ▶ To remove the battery, press the red button (1) on the base: ✓ Then the battery can be pulled out towards the front. Emptying the magazine ▶ Always empty the magazine after operation. ▶... -
Page 58: Transport And Storage
Transport and storage Transport and storage WARNING Accidental triggering may result in severe or fatal injuries. ▶ Do not point the fastener driving tool at yourself, other people or animals during transport. ▶ If a cartridge is inserted, remove the cartridge for transport. -
Page 59: Packing The Fastener Driving Tool
Transport and storage Packing the fastener driving tool The fastener driving tool and accessory parts may only be packed in the transport case included with delivery as shown here: To pack the fastener driving tool in the case, follow these steps: ▶... -
Page 60: Transporting The Fastener Driving Tool
Transport and storage ▶ Place the compressed air cartridge, fastener driving tool, rechargeable batteries and battery charging station in the transport case as shown above. ▶ Close the transport case. Transporting the fastener driving tool The type of transport determines whether you are transporting the fastener driving tool over short or long distances. -
Page 61: Storing The Fastener Driving Tool
Transport and storage Storing the fastener driving tool To protect the fastener driving tool against damage when it will not be used for an extended period, follow these steps: ▶ Vent the tool as described on page 54. ▶ Pack the fastener driving tool and accessories in the transport case included with delivery as described on page 59. -
Page 62: Cleaning And Maintenance
Cleaning and maintenance Cleaning and maintenance WARNING Accidental triggering may result in severe or fatal injuries. ▶ Do not point the fastener driving tool at people or animals. ▶ Always empty the magazine before working on the fastener driving tool. Cleaning Carry out the following activities before cleaning work: ▶... - Page 63 Cleaning and maintenance Procedure To remove dirt and foreign objects, follow these steps: ▶ Vent the tool. ▶ Turn off the tool. ▶ Remove the rechargeable battery. ▶ Remove the magazine. ▶ Clean the exposed interface and movable parts of the tool with a clean cloth or brush, removing dirt and foreign objects.
-
Page 64: Maintenance
Cleaning and maintenance Cleaning the housing and outer surfaces ATTENTION! Damage to the fastener driving tool or accessories due to unsuitable cleaning agent. ▶ For cleaning use only a dry, slightly moistened cloth or a cloth moistened with a mild soap solution. -
Page 65: Eliminating Malfunctions
Eliminating malfunctions Eliminating malfunctions WARNING Severe or fatal injuries are possible when operating a damaged or malfunctioning fastener driving tool. ▶ Empty the magazine. ▶ Do not use the fastener driving tool again until the malfunction has been eliminated. ATTENTION! The fastener driving tool can be damaged if repairs are made by unauthorized persons. -
Page 66: Eliminating Other Malfunctions
Eliminating malfunctions Eliminating other malfunctions If malfunctions have occurred on the fastener driving tool that you cannot remedy by yourself, contact the manufacturer's Customer Service. ▶ Do not perform any repair work on the fastener driving tool. ▶ Always have repairs to the fastener driving tool made by the manufacturer. -
Page 67: Overview Of Malfunctions
Eliminating malfunctions Overview of malfunctions Feature Possible cause Remedy Fastener A seal is faulty. ▶ Contact Customer Service (see driving tool page 75). Safety valve or is losing air. check valve faulty. Operating Too much If this occurs sporadically no measures are pressure too compressed air necessary. - Page 68 Eliminating malfunctions Feature Possible cause Remedy Operating ▶ Add more compressed air from the pressure is too cartridge (see page 32). low. The driving in ▶ Contact Customer Service (see process is not page 75). performed completely. The red LED The battery ▶...
- Page 69 Eliminating malfunctions Feature Possible cause Remedy The red LED Control ▶ Contact Customer Service (see in the malfunction. page 75). control The tool panel is lit at switches off a 1-second after interval. 10 seconds. The tool will Trigger button Move the trigger button or triggering safety not turn on.
-
Page 70: Ordering Accessories
Ordering accessories Ordering accessories You can order accessory parts from the manufacturer. ▶ Use only the manufacturer's original accessories or accessories that have been approved by the manufacturer for use with the fastener driving tool. ▶ Use only the nail types that are specified on the rating plate of your fastener driving tool. -
Page 71: Technical Data
Technical data Technical data We reserve the right to make technical improvements Fastener driving tools Tool PKT-8-: PR100 PR100- RKP100 RKP100- Dimensions 312 x 458 x 362 x 554 x 176 x without battery 133.6 x 159 x 142.4 x 392 mm (L x W x H): 392 mm... -
Page 72: Compressed Air Cartridge Kt-1000
Technical data Magazine system: loading from the rear Operating -5 °C to +45 °C temperature: Storage/ transport Room temperature temperature: Characteristic 3.80 m/s² vibration values: = 1.5 m/s² (EN 60745) Characteristic = 101 dB WA,1s noise values: = 90 dB pA,1s (EN 60745) <... -
Page 73: Battery And Batter Charging Station
Technical data Battery and batter charging station Use only original Metabo or CAS (Cordless Alliance System) battery packs and accessories. Approved CAS battery Capacity Voltg. LiHD: 8.0 Ah 5.5 Ah 4.0 Ah 18 V Li-Power: 2.0 Ah 4.0 Ah 5.2 Ah 18 V Other technical data 4 Ah... -
Page 74: Disposing Of The Fastener Driving Tool
Disposing of the fastener driving tool Disposing of the fastener driving tool ENVIRONMENTAL PROTECTION Environmental damage if not disposed of as required by environmental regulations. ▶ Clean the fastener driving tool before disposing of it. ▶ The tool contains oil. Comply with the applicable requirements for disposing of oil. -
Page 75: Manufacturer's Address
Manufacturer's address Manufacturer's address PREBENA Wilfried Bornemann GmbH & Co. KG Befestigungstechnik Seestrasse 20–26 D-63679 Schotten Germany Phone: +49 (0) 60 44 / 96 01-100 Fax: +49 (0) 60 44 / 96 01-820 E-mail: info@prebena.de Web: www.prebena.de... -
Page 76: Warranty
Warranty Warranty The manufacturer guarantees the designated tool for 1 year from the date of purchase according to the following warranty conditions. The manufacturer guarantees correction of defects due to faulty material or manufacturing at no cost. Malfunctions or damage caused by improper handling will not be considered within the scope of free warranty repairs. -
Page 77: Index
Index Index Condition 30 Function 44 Insertion depth 48 Triggering 45 Accessories 70 Available to order 70 Checking the condition Accessory parts 30 Adjusting External damage 30 Insertion depth 47 Triggering safety device 31 Selecting triggering process 46 Checking the function 44 After operation Turning off the tool 56 Chevron hook... - Page 78 Index Due to incorrect use 15 Insertion depth Due to nails 15 Adjusting 47 Due to noise 15 Checking 48 Due to plastic film 14 Pictogram 47 Due to recoil 15 Due to tampering 14 Fatal injuries 14 Depth adjustment 25 KT-1000 32 Technical data 72 Depth adjustment, pictogram 25...
- Page 79 Malfunction in nail transport 65 PPE (personal protective equipment) 20 Single triggering 47, 51 PR (nail type) 23 Single triggering 27 PREBENA 75 Storage 61 Preparation Checking the condition 30 Pressure gauge, see pressure indicator Target group for the manual 17...
- Page 80 Index In the transport case 60 Long distances 60 Short distances 60 Usage, prohibited 10 Transport case 30, 60 Usage, proper 9 Storing 61 Use, improper 10 Triggering Use, proper 9 Error 67 Using the crossbar hook 54 One time 51 Selecting triggering process 46 Triggering mechanism 24 Triggering one time 51...
Need help?
Do you have a question about the PKT-8-PR100 and is the answer not in the manual?
Questions and answers