Table of Contents
Advertisement
Quick Links
Translation of the original operating instructions for path-
SLIDER 4C-L50
SLIDER 5C- Q67
___________________________________________________________________________________________
controlled tackers
PREBENA Wilfried Bornemann GmbH & CO. KG
Seestraße 20 – 26, 63679 Schotten, Germany
Tel.: +49 (0) 60 44 / 96 01-0, fax: +49 (0) 60 44 / 96 01-820
info@prebena.com,
www.prebena.de
SLIDER 4C-Z50
SLIDER 5C- Z75
Advertisement
Table of Contents

Subscribe to Our Youtube Channel
Related Manuals for Prebena SLIDER 4C-Z50


Summary of Contents for Prebena SLIDER 4C-Z50
- Page 1 SLIDER 4C-Z50 SLIDER 5C- Q67 SLIDER 5C- Z75 ___________________________________________________________________________________________ PREBENA Wilfried Bornemann GmbH & CO. KG Seestraße 20 – 26, 63679 Schotten, Germany Tel.: +49 (0) 60 44 / 96 01-0, fax: +49 (0) 60 44 / 96 01-820 info@prebena.com,...
-
Page 2: Foreword
Foreword These operating instructions will help you to operate the path-controlled tackers in the Slider 4C and Slider 5C series correctly in accordance with their intended use, safely and cost-effectively. These tools are referred to simply as Sliders in these operating instructions. We assume that every person using the Slider has knowledge of how to handle pneumatic tools. -
Page 3: Table Of Contents
Table of contents Foreword .....................................2 Table of contents .................................3 Layout characteristics .................................4 General layout characteristics ............................4 Features of the danger warnings ............................4 Features of the notices on damage to property or the environment..................4 Safety ....................................5 Correct use..................................5 Improper use ...................................5 Avoiding the risk of fatal injuries ............................5 Preventing the risk of explosion ............................5 Avoiding the risk of injury ..............................6... -
Page 4: Layout Characteristics
Layout characteristics General layout characteristics Various elements in the operating instructions are marked with specific layout characteristics. They make it easy for you see whether you are reading normal text, lists or actions. Tips contain additional information such as specific information on the cost-effective use of the Slider. -
Page 5: Safety
when the work involves movements across scaffolding, stairs, ladders or ladder-type structures, involving closing boxes or crates or attaching transport securing equipment. PREBENA Wilfried Bornemann GmbH & Co. KG accepts no liability for any damage resulting from improper use. -
Page 6: Avoiding The Risk Of Injury
Never open the Slider housing. Always have repair work carried out by qualified PREBENA staff. Do not use the Slider if it has been dropped or is damaged. Have it inspected by qualified PREBENA staff before putting it into use again. -
Page 7: Description
Description Tool overview and scope of delivery... -
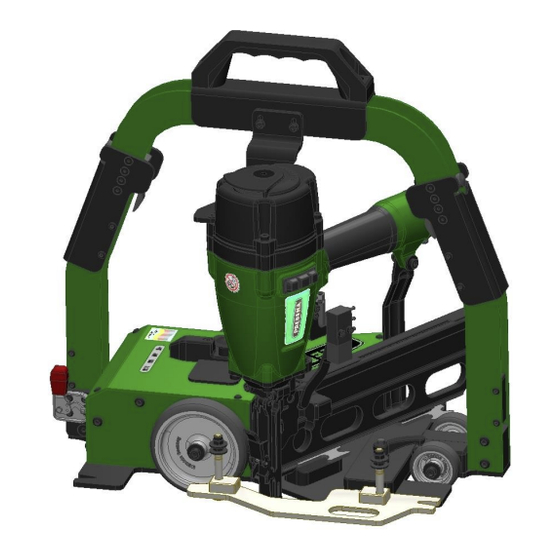
Page 8: Tool Overview And Scope Of Delivery
Tool overview and scope of delivery Explanation Carrying handle 360° adjustable exhaust outlet Trigger button for single shot Continuous operation trigger lever with path control Handle Release cylinder Magazine Spacer plates for depth control Clamping lever for parallel guide Empty shot safety device Guide pin for parallel guide Parallel guide Tool quick release... -
Page 9: Product Features
Product features The Slider has the following features: Single shot possible at any time Adjustable parallel guide Empty shot safety device Trigger lock Can be used in both directions Quick coupler on tool ... -
Page 10: Information Signs On The Slider
Information signs on the Slider Next to the rating plate, there are five pictograms affixed to the Slider. These have the following meanings: Label Meaning Label Meaning Wear suitable ear protection Wear suitable eye protection Observe the operating instructions Staple distances Observe the operating instructions Made in Germany The following uses are not permitted:... -
Page 11: Preparing The Slider
Scratches on the housing paint do not constitute damage. Do not connect a damaged Slider to the compressed air supply. Have a damaged Slider repaired by qualified PREBENA staff before putting it into operation. CAUTION Damaged hose connections can burst and cause injury or damage to property. -
Page 12: Connecting The Slider To The Compressed Air Supply
If no oiler is installed, the length of the air line to the tacker must not exceed 10 m. Otherwise, three to five drops of PREBENA special nailer oil must be filled directly into the air inlet of the Slider every day prior to operation. -
Page 13: Filling The Magazine
CAUTION Using the wrong fasteners can lead to injury, impair the proper functioning of the Slider or damage the Slider. Only use the PREBENA fasteners listed in the section on "Ordering accessories" (see page 29 onwards). CAUTION Risk of crushing from spring-loaded pusher. -
Page 14: Adjusting The Exhaust Outlet
Carry out the following work steps to fill the magazine: Disconnect the Slider from the compressed air supply. Pull the pusher (24) back until it audibly locks into place at the detent pin (26). Insert the fasteners (25) into the magazine with the legs pointing downwards. ... -
Page 15: Checking The Function
Checking the function To ensure that the Slider is functioning correctly, proceed as follows when starting it for the first time: CAUTION Note the danger warnings in the section on "Safety" from page 19 onwards. CAUTION When operating the Slider, there is a risk of injury or damage to property. ... -
Page 16: Operating The Slider
Operating the Slider Proceed as follows to operate the Slider: Prepare the Slider as described from page 11 onwards. Using the parallel guide or guide sight slot Proceed as follows for operation with the built-in parallel guide (12) on the edge of a panel or using the guide sight slot (19) on a specified line: ... -
Page 17: Selecting The Staple Distance
Selecting the staple distance You can adjust the distance between the individual fasteners for operation using continuous triggering. You can choose between distances of 40, 60, 80 or 110 mm. Proceed as follows to select the required distance: WARNING Accidental triggering when selecting the staple distance can lead to serious or even fatal injuries. -
Page 18: Checking The Driving Depth
Proceed as follows to adjust the operating pressure: Adjust the pressure at the pressure valve of the compressor or of the pressure system. Note the pressure gauge on the compressor or the pressure system. Regulating the driving depth with spacer plates You can adjust the driving depth of the fasteners in the material by inserting or removing spacer plates in different positions. -
Page 19: Driving In Fasteners
Driving in fasteners WARNING Risk of injury due to electric shock. Before triggering the Slider, ensure that no power cables can be struck. WARNING During operation, injuries to the eyes and other body parts are possible due to flying splinters. ... - Page 20 You can easily trigger the Slider at any time or continuously at the selected staple distances. Triggering a single shot Proceed as follows to trigger the Slider for a single shot: Place the Slider on the workpiece to be worked on. ...
-
Page 21: Releasing Jams
Releasing jams The Slider has a cover plate on the tool lug. This can be used to remove any jammed or deformed fasteners from the tool lug. WARNING Note the following information before dealing with jamming problems: Disconnect the Slider from the compressed air supply. ... -
Page 22: Reloading The Magazine (Empty Shot Safety Device)
Reloading the magazine (empty shot safety device) The Slider is equipped with an empty shot safety device. This prevents you from being able to trigger the Slider if there are no more fasteners in the magazine. If the empty shot safety device has been triggered, you cannot drive in any more fasteners. ... -
Page 23: After Operation
After operation After operation, or during long periods when the tool is not in use, perform the steps described below. Disconnecting the compressed air supply Pull the quick coupler of the compressed air hose away from the handle. The quick coupler is now released. ... -
Page 24: Transporting And Storing The Slider
Transporting and storing the Slider Packing Pack the Slider in its original cardboard box prior to storage or before the following types of transport: Distances of more than 10 m Transport over unstable ground Transport that involves an unusual posture. Carry out the following preparatory steps: ... -
Page 25: Storing
Only set down the original cardboard box so that it is upright with the lid facing upwards. Storing Oil all metal parts of the Slider thinly with PREBENA special oil. Pack the Slider in the original cardboard box. -
Page 26: Servicing The Slider
Check the safety devices. Check all accessible hose connections. If there is no maintenance unit available, spray 10 to 15 drops of PREBENA special nailer oil, order no.: Z200.10 into the air supply for the tool. CAUTION There is a risk of environmental pollution if the lubricating oil is spilled. -
Page 27: Oiling The Slider
If no oiler is installed and the length of the air line to the tacker is over 10 m, sufficient lubrication is not guaranteed. In both cases, two to five drops of PREBENA special nailer oil must be filled directly into the connection for the compressed air source every day prior to operation. -
Page 28: Faults
If faults occur on the Slider that you are unable to rectify through lubrication and cleaning, you must notify PREBENA Service. Do not perform any repair work on the Slider. Ensure that all faults on the Slider are rectified by PREBENA Service. Overview of faults The following overview lists possible faults and the necessary measures. -
Page 29: Ordering Accessories
PREBENA for operation of the Slider. Ordering fasteners The Slider must only be used with the appropriate PREBENA staples shown on the rating plate. Explanation of the model designation Example: Z50 C NK HA... -
Page 30: Disposing Of The Slider
Never dispose of the Slider or parts of it with normal household rubbish. If you wish to dispose of the Slider, send it to PREBENA. PREBENA can guarantee the correct disposal of the Slider. Contact data can be found on page 30. -
Page 31: Warranty
The warranty shall not cover wear parts, e.g. O rings, etc. It shall be at the discretion of PREBENA to implement the warranty by replacing the defective part or arranging a replacement delivery. No further claims shall be accepted. -
Page 32: Index
Index Accessories 29 Damage Adjusting Avoiding 6 Driving depth 17 Exhaust outlet 14 Description 7 Parallel guide 16 Function 8 Staple distance 16 Product features 9 Scope of delivery 8 Adjusting the exhaust outlet 14 Tool overview 7, 8 After operation Disconnecting the compressed air supply 23 Disconnecting the compressed air supply 23 Emptying the magazine 23... - Page 33 Magazine Safety Empty shot safety device 22 Basic instructions 5 Emptying 23 Empty shot safety device 22 Filling 13 Information signs 10 Reloading 22 Safety devices 9 Manufacturer's address 30 Selecting the staple distance 16 Service intervals 27 Servicing 26 Operation First service 26 After operation 23...
- Page 34 ___________________________________________________________________________________________ PREBENA Wilfried Bornemann GmbH & CO. KG Seestraße 20 – 26, 63679 Schotten, Germany Tel.: +49 (0) 60 44 / 96 01-0, fax: +49 (0) 60 44 / 96 01-820 info@prebena.com, www.prebena.de...
Need help?
Do you have a question about the SLIDER 4C-Z50 and is the answer not in the manual?
Questions and answers