
Related Manuals for Promise Technology PegasusPro R8


Summary of Contents for Promise Technology PegasusPro R8
- Page 1 Server Appliances egasusPro R8 Product Manual Version 1.0 ©2021 PROMISE Technology, Inc. All Rights Reserved.
- Page 2 For the latest information and specifications regarding PROMISE Technology, Inc. and any of its offerings or services, please contact your local PROMISE office or the corporate headquarters. Visit www.promise.com for more information on PROMISE products.
- Page 3 About this guide About this guide This Product Manual describes how to setup, use, and maintain the PegasusPro R8. It also describes how to use the PROMISE Utility Pro software that you install and run on your computer, as well as how to perform advanced system management using the web-based user interface, WebPAM InSight.
- Page 4 Promise Technology PegasusPro R8 Regulatory compliance identification numbers For the purpose of regulatory compliance certifications and identification, this product has been assigned a unique regulatory model number. The regulatory model number can be found on the product nameplate label, along with all required approval markings and information. When requesting compliance information for this product, always refer to this regulatory model number.
- Page 5 For questions regarding this FCC SDoC, contact us by mail or telephone: • PROMISE TECHNOLOGY USA • 3241 Keller St., Santa Clara CA 95054, USA • Email: sales@promise.com For questions regarding this product, go to the PROMISE TECHNOLOGY INC. Support Center Website: http://www.promise.com...
- Page 6 Promise Technology PegasusPro R8 Canada (Avis Canadian) Class A equipment This Class A digital apparatus meets all requirements of the Canadian Interference-Causing Equipment Regulations. CAN ICES-3(A)/NMB-3(A) Cet appareil numérique de la class A respecte toutes les exigences du Règlement sur le matériel brouilleur du Canada.CAN ICES-3(A)/NMB-3(A)
- Page 7 The installation and maintenance of products must be carried out by qualified personnel. If the product sustains damage requiring service, disconnect the product from all power sources and refer servicing to a PROMISE TECHNOLOGY INC. authorized service provider. Examples of damage requiring service include: •...
- Page 8 • Use an approved power cord. If you have questions about the type of power cord to use, contact your PROMISE TECHNOLOGY INC. authorized service provider. • If you have not been provided with a power cord for your product or for any AC-powered option intended for your product, purchase a power cord that is approved for use in your country.
- Page 9 PegasusPro Product Manual About this guide Precautions for maintaining and servicing products To reduce the risk of electric shock or damage to the equipment when installing, maintaining, or servicing products, observe the following precautions: • Some products contain power supplies that are capable of producing hazardous energy levels.
- Page 10 Promise Technology PegasusPro R8 Batteries...
- Page 11 PegasusPro Product Manual About this guide WEEE Information For EU (European Union) member users: According to the WEEE (Waste electrical and electronic equipment) Directive, do not dispose of this product as household waste or commercial waste. Waste electrical and electronic equipment should be appropriately collected and recycled as required by practices established for your country.
- Page 12 Promise Technology PegasusPro R8 ������������������������������������������������������������������������������������������������������������������������������������������������������� bout this guide ������������������������������������������������������������������������������������������������������������������������������������������������������������ 1 ntroduction ������������������������������������������������������������������������������������������������������������������������������������������������������������� 1 acking ���������������������������������������������������������������������������������������������������������������������������������������������������������� 2 Pecifications ����������������������������������������������������������������������������������������������������������������������������������������������������������������� 3 ardware ������������������������������������������������������������������������������������������������������������������������������������������������������������ 3 ront Anel ������������������������������������������������������������������������������������������������������������������������������������������������������������� 4 Anel ������������������������������������������������������������������������������������������������������������������������������������������ 5 nstAllAtion And etuP ����������������������������������������������������������������������������������������������������������������������������������������������������������������� 6 nPacking ������������������������������������������������������������������������������������������������������������������������������ 6 ummAry oF the setuP Procedure ����������������������������������������������������������������������������������������������������������������������������...
-
Page 13: Table Of Contents
PegasusPro Product Manual Contents ������������������������������������������������������������������������������������������������������������������������������������������������������������� 38 asHBoard ���������������������������������������������������������������������������������������������������������������������� 39 eMBer and roUP anageMent ��������������������������������������������������������������������������������������������������������������������������� 40 reAting A ember ccount ��������������������������������������������������������������������������������������������������������������������������������� 41 eleting An xisting ccount ������������������������������������������������������������������������������������������������������������������������������ 42 reAting A ember rouP ����������������������������������������������������������������������������������������������������������������������������������� 43 dding embers to A rouP ����������������������������������������������������������������������������������������������������������������������������������������� 44 etwork anageMent �����������������������������������������������������������������������������������������������������������������������������������... - Page 14 • “Rear Panel” Packing List Check the shipping package to make sure you have the following items: • PegasusPro R8 (includes 8 hard disk drives installed in drive carriers) • One power cord (1.5 meter) • Thunderbolt™ 3 cable • Quick Start Guide...
- Page 15 Promise Technology PegasusPro R8 Specifications Interface Thunderbolt Ports 2 Thunderbolt™ 3 ports LAN Ports Four 10 GbE ports (Base-T or SFP) USB Ports USB 2.0*2 / USB 3.2*4 Network 1 GbE RJ-45*2 Form Factor Intel CPU i5-8500.3.0 GHz.9M Cache.65W.6 Cores...
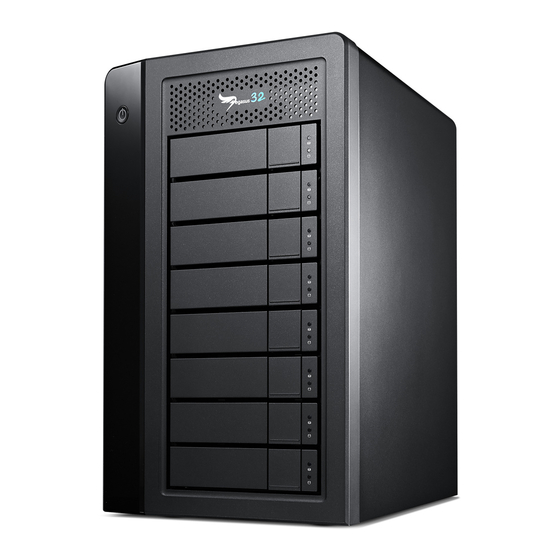
- Page 16 PegasusPro Product Manual Introduction Hardware The following section provides a summary of the front and back panel hardware features of PegasusPro R8. Front Panel The front panel of PegasusPro R8 enclosures provide access to drives carriers. Defective drives can be replaced without interruption of data availability to the host computer. If so configured, a hot spare drive...
- Page 17 PegasusPro R8 Rear Panel The rear panel of the PegasusPro R8 enclosure provides access to the power supply, Thunderbolt™ 3 DAS (Private) ports, 10G NAS (Share) ports, VGA and HDMI video monitor connections, 1G Ethernet ports for device management over the local network, and USB 3.2 ports.
- Page 18 PegasusPro Product Manual Installation and Setup nstallatIon and etup This chapter contains the following topics: • “Unpacking” • “1 Download Software and Driver” • “2 Install PegasusPro Driver on your Mac” • “3 Install PROMISE Utilty Pro on your Mac” • “4 Connect Power and power on”...
- Page 19 10G Ethernet (Public) interface. Install the PegasusPro Driver Install PROMISE Utility Pro. Connect the power cord and power on the PegasusPro R8. Connect the PegasusPro Private Port to your computer with a Thunderbolt™ 3 cable. Connect the PegasusPro Share Port to the network.
- Page 20 PegasusPro Product Manual Installation and Setup 2 Install PegasusPro Driver If PegasusPro is connected to a Thunderbolt port on your computer, a PROMISE PegasusPro Driver should be installed and loaded before you using PegasusPro on Mac or Windows system. Follow instructions for your OS in the wizard to install the PROMISE Pegasus Driver. The final step will be to restart the computer in order to complete the installation. Install Driver on Mac Follow the instructions below for Mac users.
- Page 21 Promise Technology PegasusPro R8 Type the administrator password of your computer and click Install Software. Click Continue Installation to confirm you want to continue with the installation. It will be necessary to restart your computer.
- Page 22 PegasusPro Product Manual Installation and Setup Install Driver on Windows Download the latest PROMISE Pegasus Driver for Windows, and follow these steps to install the driver on a Windows computer. Double-click on the driver installation file to launch the install wizard. Click on the Next button to begin installation. In the License Agreement dialog, you must click I accept the terms of the license agreement to continue. If you click agree, you can click Next to continue. The installer will start. Click Finish to close the menu. You will need to restart your computer.
- Page 23 Promise Technology PegasusPro R8 3 Install PROMISE Utilty Pro The PROMISE Utility Pro software utility is necessary for managing users and folders, for enabling File Boost, and other important features of the PegasusPro Series. More advanced configuration such as changing the Disk Pools or RAID type can be done using the web- based management interface, WebPAM InSight, if preferred. The software utility installation package is located on the PegasusPro. Follow the instructions below to install the utility according to the OS you are using. Install Utility on Mac To install the PROMISE Utility Pro on Mac: Double-click on the PegasusPro icon on your desktop to view the device contents.
- Page 24 PegasusPro Product Manual Installation and Setup Administrator permission is required to install the software. Type the administrator password of your computer for permission to install the software. You can change the location on your system for the installation if desired by clicking the Change Install Location button.
- Page 25 Promise Technology PegasusPro R8 Install Utility on Windows To install the PROMISE Utility Pro on Windows: Double-click on the utility installation file to launch the install wizard. Click on the Next button to begin installation. Click Install to continue. The installer will start. Click Finish to close the menu.
- Page 26 Insert the female end of one of the supplied power cable in to a power cable receptacle on the power supply unit, and plug the other end in to a suitable power outlet. Power insert and PSU on rear panel of PegasusPro R8 Press the Power button on the front left bracket facing.
- Page 27 Promise Technology PegasusPro R8 5 Connect Thunderbolt™ 3 (Private Port) Connect the host computer directly to the PegasusPro R8 with a Thunderbolt 3 cable. There are two Thunderbolt™ 3 ports, use either one. This Direct Attached Storage (DAS) connection is called the Private Port; it is used by one individual with access to two DAS volumes. PegasusPro R8 Thunderbolt™3 ports on rear panel PegasusPro is compatible with a Thunderbolt™4 Windows PC...
- Page 28 Use a suitable Ethernet cabling (Cat. 6e or better) to connect one to four of the Share Ports (10G network ports) on the rear panel. The network cables for the Share Ports can be connected to a switched Ethernet network, or connect directly to a collaborative user computer. PegasusPro R8 10G ports on rear panel The 10G network Share Port enables collaborative workflow for users connected via 10G network. Users install the same software, PROMISE Utility Pro, and use it to mount shared folders for collaborative work.
- Page 29 PegasusPro to the same switched network as the computer used to manage the system. Note that this is an optional step, since the device is ready to use as shipped. However, some advanced configuration options can only be accessed using the WebPAM Insight interface. 1G ports on back of PegasusPro R8 Connect either 1G port to 1G network for system management using WebPAM Insight.
- Page 30 PegasusPro Product Manual HDD Replacement Hdd r eplacement PegasusPro models are shipped with Hard Disk Drives (HDD) installed, so it will not be necessary to install new drives in order to use the device. If it is necessary to change a drive, follow the instructions in this section. It is best to have identical HDD in all bays, or at least identical specifications for capacity and speed.
- Page 31 Installing 3.5” Disk Drive in the Carrier The instructions below apply 3.5” hard disk drives installed in drive carriers intended for use with PegasusPro R8. 1. Remove a disk drive carrier. 2. Carefully lay the disk drive into the drive carrier at the front, so that the screw holes on the sides line up correctly with the power and data connectors facing away from the carrier handle.
- Page 32 PegasusPro Product Manual Managing the PegasusPro promIse u sIng tIlIty Most system management can be done using PROMISE Utility Pro connected directly through the Thunderbolt™ 3 connection or Private Port. Some more advanced system changes however require using the WebPAM Insight web-based system management GUI. For example, if you want to change the RAID, extend or change a Storage Pool, these operations must be done using WebPAM Insight.
- Page 33 Promise Technology PegasusPro PROMISE Utility Pro Many users might find it simpler to perform administrative operations using Pegaus Utility Pro. Fortunately, many of the necessary administrative functions can be done easily using either method. In this section we describe most of the basic setup functions and some of the user tasks that can be completed using PROMISE Utility Pro.
- Page 34 PegasusPro Product Manual Managing the PegasusPro The default login settings are: • User Account name: admin Password: admin • The administrator login information is used for accessing the management interface on the network as well. You will need to change the default login settings the first time you set up the system. Upon logging in you are presented with an opportunity to change the login password for the administrator.
- Page 35 Promise Technology PegasusPro The Folders menu appears with the default folder configuration (PegasusPro_DAS_1 and PegasusPro_ DAS_2) and the shared space folders (Public and Home). The administrator has access to the DAS Volume folders. The shared space Team folders are available to be shared over the 10G network.
- Page 36 PegasusPro Product Manual Managing the PegasusPro Summary of Folder Types Folder Type Administrator account Member account DAS Volume • The Administrator can remove any or all of the DAS Volumes appear only when files and subfolders in the DAS Volumes. connected to the PegasusPro via Direct Attached Storage •...
- Page 37 Promise Technology PegasusPro Members First Time Using PROMISE Utility Pro on Mac Install the PROMISE Utility Pro on your Mac and launch the utility. The Welcome menu presents with two options for connecting with the PegasusPro. If you have an account already, login normally with your User Name and Password.
- Page 38 PegasusPro Product Manual Managing the PegasusPro Follow the steps below for first time member set up: If you are using a Mac, click the Continue with Mac Device button to proceed with the first time setup. To access the PegasusPro, you first need to get permission from the administrator. Click on the Ask For Access Now button.
- Page 39 Promise Technology PegasusPro It is first necessary to create a password for your account. Your default account user name is the name of the Mac user account logged in when the request was sent. The user name cannot be changed. Click on the Set up now link in the blue banner that appears in the Folders menu.
- Page 40 PegasusPro Product Manual Managing the PegasusPro Members First Time Using PROMISE Utility Pro on Windows Install the PROMISE Utility Pro on your Windows 10 (or later) system and launch the utility. The Welcome menu presents with two options for connecting with the PegasusPro. If you have an account already, login normally with your User Name and Password.
- Page 41 Promise Technology PegasusPro Follow the steps below for first time member set up in Windows: If you are using Windows, click the Continue with Windows Device button to proceed with the first time setup. To access the PegasusPro, you first need to get permission from the administrator. Click on the Ask For Access Now button.
- Page 42 PegasusPro Product Manual Managing the PegasusPro It is first necessary to create a password for your account. Your default account user name is the name of the Windows user account logged in when the request was sent. The user name cannot be changed.
- Page 43 Promise Technology PegasusPro Adding a folder with PROMISE Utility Pro To add a folder to a Team Volume, follow these steps: Click on the + icon in the lower right corner, enter a name for the new folder. If there are more than one Team Volume, first choose the New Team Volume option that appears.
- Page 44 PegasusPro Product Manual Managing the PegasusPro There are two categories for Members: Members which are allowed to add, delete or edit their files in the Team folder (read/write) and Members that can view content but not make changes (read only). Hover the cursor over Members to move from one category to the other, then click Create Folder to finish.
- Page 45 Promise Technology PegasusPro Using FileBoost FileBoost is a PROMISE proprietary technology that makes possible very rapid data transfers to and from the DAS Volume and the NAS folder accessible on Member computers. This is a key feature of the PegasusPro system and is especially useful when large amounts of data need to be moved between folders mounted on Member computers.
- Page 46 PegasusPro Product Manual Managing the PegasusPro To start using FileBoost: Click on the FileBoost button, the FileBoost menu appears. The menu reveals the content of the Source Volume in the left panel, with the Target folders available to the Member in the right panel.
- Page 47 Promise Technology PegasusPro The items appear in the target location. Click X to close the FileBoost menu when you are finished copying or moving files. Status on the transfers appear above the menu. Click outside the menu to close the status menu.
- Page 48 In order to connect to WebPAM Insight, the computer used for management and the PegasusPro must be connected to the same switched 1G network, and be in the same IP subnet. 1G ports on back of PegasusPro R8 Connect either 1G...
- Page 49 Promise Technology PegasusPro Accessing WebPAM Insight The simplest way to access WebPAM Insight is to click on the link embedded in the PROMISE Utility Pro interface. To launch WebPAM Insight in the default web browser, click the icon to view the various options and select Manage device.
- Page 50 PegasusPro Product Manual Managing the PegasusPro Perusing WebPAM Insight GUI The WebPAM Insight interface consists of menu icons in the left panel, each leading you to a specific function; a virtual front view of the PegasusPro R16 with drives indicating their working status; a system health status indicator, capacity indicator that informs of total and available storage capacity;...
- Page 51 Promise Technology PegasusPro Dashboard The Dashboard menu is the starting point on WebPAM Insight after login. This display menu provides a quick overview of the real time status to the physical enclosure hardware and functional systems of the PegasusPro. Dashboard Click on the arrow icon to view a drop-down menu to create a Service Report, find the current version of WebPAM Insight, or link to the Support menu on the PROMISE website.
-
Page 52: M Ember And G
PegasusPro Product Manual Managing the PegasusPro Member and Group Management Management of accounts and groups can be done by the administrator using PROMISE Utility Pro or WebPAM Insight. In WebPAM Insight, click the Members icon in the left panel to go to the Members main menu. - Page 53 Promise Technology PegasusPro Creating a New Member Account To create a new account, in the Members menu: Click on the Create Account button, a new menu appears. Enter a Name and a Display Name for the account. Choose the Primary Group...
-
Page 54: Deleting An Existing Account
PegasusPro Product Manual Managing the PegasusPro Deleting an Existing Account To remove an existing account: Go to the Members Main Menu, click on the icon in the right column for the account to be removed, and select the Delete option; a new menu appears. Members menu Confirm that you want to remove the account, click on Delete Account. -
Page 55: Creating A New Member Group
Promise Technology PegasusPro Creating a New Member Group To create a new member group: In the Group menu, click on the Create Group + icon, a new menu appears. Group menu Enter a Group Name and a Description for the account. -
Page 56: Adding Members To A Group
PegasusPro Product Manual Managing the PegasusPro Adding Members to a Group To add members to an existing group: In the Group menu, click on the Group icon to view details for that group. Click on the Add Account button, a new menu appears. Select existing users from the list and click Save. -
Page 57: Network Management
Promise Technology PegasusPro Network Management Network management on the PegasusPro R16 includes managing network settings for the 10G and 1G Ethernet interfaces, as well as enabling and configuring bonding for the Ethernet interfaces. Device management over the network is done through the 1G Ethernet interface. Note that if you change the IP address or other network settings on this interface, you will need to reconnect to the device for further management changes. -
Page 58: Network Interface Bonding
PegasusPro Product Manual Managing the PegasusPro Network Interface Bonding Network bonding is a process of combing or joining two or more network interfaces together into a single interface. Network bonding offers performance improvements and redundancy by increasing the network throughput and bandwidth. If one interface is down or unplugged the other one will work. It can be used in situations where you need fault tolerance, redundancy or load balancing networks. -
Page 59: Team Folders
Promise Technology PegasusPro Team Folders Management of production teams for collaboration will likely be one of the main activities of the PegasusPro administrator. The user interface and menus are user friendly and intuitive in order to simplify overall system management. Folders, teams and users can also be managed using the PROMISE Utility Pro. -
Page 60: Creating A New Team Folder
PegasusPro Product Manual Managing the PegasusPro Creating a New Team Folder To create a new Team Folder, click the + Add Folder button, the Add New Folder menu appears. Add New Folder to Team Volume menu To create a new Team Folder: Type a Folder Name, and click to enable or disable protocols for the folder (SMB, FTP, NFS or WEBDAV all enabled by default). -
Page 61: Adding Members To A Team Folder
Promise Technology PegasusPro Adding Members to a Team Folder To add members to a team folder, click on the Add Member icon for an eligible team folder. Note that team folders with the blue T icon are eligible for member management in this menu. -
Page 62: Editing/Deleting Members And Permission Settings
PegasusPro Product Manual Managing the PegasusPro Editing/Deleting Members and Permission Settings To delete members from a team folder or to change settings such as read-write permission settings, go to the Folders List, click on the Details icon for the folder ( ... ) and choose the Edit Details option. Note that this is also where you can change the name of the folder. -
Page 63: Evice I Nformation D
Promise Technology PegasusPro Device Information The Device menus include a few settings menus for system alarm and system time. This is also where you can reset the the device to the factory default settings. Most of the menus under the Device banner are used to present information about the enclosure. -
Page 64: Device Settings
PegasusPro Product Manual Managing the PegasusPro Device Settings Click the Settings link in the Device menu to view the basic settings menu for the device. The actions available in the Basic Settings menu are: • Allow detection using PROMISE Utility Pro Enabled by default. -
Page 65: Device Health
Promise Technology PegasusPro If additional JBOD systems are connected, a link on the left panel provides a quick view of the status. JBOD Status in Device menu WP DEVICE JBOD Status.jpg Device Health Click the Health link in the Device menu to view system health status information for the following: • Controller... -
Page 66: Physical Drive Status
PegasusPro Product Manual Managing the PegasusPro Physical Drive Status Click on the Physical Drives link in the Device menu to view the current status of the physical drives populating the enclosure. Basic information includes that drive health, the type, capacity and configuration status. -
Page 67: Events Log
Promise Technology PegasusPro Administration Administration menus include the Events, Firmware Update, Import/Export settings, Service, Protocol Registration menus. Events Log The log of Events appears. Events are added to the top of the list. Each item includes: • Index number – Begins with 0 at system startup. -
Page 68: Ervice
PegasusPro Product Manual Managing the PegasusPro Service Use the Service menu to start, stop or configure SSH, Email and Webserver functions. Click on the icon for the service and choose the option to configure Settings, Start, Stop or Restart. Protocol The Protocol menu is used to enable, disable or configure settings for SMB, NFS, FTP and HTTP protocols. -
Page 69: Configuring A New Storage Volume
Promise Technology PegasusPro Configuring A New Storage Volume The PegasusPro is shipped with the storage configured ready to use. However, if you should want to delete the existing storage volumes and create a new storage configuration, the instructions in this section explain how to do it. - Page 70 PegasusPro Product Manual Managing the PegasusPro Template Option The Template option will create everything in one step. You simply need to enter a name for the storage pool, click Yes or No to create or not create a spare drive and click on Create. The new pool will use all available drives for one storage pool with two volumes.
-
Page 71: C Ontacting T Echnical S Upport
Promise Technology PegasusPro ontactIng ecHnIcal upport PROMISE offers local Phone Support for Pegasus series during normal business hours: For telephone support and business hours click here (http://www.promise.com/ContactUs) Web support and Live Chat is offered 24/7 Web: https://support.promise.com Live Chat: http://www.promise.com/us/Support Please be sure to register your product at PROMISE eSupport (https://support.promise.com ) - Page 72 PegasusPro Product Manual Contact Technical Support United States 3241 Keller St. Santa Clara CA. 95054 Technical Support (E-Support): https://support.promise.com Web Site: http://www.promise.com Australia Technical Support (E-Support): https://support.promise.com Web Site: http://www.promise.com EMEA Netherlands Science Park Eindhoven 5228 5692 EG Son, The Netherlands Technical Support (E-Support): https://support.promise.com Web Site: http://www.promise.com Austria...
- Page 73 Promise Technology PegasusPro Norway ITF Technical Support (E-Support): https://support.promise.com Web Site: http://www.promise.com Belguim Technical Support (E-Support): https://support.promise.com Web Site: http://www.promise.com Luxembourg Technical Support (E-Support): https://support.promise.com Web Site: http://www.promise.com United Kingdom Technical Support (E-Support): https://support.promise.com Web Site: http://www.promise.com Taiwan Technical Support (E-Support): https://support.promise.com Web Site: http://www.promise.com...
- Page 74 PegasusPro Product Manual Contact Technical Support Korea Technical Support (E-Support): https://support.promise.com Web Site: http://www.promise.com Hong Kong Technical Support (E-Support): https://support.promise.com Web Site: http://www.promise.com Singapore Technical Support (E-Support): https://support.promise.com Web Site: http://www.promise.com Japan 3F, Mura Matsu Bldg, 3-8-5, Hongo Bunkyo-ku Tokyo 113-0033, Japan Technical Support (E-Support): https://support.promise.com Web Site: http://www.promise.com...
-
Page 75: L Imited W Arranty
PegasusPro imited arranty PROMISE Technology, Inc. (“PROMISE”) warrants that this product, from the time of the delivery of the product to the original end user: a) all components for a period of three (3) years; b) will conform to PROMISE’s specifications;... -
Page 76: D Isclaimer Of Other Warranties
PegasusPro Product Manual Contact Technical Support iscLaimeR of otheR waRRanties This warranty covers only parts and labor, and excludes coverage on software items as expressly set above. Except as expressly set forth above, PROMISE disclaims any warranties, expressed or implied, by statute or otherwise, regarding the product, including, without limitation, any warranties for fitness for any purpose, quality, merchantability, non-infringement, or otherwise. -
Page 77: Y Our R Esponsibilities
Promise Technology PegasusPro esponsibiLities You are responsible for determining whether the product is appropriate for your use and will interface with your equipment without malfunction or damage. You are also responsible for backing up your data before installing any product and for regularly backing up your data after installing the product. - Page 78 PegasusPro Product Manual Contact Technical Support Return ONLY the specific product covered by the warranty. Do not ship cables, manuals, CDs, etc. USA and PROMISE Technology, Inc. Canada: Customer Service Dept. Attn.: RMA # ______ 47654 Kato Road Fremont, CA 94538...
Need help?
Do you have a question about the PegasusPro R8 and is the answer not in the manual?
Questions and answers