
Related Manuals for AVANT MINI DIGGER 120


Summary of Contents for AVANT MINI DIGGER 120
- Page 1 English Mini digger 120 2019 1 Operator's Manual for Attachment Mini digger 120 Product number: A36822 www.avanttecno.com A438881 2019 1 EN 2016-...
- Page 2 Mini digger 120 2019 1...
-
Page 3: Table Of Contents
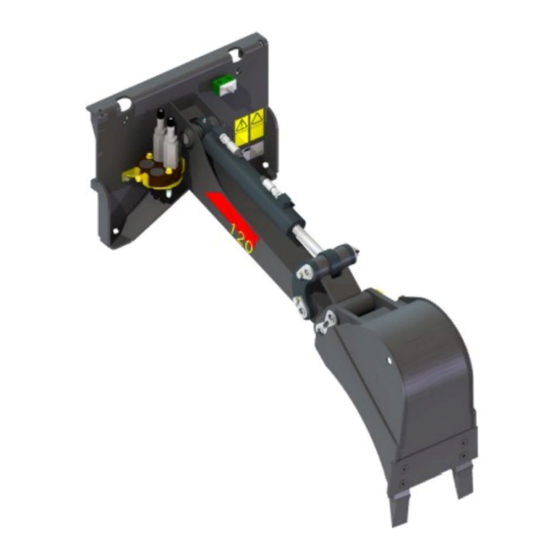
Mini digger 120 2019 1 CONTENTS 1. FOREWORD ............................4 Warning symbols used in this manual ..........................5 2. DESIGNED PURPOSE OF USE ......................6 3. SAFETY INSTRUCTIONS FOR USING THE ATTACHMENT ............7 4. TECHNICAL SPECIFICATIONS ......................10 Safety labels and main components of the attachment.................. 10 5. -
Page 4: Foreword
If you sell or transfer the equipment, be sure to hand over this manual to the new owner. If the manual is lost or damaged, you can request a new one from your Avant dealer or from the manufacturer. -
Page 5: Warning Symbols Used In This Manual
5 (26) Warning symbols used in this manual The following warning symbols are used throughout this manual. They indicate factors that must be taken into account to reduce the risk of personal injury or damage to property: WARNING SAFETY ALERT SYMBOL This symbol means: “Warning, be alert! Your safety is involved!”... -
Page 6: Designed Purpose Of Use
2. Designed purpose of use The AVANT Mini digger 120 is an attachment that is suitable for use with AVANT multi purpose loaders that are shown in Table 1. The digger is designed for occasional use as a quick and simple to use digging attachment, that is also easy to transport. -
Page 7: Safety Instructions For Using The Attachment
Never lift or move an unlocked attachment. The Mini digger 120 is designed to be used by one operator at a time. Do not let WARNING others near the danger area of the equipment when it is in use. - Page 8 8 (26) Do not use the digger on horizontally tilted terrain. Ensure the stability of the loader and firmness of the ground also on even terrain. Pay attention to the surroundings and any other persons and machines moving in the vicinity.
- Page 9 9 (26) Remember to wear proper personal protective equipment: The noise level at the driver's seat may exceed 85 dB(A) depending on loader model and operating cycle. Extended exposure to loud noise can cause hearing impairment. Wear hearing protection while working with the loader. ...
-
Page 10: Technical Specifications
Maximum input of hydraulic energy: 25 l/min, 20 MPa (200 bar) Suitable Avant loaders: See Table 1 Several available bucket options are listed in Table 3 below. Table 3 - Mini digger 120 - Bucket options A415232 A415230 A35564 (standard bucket) - Page 11 Crushing hazard - Do not go under a raised attachment; stay away from raised equipment. A420269 Attachment identification plate Table 5 - Main components of the Mini digger 120 Frame with quick coupling brackets Tilt cylinder Bucket pin coupling Interchangeable bucket...
-
Page 12: Attaching The Attachment
Do not stay in the area between the attachment and the loader. Mount the attachment only on level surface. WARNING Never move or lift an attachment that has not been locked. Avant quick coupling system: Step 1: Lift the quick attach plate locking pins up and turn them backwards into the slot so that they are locked in the upper position. -
Page 13: Connecting And Disconnecting Hydraulic Hoses
5.1 Connecting and disconnecting hydraulic hoses On Avant loaders the hydraulic hoses are connected using the multi connector system. If you have an Avant 300-700 series loader with the conventional quick couplers and wish to change to the multi connector system, contact your Avant dealer or service point for instructions or installation services. - Page 14 14 (26) Keep all fittings as clean as possible; use the protective caps on both the attachment and the loader. Dirt, ice, etc. may make using the fittings significantly more difficult. Never leave the hoses hanging on the ground; place the couplings onto the holder on the attachment.
-
Page 15: Unattaching The Digger And Correct Storage Position
15 (26) 5.2 Unattaching the digger and correct storage position Correct storage position: Before disconnecting the digger, turn the bucket so that it will be in level with the digger frame, or tilted slightly above, as shown in adjacent figure. In this way it will be easy to connect the digger to the loader. -
Page 16: Changing Of Bucket
16 (26) Do not store the attachment directly against the ground; place it on blocks of wood or on a pallet, for example. For longer storage periods touch up the paint where needed, grease the lubrication points and oil the visible parts of the hydraulic cylinder shaft to prevent rust damage. -
Page 17: Instructions For Use
17 (26) 6. Instructions for use Check the attachment and the operating environment once more before starting to work, and that all obstacles have been removed from the operating area. Quick inspection of the equipment and the operating area before use are parts of ensuring safety and the best performance of the equipment. -
Page 18: Checks Before Use
18 (26) 6.1 Checks before use Check that all obstacles, including any possibly hidden ones, have been removed from the working area or marked visibly before operation. Make sure that it safe to dig at the location. Find out if there are electric cables, water lines or similar ... - Page 19 19 (26) Planning and efficient use of the digging equipment Digging work is always started with thorough inspection of the site and planning the work in advance. Things to consider include at least the following: Inclinations and loader capabilities Digging movements and reach of the equipment ...
- Page 20 20 (26) Filling the bucket: Depending on soil type and operating conditions, the most effective position and movements may differ from the pictures shown. pictures represent typical recommended operating practise. The bucket should never be pressed hard directly downwards, as this would result only in lifting the front tyres of the loader, and moving of the loader.
-
Page 21: Maintenance And Service
Finding any fault means that the hydraulic hose or component must be replaced and the equipment must not be used until it is repaired. Spare parts are available from your nearest AVANT retailer or authorised service point. Leave the repair work to professional service technicians, if you don’t have adequate knowledge and... -
Page 22: Cleaning The Attachment
22 (26) 7.2 Cleaning the attachment Clean the attachment regularly to prevent accumulation of dirt which is more difficult to remove. A pressure washer and mild detergent can be used for cleaning. Do not use strong solvents, and do not spray directly at the hydraulic components, or at the labels on the attachment. -
Page 23: Warranty Terms
23 (26) 8. Warranty terms Avant Tecno Oy grants a warranty of one year (12 months) from the date of purchase for the attachment it manufactures. The warranty covers repair costs as follows: Work costs are covered, if the repair is not performed at the factory. - Page 24 SFS-EN ISO 12100, SFS-EN ISO 4413 Mallit / Modeller / Models Avant Hydraulitoiminen kaivuulaite; Avant-kuormaajan työlaite Hydraulisk grävaggregat; arbetsredskap för Avant lastare A36822 Hydraulic Mini digger; attachment for Avant loaders 20.11.2019 Ylöjärvi, Finland Risto Käkelä, Toimitusjohtaja / Verkställande direktör / Managing Director...
Need help?
Do you have a question about the MINI DIGGER 120 and is the answer not in the manual?
Questions and answers