
Related Manuals for progeo JOKER R2


Summary of Contents for progeo JOKER R2
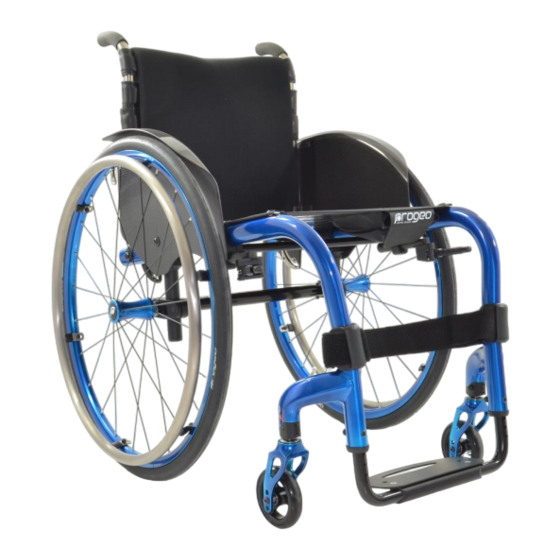
- Page 1 ULTRA-LIGHT WHEELCHAIR WITH RIGID FRAME JOKER R2 User’s manual ENGLISH - rev. 0 – 2021/05...
- Page 2 Joker R2...
-
Page 3: Table Of Contents
Negotiating obstacles: steps and stairs ............20 TECHNICAL SPECIFICATIONS ..............42 Negotiating slopes or inclines ..............22 WARRANTY ....................43 Ensuring stability ..................23 TRASPORT OF THE WHEELCHAIR ............24 GENERAL DESCRIPTION OF PARTS ............25 ADJUSTMENTS ..................26 ACCESSORIES ..................27 Joker R2... -
Page 4: Introduction
BEFORE using this wheelchair, please READ all parts of this manual and keep it for future reference. Check that the warranty certificate has been fully compiled by the dealer and keep it with care. This document is also available in PDF format for the visually impaired at www.rehateamprogeo.com. Joker R2... -
Page 5: Flammability
This symbol indicates a potentially hazardous situation, which, if not avoided, may This symbol indicates important instructions or special information. cause minor personal injuries or property damage. PRODUCT LABELS UDI code (Unique Device Progeo brand logo Year/month of production Identification) XXXXXXX Product name Serial number Read the user’s manual... -
Page 6: Intended Purposes And Conditions Of Use
If the wheelchair configuration causes the wheelchair width to exceed 700 mm, it may be difficult or impossible to travel on public transport. JOKER R2 Given its dimensional and structural characteristics, the wheelchair model is ideal for use by both teenagers and adults. -
Page 7: Putting The Wheelchair Into Service And Regular Use
In case of installation of any additional accessory to the product delivered by Rehateam s.r.l., the latter must be guaranteed by your dealer, the accessory device manufacturer, and approved by Rehateam s.r.l. Joker R2... -
Page 8: Tyre Pressure
Occupants with reduced upper limb strength should use the extended lever. Take care not to pinch/crush your fingers when applying and releasing the brakes, but also in any other situation where your hands come close to the brakes. Joker R2... - Page 9 On the other hand, in comparison with traditional brakes, its lever is located a lower position and it is more challenging to operate. For these reasons, it is not suitable for occupants with reduced control/movement of the torso and/or upper limbs and hands. Joker R2...
-
Page 10: Quick Release Rear Wheels
Always release the brake before removing and inserting the rear wheel. Always check the correct engagement of the quick release axles. The holes for the rear wheel positioning may pinch or crush your fingers. Take care whenever your hands are close to such holes. Joker R2... -
Page 11: Unfolding And Folding The Backrest
A click indicates that pin B has been inserted into the hole in plate C. When the backrest lock is closed, you can lift the wheelchair by grasping its ridizer bar. With tubular armrests, it may be necessary to rotate them slightly in order to fold down the backrest. Joker R2... -
Page 12: Footrest
(5) Aluminium flip-back, angle and depth adjustable. Flipping up the footrest is a very easy operation you can perform with one hand by raising the footrest. To return the footrest to the using position, just push it down. Joker R2... -
Page 13: Calf Strap
The combination of the inclination of the seat with the inclination of the backrest posts and the inclination of a postural backrest with respect to the posts, could result in an angle greater than 25° with respect to the vertical. In that case, the wheelchair must have a headrest or arrangement to secure it as intended for this model. Joker R2... -
Page 14: Armrests
(1) The correct position of use is shown as P and is attained when the shaft A is inserted into the support B and is secured by bolt C driven into the cavity D (2) (3) (4). (5) To remove the armrest, just pull it up. (5) (6) To fit the armrest, insert the shaft A into the support B and let it slide down to its correct position as previously indicated. Joker R2... - Page 15 (9) To insert the armrest; insert the part A of the support into the hole of part B and turn the armrest until it locks as described above. The supports A and B are precisely machined so that inserting and removing the armrest is possible only if the movement is perfectly vertical. Joker R2...
-
Page 16: Fasteners
Wheelchair lifetime PROGEO wheelchairs are used on a daily basis and they are consequently subject to continuous stress that causes inevitable wear and tear of the parts. With this in mind, PROGEO wheelchairs have a lifetime of 5 years provided they receive thorough periodic maintenance. -
Page 17: Safety
SAFETY The Progeo wheelchair is a medical device and therefore it MUST NOT BE LENT NOR GIVEN TO OTHER USERS, even for short period. It is forbidden to make any unauthorised modifications or use un-approved parts that may change the wheelchair structure and create an unsafe condition or possible harm to the wheelchair and occupant. -
Page 18: Transfers: Getting In And Out Of The Wheelchair
During wheelchair transfers, never lean or sit on the clothing guard or armrest. These elements could bend or break, possibly resulting in injury. If your wheelchair is equipped with armrests, remove or swivel the transfer-side armrest outwards or back to facilitate the manoeuvre. If your wheelchair is a tilting seat type, you should set it flat. Joker R2... -
Page 19: Starting To Drive Your Wheelchair
If you hang a backpack, a bag or any other object on the push handlebars or any rear area of the wheelchair, the resulting uneven weight distribution can significantly affect the risk of overbalancing. TO PREVENT THE WHEELCHAIR FROM OVERBALANCING DURING NORMAL USE, WE RECOMMEND FITTING AN ANTITIPPING SYSTEM. Joker R2... -
Page 20: Negotiating Obstacles: Steps And Stairs
Tip the wheelchair forward until the front castors rest on the upper surface of the obstacle. Lean forward in the chair so that the rear of the chair is lighter. Grasp the hand rims tightly and move the rear wheels forwards to push them on top of the obstacle. Joker R2... - Page 21 In the case of stairs with more than one step, two assistants are always required. The first assistant stands behind the wheelchair and holds the push handles. The second assistant grasps a fixed part of the front frame, guiding the wheelchair manoeuvre from the front. Joker R2...
-
Page 22: Negotiating Slopes Or Inclines
Hold on to the hand rims on the rear wheels and allow them to slide slowly through your hands. The occupant should be able to stop the wheelchair at any time simply by blocking the motion of the hand rims. Joker R2... -
Page 23: Ensuring Stability
Do not move your upper body beyond the rear wheel as the wheelchair could overbalance. For greater safety and stability, hold on to the wheelchair with your free hand. Do not lean too far out to the side, the wheelchair could overbalance. Joker R2... -
Page 24: Trasport Of The Wheelchair
Take hold of the chair with two hands on the two fixed parts of the frame to balance the wheelchair’s weight and make it easier to lift. Load the wheelchair into the car and then the rear wheels. Joker R2... -
Page 25: General Description Of Parts
8 Hand rim 9 Rear wheel 10 Quick release axle 11 Tyre 12 Welded fork support 13 Fork adjustment support 14 Fork 15 Castor 16 Brakes 17 Front axle 18 Backrest plate 19 Rear axle 20 Footrest 21 Calf strap Joker R2... -
Page 26: Adjustments
ADJUSTMENTS The PROGEO wheelchair is a medical device manufactured according to a patient-specific data sheet compiled by qualified personnel. Rehateam s.r.l.. manufactures, tests and delivers the wheelchair to the dealer with the measurements and characteristics required in the order data sheet. -
Page 27: Accessories
Remember that while using the transit wheels (with the rear wheels removed), the parking brakes will not work at all. The stability of the wheelchair resting on the wheels for narrow passages is reduced, therefore pay great attention and seek help from an assistant. Joker R2... -
Page 28: Anti-Tip Wheel
(6) To put the anti-tip wheel on, insert the part A of the support in the hole of the part B and turn the post until the two parts locks together. The supports A and B are precisely machined; thus the anti-tip wheel may be inserted only with a vertical movement. Joker R2... -
Page 29: Push Handles For Assistant
To swing the handle up to the operating position (2), just swing it up until the pin A automatically locks. When the assistant moves the wheelchair with the occupant sitting on it, make sure the push handles are safely locked in their operating position. Joker R2... -
Page 30: Tetraclip
Before using the tray, make sure it is firmly fixed. Try to move it to-and-fro: if it does not move, it is ready for use. To remove the tray, loosen the bolt A of the support S on each side of the wheelchair and slide it off. Joker R2... -
Page 31: Pelvic Belt And Harness
Before sitting in the wheelchair, the occupant or assistant should open the buckles by pressing on both sides of the locking buckle and pulling the two parts open. Once seated in the chair with the belt or harness in place, the occupant can close the buckles by fastening the two parts together. Both belts can be easily adjusted by pulling the extremities of their bands. Joker R2... -
Page 32: Lumbar Support
Turn the lever A by 90°and swing the lateral support to the opposite position where it will automatically lock. Make sure the system is stable. Always check the adjustment; in fact, if the system is unstable, it may pose a risk to the occupant. Joker R2... -
Page 33: Rear Wheels
*You can choose this type of wheel as an additional kit to the main rear wheels you choose for your wheelchair. In this case, the wheels are interchangeable and, thus, you simply remove one pair and fit the other. See also the chapter “Quick release rear wheels”. Joker R2... -
Page 34: Hand Rims
7.11 Hand rims Special hand rims are available for this PROGEO wheelchair model. Their special features ensure improved grip and therefore a more efficient pushing motion, especially for occupants with limited strength or mobility of the hands and fingers. When assembling these hand rims, there is a risk of pinching or crushing the fingers between the hand rim itself and the wheel rim. -
Page 35: Castors
Be careful not to squeeze your fingers when mounting the removable lateral clothing guards. In the configuration with Full Carbon side plate (2), the lateral clothing guards are integral part of the plate itself. They can either be of the “mudguard” or “straight” type. Joker R2... -
Page 36: Vanity Flap (Seat/Backrest Bonding Canvas)
(6) Once slotted guide B is free, pull the bag upwards to remove it. To attach the bag, insert the support D along the slotted guide B and finally turn the knob to a locking position as indicated above. Joker R2... -
Page 37: Frame Protection Pad
The operation is rather easy, in fact just detach the Velcro strap from itself and stretch it or slacken it as needed by letting it run through the buckle A. Finally, fasten the Velcro strap. 7.20 Rigid seat This is a non-deformable carbon fibre rigid seat board that provides greater stability. Joker R2... -
Page 38: Maintenance
Have a complete check of the wheelchair carried out (at least every three months) by qualified personnel authorised for maintenance on PROGEO products. For any questions relating to the adjustment and maintenance of your PROGEO wheelchair, the experienced technical staff at Rehateam s.r.l. are at the complete disposal of all our clients. -
Page 39: Replacement Of Worn Parts
Check the quick release axles. • Check the folding system (seat and/or backrest). • Check the footplate. • Check the parking brakes. • General check of all screws. • The condition of all parts subjected to wear and tear. Joker R2... -
Page 40: Disinfection And Reuse Of The Wheelchair
Alternatively, you can return the backrest to your dealer for disposal In the event of disposal, be aware of any broken or damaged parts which could create a situation of potential danger with cutting or pinching injuries. The use of suitable protection is recommended. Joker R2... -
Page 41: Troubleshooting Guide
Worn out tyres. Change tyres. Clean and lubricate the parts. Friction on the locking pin. The backrest does not lock. The travel-limit screw is too long and it touches the frame before locking Tighten the travel-limit screw. occurs. Joker R2... -
Page 42: Technical Specifications
Keys: = from to; = adjustable; = frame; 1= conservative; 2 = standard; 3 = active; 4 = extreme; SW = seat width; ≈ = approximately; ├ = starting from; = according to model; = with camber JOKER R2 SEAT WIDTH... -
Page 43: Warranty
The authorised distributor in cases of simple repairs may take action independently to eliminate the defect or bring the defect to the attention of Rehateam s.r.l. in specific cases. With reference to our production line that is labelled with the trademarks PROGEO and PHYSIO, since these products are manufactured to occupant specifications and with artisanal and not industrial procedures, minor imperfections, minor colour and carbon fibre weave discrepancies are not to be considered as defects. - Page 44 Certified company TÜV Rheinland in compliance with directive UNI CEI EN 13485 : 2016 Place of production: Castagnole di Paese (TV) ITALY DISTRIBUTOR / DEALER PRODUCT LABEL Date of delivery to user: ___________________________ Stamp of distributor / dealer Joker R2...
Need help?
Do you have a question about the JOKER R2 and is the answer not in the manual?
Questions and answers