
Related Manuals for Yardworks 060-1983-0


Summary of Contents for Yardworks 060-1983-0
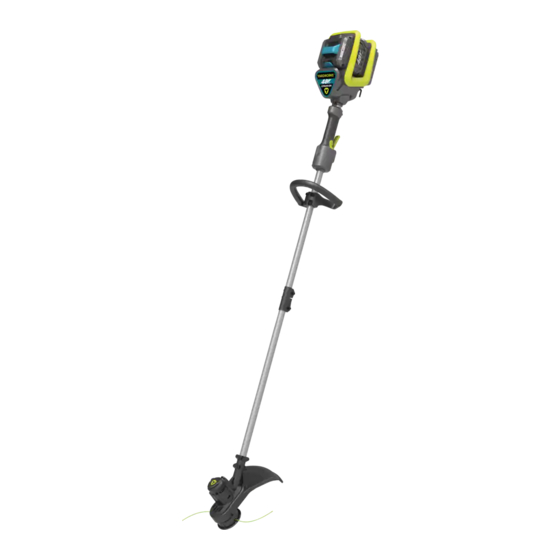
- Page 1 13” (33 CM) CORDLESS GRASS TRIMMER model number 060-1983-0 | contact us: 1.866.523.5218 3026035 IMPORTANT: Instruction Read and follow all safety rules and operating Manual instructions before using this product.
- Page 2 060-1983-0 | contact us: 1.866.523.5218 model no. 060-1983-0 | contact us: 1.866.523.5218...
- Page 3 060-1983-0 | contact us: 1.866.523.5218 Introduction Safety Instructions and Symbols Product Specifications Product Diagram Assembly Operation Maintenance Storage Troubleshooting Exploded View Parts List Warranty...
-
Page 4: Safety First
It has been designed, engineered ® and manufactured to give you the best possible dependability and performance. Should you experience any problem you cannot easily remedy, please contact our Yardworks ® customer service line at 1.866.523.5218. PLEASE READ AND RETAIN THIS INSTRUCTION MANUAL. These instructions will enable you to assemble and maintain your appliance properly. - Page 5 060-1983-0 | contact us: 1.866.523.5218 FOR ALL APPLIANCES moving parts, the binding of the moving parts. Check for broken or defective • Avoid dangerous environments — do not parts that can affect the safe operation use appliances in damp or wet locations.
- Page 6 060-1983-0 | contact us: 1.866.523.5218 additional medical help. Liquid ejected not store battery packs haphazardly in a box or drawer where they may from the battery may cause irritation or burns. short-circuit each other or be short- circuited by other metal objects. When 7.
- Page 7 060-1983-0 | contact us: 1.866.523.5218 q) The battery pack gives its best radio frequency energy and, if not installed performance when it is operated at and used in accordance with the instructions, normal room temperature (20°C ± may cause harmful interference to radio 5°C/68°F ±...
- Page 8 060-1983-0 | contact us: 1.866.523.5218 Some of the following symbols may be used on this product. Please study them and learn their meaning. Proper interpretation of these symbols will allow you to operate the product effectively and safely.
-
Page 9: Product Specifications
060-1983-0 | contact us: 1.866.523.5218 PRODUCT SPECIFICATIONS Voltage 48 V No Load Speed 7000/min Cutting Diameter 13” (33 cm) Line Diameter 0.080” (2.0 mm) Line Length 2x8ft (4.9 m) Battery Capacity (060-1987-2) 2.0 Ah Charger Input (060-1990-2) 120 V~, 60 Hz, 110 W... - Page 10 060-1983-0 | contact us: 1.866.523.5218 Battery pack (060-1987-2) Battery pack release button On/Off switch Lock-off button Auxiliary handle Connector Safety guard Line cutter Trimmer head 10. Spool 11. Bump knob 12. Charger (060-1990-2) 13. Wrench (Fig. A1) 14. Screws (Fig. B) We recommend that you purchase your accessories listed in the above list from the same store that sold you the tool.
- Page 11 060-1983-0 | contact us: 1.866.523.5218 To reduce the risk of injury, user must read instruction manual Intended Use The machine is intended for the cutting of grass and weeds under bushes, as well as on slopes and edges that cannot be reached with the lawn mower.
- Page 12 Locking/ Guide recess Release knob model no. 060-1983-0 | contact us: 1.866.523.5218 model no. 060-1983-0 | contact us: 1.866.523.5218 3. Assembling the safety guard Attach the safety guard to the trimmer head. Align the guard so it slides into the slots located on the trimmer head.
-
Page 13: Charging Indicator
060-1983-0 | contact us: 1.866.523.5218 CHARGING INDICATOR This charger is designed to detect some problems that can arise with battery packs. Indicator lights indicate problems (see table below). Light ON/ Flash Status Defective battery. Red on Battery Temperature Protection. -
Page 14: Switch On/Off
Release knob model no. 060-1983-0 | contact us: 1.866.523.5218 1. SWITCH ON/OFF To switch on, press the lock-off button first, then the On/Off Switch. (See Fig. F.) To switch off, release the On/Off Switch. 2. TRIMMING 1) Keep the trimmer head at an angle of about 30° to the ground when trimming. (See Fig. G1.) 2) Do not cut wet grass because it tends to stick to the trimmer head and guard, prevents proper discharge of grass clippings, and could cause you to slip and fall. - Page 15 060-1983-0 | contact us: 1.866.523.5218 3. ADJUSTING CUTTING LINE LENGTH—AUTOMATIC BUMP LINE FEED The trimmer head allows the operator to release more cutting line without stopping the motor. As line becomes frayed or worn, additional line can be released by lightly tapping the bump knob on the ground while operating the trimmer.
- Page 16 060-1983-0 | contact us: 1.866.523.5218 4. TO REPLACE THE SPOOL AND LINE 1) For your convenience, it is recommended you buy a replacement spool with line. 2) Press and hold in the two cap release latches. Loosen the cap by rotating it counter- clockwise.
- Page 17 060-1983-0 | contact us: 1.866.523.5218 5. TO REPLACE THE LINE ON THE SPOOL 1) Cut a piece of line approximately 16’ (4.9 m) long. 2) Insert the centre point of line into the notch in the middle section of the spool and wind the line in a clockwise direction as shown.
-
Page 18: Maintenance
060-1983-0 | contact us: 1.866.523.5218 MAINTENANCE Always check the product prior to use for any damage. After use, disconnect the battery from the tool and check for damage. Your power tool requires no additional lubrication or maintenance. There are no user- serviceable parts in your power tool. - Page 19 060-1983-0 | contact us: 1.866.523.5218 The following table gives problems and actions that you can perform if your machine does not operate correctly. Warning: Switch the machine off and remove the battery prior to any troubleshooting. Problems Possible Causes Corrective Action Battery discharged.
- Page 20 060-1983-0 | contact us: 1.866.523.5218...
- Page 21 060-1983-0 | contact us: 1.866.523.5218 Part Description Quantity Compression Spring Self-Tapping Screw Self Tapping Screw Rear Cover Compression Spring Baffle Trigger Motor Right_handle Self Tapping Screw Housing Self Tapping Screw Screw Right Side Cover Right_battery_support Gear Self Tapping Screw...
- Page 22 060-1983-0 | contact us: 1.866.523.5218 model no. 060-1983-0 | contact us: 1.866.523.5218 FIVE-YEAR LIMITED WARRANTY HOW TO OBTAIN SERVICE Warranty service is available by calling For five (5) years from the date of purchase the toll-free helpline at 1.866.523.5218.
- Page 23 060-1983-0 | contact us: 1.866.523.5218 FCC Part 15 Supplier’s Declaration of Conformity Product Description: 48V 2.0A Charger Model Number: 060-1990-2 Trade Name: YARDWORKS ® This device complies with part 15 of the FCC Rules. Operation is subject to the following two conditions:...
- Page 25 CORDLESS TRIMMER & BLOWER COMBO/ Cordless Blower model number CBV48CU | contact us: 1.866.523.5218 3026035 IMPORTANT: Instruction Read and follow all safety rules and operating Manual instructions before using this product.
- Page 26 model no. CBV48CU | contact us: 1.866.523.5218 model no. CBV48CU | contact us: 1.866.523.5218...
- Page 27 model no. CBV48CU | contact us: 1.866.523.5218 Introduction Safety Instructions and Symbols Product Specifications Product Diagram Assembly Operation Maintenance Storage Troubleshooting Exploded View Parts List Warranty...
- Page 28 It has been designed, engineered ® and manufactured to give you the best possible dependability and performance. Should you experience any problem you cannot easily remedy, please contact our Yardworks ® customer service line at 1.866.523.5218. PLEASE READ AND RETAIN THIS INSTRUCTION MANUAL. These instructions will enable you to assemble and maintain your appliance properly.
- Page 29 model no. CBV48CU | contact us: 1.866.523.5218 FOR ALL APPLIANCES safety guard. Check the alignment of the moving parts, the binding of the moving • Avoid dangerous environments — do not parts. Check for broken or defective use appliances in damp or wet locations. parts that can affect the safe operation •...
- Page 30 model no. CBV48CU | contact us: 1.866.523.5218 be ejected from the battery; avoid ADDITIONAL SAFETY WARNINGS contact. If contact accidentally occurs, IMPORTANT SAFETY INSTRUCTIONS flush with water. If liquid contacts eyes, When using an electrical appliance, basic additionally seek medical help. Liquid precautions should always be followed, ejected from the battery may cause including the following:...
-
Page 31: Safety Warnings For Battery Pack
Recharge only with the charger e) Do not subject battery pack to specified by Yardworks . Do not ® mechanical shock. use any charger other than that In the event of battery leaking, do not... - Page 32 model no. CBV48CU | contact us: 1.866.523.5218 model no. CBV48CU | contact us: 1.866.523.5218 interference, and (2) This device must accept any interference received, including interference that may cause undesired operation. NOTE: This equipment has been tested and found to comply with the limits for a Class B digital device, pursuant to Part 15 of the FCC Rules.
- Page 33 Yardworks CANADA has established a partnership with the ® RBRC Corporation to recycle any Yardworks batteries with the ® RBRC-call2recycle seal. For environmental protection, please do not discard batteries in the trash. After the battery’s life cycle is ended, please call 1-800-822-8837 for a free service that will properly dispose of the battery.
- Page 34 model no. CBV48CU | contact us: 1.866.523.5218 PRODUCT SPECIFICATIONS Rated voltage 48 V Air speed Turbo: 100 MPH (160 km/h) Air volume Turbo: 400 CFM (11 m /min) Battery capacity (060-1987-2) 2.0 Ah Charger input (060-1990-2) 120 V~, 60 Hz, 110 W Charger output (060-1990-2) 48 V , 2 A...
- Page 35 model no. CBV48CU | contact us: 1.866.523.5218 Turbo button On/off switch with variable speed control Handle Battery pack (060-1987-2) Motor housing Tube release button Blower tube Battery pack release button Charger (060-1990-2) We recommend that you purchase your accessories from the same store that sold you the tool.
- Page 36 model no. CBV48CU | contact us: 1.866.523.5218 NOTE: Before using the tool, read the instruction book carefully. ASSEMBLY 1. ASSEMBLING AND REMOVING THE BLOWER TUBE (SEE FIG. A1) - ASSEMBLING Before assembling the blower tube, be sure the on/off switch is in “O’’ Off position. Insert the blower tube directly to the motor housing as shown in Fig.
-
Page 37: Charging Procedure
model no. CBV48CU | contact us: 1.866.523.5218 OPERATION BEFORE PUTTING INTO OPERATION 1. CHARGING THE BATTERY (SEE FIG. B) a. The battery in your new tool is not charged when it leaves the plant. Therefore it must be fully charged before using the first time. b. - Page 38 model no. CBV48CU | contact us: 1.866.523.5218 CHARGING INDICATOR This charger is designed to detect some problems that can arise with battery packs. Indicator lights indicate problems (see table below). Light ON/ Flash Status Defective battery. Red on Battery Temperature Protection. The temperature of battery pack is less than 0 C (32...
-
Page 39: Variable Speed Control
model no. CBV48CU | contact us: 1.866.523.5218 3. STARTING AND STOPPING (SEE FIG. D) - STARTING Move the on/off switch forward to the “I” position. - STOPPING Move the on/off switch backward to the “O” position. - VARIABLE SPEED CONTROL The on/off switch with variable speed (2) controls the airflow. - Page 40 model no. CBV48CU | contact us: 1.866.523.5218 4. USING THE BLOWER (SEE FIG. E1, E2) The blower is intended for residential use only. Use the blower outdoors to move debris from hard surfaces. Adjust the airflow by adjusting the on/off switch to suit different working conditions. USER TIPS - Hold the blow tube approximately 8”...
- Page 41 model no. CBV48CU | contact us: 1.866.523.5218 5. TURBO BUTTON FOR POWER BOOSTING (SEE FIG. F) The turbo button can increase airflow significantly, and it can be used for clearing heavy or wet debris. To use the turbo button, first switch on the blower, push the on/off switch forward to select any speed control, then depress the turbo button and hold it.
-
Page 42: Cleaning The Tool
model no. CBV48CU | contact us: 1.866.523.5218 Remove the battery pack before carrying out any adjustment, servicing or maintenance. There are no user-serviceable parts in your blower. Keep the motor ventilation slots clean. Keep all working controls free of dust. CLEANING THE TOOL Clean the tool regularly. - Page 43 CBV48CU | contact us: 1.866.523.5218 The following table gives checks and actions that you can perform if your machine does not operate correctly. If these do not identify/remedy the problem, contact Yardworks at 1.866.523.5218. ® Symptom Possible Causes...
- Page 44 model no. CBV48CU | contact us: 1.866.523.5218...
- Page 45 model no. CBV48CU | contact us: 1.866.523.5218 Item Description QTY. Item Description QTY. Left Decorative Cover Support Leg Left Housing Front Cover Right Housing LED Panel Right Decorative Cover 1 Screw Button Set PCBA Compression Spring Screw Cover Rear Cover Button Set Power Cord Spring...
- Page 46 (365) days from the date of retail purchase. Made in China. Imported by Yardworks Canada Toronto, Canada M4S 2B8 Always remove or disconnect the battery pack before adjusting, cleaning,...
- Page 47 FCC Part 15 Supplier’s Declaration of Conformity Product Description: 48V 2.0 A Charger Model Number: 060-1990-2 Trade Name: Yardworks ® This device complies with part 15 of the FCC Rules. Operation is subject to the following two conditions: (1) This device may not cause harmful interference, and (2) This device must accept any interference received, including interference that may cause unde- sired operation.
-
Page 49: Assembling The Safety Guard
CORDLESS TRIMMER & BLOWER COMBO Item # CGT48CU | contact us: 1.866.523.5218 1. ASSEMBLING THE UPPER SHAFT AND LOWER SHAFT a) Loosen the bolt on the connector. (See Fig. A1.) b) Align and insert the lower shaft directly into the upper shaft. (See Fig. A2.) c) Position the locking/release button into the guide recess. - Page 50 CORDLESS TRIMMER & BLOWER COMBO Item # CGT48CU | contact us: 1.866.523.5218 BEFORE OPERATION 1. CHARGING PROCEDURE (SEE FIG. D.) a) Plug the charger into an appropriate outlet. b) Slide the battery pack into the charger; the light will begin flashing green to indicate the charging process has started.
Need help?
Do you have a question about the 060-1983-0 and is the answer not in the manual?
Questions and answers
Je cherche un endroit pour me procurer la pièce jointe en photo. wedd trimmer 060-1983-0 Yardworks 48 V Li-ion
You can find the Yardworks 060-1983-0 part for the 48 V Li-ion weed trimmer at Battery World, where it is listed under the product name "Yardworks 48 V Grass Trimmer & Edger, 2Ah Battery, 13-in."
This answer is automatically generated
Can I order a complete spool assembly that comes wth the spool cap, the spool and the base assembly with bumper spring.