Table of Contents
Advertisement
Available languages
Available languages
Quick Links
INSTRUCTIONS DE MISE EN SERVICE ET D'UTILISATION
INSTALLATION AND OPERATING INSTRUCTIONS
s'assurer à réception que le produit n'a pas été endommagé durant le transport pour réserve au transporteur
Upon receipt, always check the product for damage during shipment. If any is found, you may file a damage
Opalys 7
B.P. 1
49340 TRÉMENTINES
FRANCE
Tél. : 02 41 71 72 00
Fax : 02 41 71 72 01
www.bodet.com
claim with the carrier.
Réf.: 606248 L
1
Advertisement
Table of Contents

Subscribe to Our Youtube Channel
Related Manuals for Bodet Opalys 7


Summary of Contents for Bodet Opalys 7
- Page 1 Opalys 7 INSTRUCTIONS DE MISE EN SERVICE ET D’UTILISATION INSTALLATION AND OPERATING INSTRUCTIONS B.P. 1 49340 TRÉMENTINES FRANCE Tél. : 02 41 71 72 00 Fax : 02 41 71 72 01 www.bodet.com Réf.: 606248 L s’assurer à réception que le produit n’a pas été endommagé durant le transport pour réserve au transporteur Upon receipt, always check the product for damage during shipment.
-
Page 2: Table Of Contents
Table des matières FRANÇAIS I - VÉRIFICATION INITIALE- Consignes de sécurité 1.1 Déballage de l’horloge 1.2 Sauvegarde des données 1.3 Consignes de sécurité – Précautions d’utilisation : II - PRÉSENTATION DE L’HORLOGE Opalys III - MISE EN SERVICE - INSTALLATION 3.1 Alimentation 3.2 Horloge réceptrice IV - MENU MISE À... - Page 3 Table of contents ENGLISH I - INITIAL VERIFICATION 1.1 Unpacking the clock II - INTRODUCTION TO THE OPALYS CLOCK III - SETTING IN OPERATION - INSTALLATION 3.1 Power supply 3.2 Link-up to a time distribution network IV - TIME SETTING MENU 4.1 Independent quartz clock 4.2 Radio synchronised Clock 4.3 AFNOR or impulses slave Clock...
-
Page 4: Français
I - VÉRIFICATION INITIALE- CONSIGNES DE SÉCURITÉ Nous vous remercions d’avoir choisi une horloge BODET. Ce produit a été conçu avec soin pour votre satisfaction d’après les bases qualité ISO9001. Nous vous recommandons, de lire attentivement ce manuel avant de commencer à manipuler l’horloge. -
Page 5: Consignes De Sécurité - Précautions D'utilisation
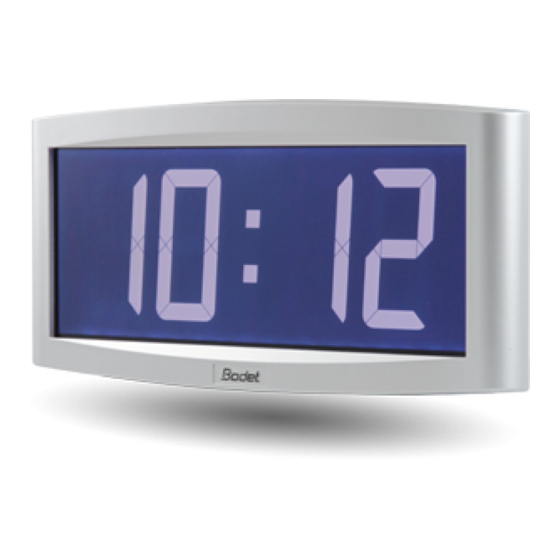
Ce produit doit être installé dans un environnement résidentiel, commercial ou d’industrie légère. II - PRÉSENTATION DE L’HORLOGE OPALYS L’horloge Opalys 7 est une horloge pour l’intérieur. Elle affiche les heures (en mode 12 h ou 24 h) les minutes et la date. Elle gère automatiquement les changements d’horaires été-hiver. -
Page 6: Mise En Service - Installation
III - MISE EN SERVICE - INSTALLATION 3.1 Alimentation Attention : l’horloge Opalys doit être alimentée en TBTS (Très Basse Tension de Sécurité) via le coffret d’alimentation livré. Fig.: 2 Reset Sel. Vis de verrouillage antivol Mise en place du support de table (option) (Dans Les 2 encoches du support mural). -
Page 7: Horloge Réceptrice
d. Connecter l’alimentation très basse tension venant du transformateur, sur le bornier au dos de l’horloge. Il n’y a pas de polarité à respecter. e. Clipser l’horloge en place sur le support et la bloquer avec la vis de blocage antivol fournie (voir fig.2). -
Page 8: Menu Mise À L'heure
IV - MENU MISE À L’HEURE 4.1 Horloge radio synchronisée DCF Les horloges radio synchronisées se mettent à l’heure automatiquement. Il est toutefois possible de les mettre à l’heure et à la date manuellement en suivant la procédure expliquée dans le paragraphe suivant. Reset 4.2 Réglage de l’heure et de la date Le bouton [Sel] permet la sélection des menus et le bouton [+]... -
Page 9: Horloge Réceptrice Afnor/Impulsion
4.3 Horloge réceptrice AFNOR/Impulsion Les horloges réceptrices (AFNOR/Irig-B), se mettent à l’heure automatiquement. Les horloges AFNOR/Irig-B, après un reset ou un changement d’heure, recherchent pendant 20 secondes toutes les minutes jusqu’à se synchroniser. Les horloges réceptrices “Minute” ou “½ minute” doivent être mises à l’heure du réseau à l’installation. Remarque : voir le chapitre “Menu technicien”... -
Page 10: Menu Configuration
V - MENU CONFIGURATION Ce menu permet le choix de différents modes : 12/24H, Eco, affichage, zone horaire été-hiver et décalage horaire. Pour programmer votre horloge, choisir l’option d’affichage ci-dessous puis aller dans le paragraphe “Fonctions avancées” page 10. Affichage standard de votre horloge. Affichage de l’heure en mode 12 H AM/PM. - Page 11 4. Le menu Affichage est visible. Ce menu détermine les informations qui seront affichées sur l’écran de l’horloge. a Choisir avec [+] parmi les différentes options : Affichage en alternance du numéro de la semaine avec l’heure : - Affichage de l’heure fixe : (l’heure courante est affichée) - Affichage en alternance de la date au format “jour-mois”...
- Page 12 Zone Europe de l’est “mode_east” (Grèce, Finlande, ...). Heure d’hiver vers l’été = dernier dimanche de mars à 1 h 00 UTC (soit 3h00 heure locale). Heure d’été vers l’hiver = le dernier dimanche d’octobre à 1 h 00 UTC (soit 4h00 heure locale).
- Page 13 Nota : pour les horloges indépendantes (sans synchronisation externe), ce réglage est inactif. L’heure est réglée uniquement par le menu mise à l’heure. Changement saisonnier programmable sur “mode_prg” Ce menu permet de programmer les dates de changements d’horaire été/hiver. Il propose de déterminer le début de la période d’été (points 1 à...
-
Page 14: Principe De Mise À L'heure Pour Les Réceptrices
VI - PRINCIPE DE MISE À L’HEURE POUR LES RÉCEPTRICES 6.1 Réceptrices avec le module AFNOR 1. A la première mise sous tension, l’heure est initialisée à 00h00mn00ss du 01/01/2000 mais n’est pas affichée (seuls les 2 points sont affichés en fixe). L’horloge cherche à... -
Page 15: Réceptrices Minute Ou ½ Minute 24V Parallèle
continue de fonctionner sur son quartz interne avec les 2 points fixes. En cas de besoin (changement de canal de l’émetteur, nouvelle installation, ...) il est possible de remettre une horloge en mode “Initialisation” dans le menu technicien. 6.3 Réceptrices Minute ou ½ minute 24V parallèle 1. - Page 16 6.5 Annexe pour les décalages horaires. Choisir le pays de référence pour les changements d’heure été / hiver, ainsi que le décalage horaire, en fonction de la ville dont vous voulez afficher l’heure locale. Décalage horaire / VILLE Zone Pays de référence heure GMT USAP États-Unis / Canada...
-
Page 17: Vii- Menu Technicien
VII- MENU TECHNICIEN L’accès au menu technicien s’effectue par l’intermédiaire des deux boutons [SELECT] et [+]. La touche [SELECT] est au-dessus de la touche [+]. Procéder en deux étapes. 1. Appuyer sur le bouton [SELECT], et [+] pour accéder au menu Configuration. Relâcher puis : 2. - Page 18 Si l’horloge est en mode COD, l’heure affichée est celle reçue de l’horloge mère. Si l’horloge est en mode LOC, l’heure affichée prend en comptes les décalages choisis dans le menu horaire de l’horloge Opalys (décalage horaire et décalage saison). DHF : activation de la carte de synchronisation radio HF.
-
Page 19: Viii-Caractéristiques Techniques
VIII-CARACTÉRISTIQUES TECHNIQUES L’horloge Opalys 7 respecte la directive compatibilité électromagnétique 89/336/CEE. Elle est destinée à un environnement résidentiel, commercial ou industrie légère. Elle est conforme aux normes européennes en vigueur. Alimentation : secteur 230 V +/- 10% 50 Hz, classe II, sortie 24V DC 12W, sortie protégée contre surcharge et court-circuit intégrée. -
Page 20: Que Faire Si
IX - QUE FAIRE SI...? ...VÉRIFIER. Que faire si...? … Vérifier. ■ L’horloge n’affiche pas la date ■ L’horloge est programmée en mode affichage numéro mais un numéro. semaine (revoir la notice page 10, § 4 ). ■ L’affichage de l’horloge ne ■... -
Page 21: English
TABLE OF CONTENTS I - INITIAL VERIFICATION Thank you for choosing a BODET clock. This product has been carefully designed for your satisfaction based on ISO9001 quality requirements. We advise you to read this manual thoroughly before attempting to manipulate the clock. -
Page 22: Introduction To The Opalys Clock
This product is suitable for installation in a residential, commercial or light industrial environment. II - INTRODUCTION TO THE OPALYS CLOCK The Opalys 7 clock is a calendar clock for indoor use. It displays the hours (in 12 hr or 24 hr mode), minutes and date. It automatically manages summer-winter time changeovers. -
Page 23: Setting In Operation - Installation
III - SETTING IN OPERATION - INSTALLATION 3.1 Power supply Attention : Opalys clock has to be powered in TBTS (very low tension) through the power supply unit delivered. Fig.: 2 Reset Sel. Anti-theft locking screw Setting of the table bracket (if supplied) (in the 2 notches of the wall bracket). -
Page 24: Link-Up To A Time Distribution Network
d. Connect the extra low voltage output of the power supply unit to the terminal strip at the back of the clock. Polarity does not matter. e. Clip the clock in place on the bracket and secure with the anti-theft locking screw provided (see fig.2). -
Page 25: Time Setting Menu
IV - TIME SETTING MENU Reset 4.1 Independent quartz clock Adjusting the time and date Sel. The [SEL] button enables you to shift between the different menus and the [+] button enables you to scroll through the setting values. Caution : it is necessary to set up the clock in independent synchronisation mode in order to get a proper operation (see page 33). -
Page 26: Afnor Or Impulses Slave Clock
4.3 AFNOR or impulses slave Clock The time on the AFNOR/Irig-b slave clock will be set automatically. After a reset or a time setting, the clock search each minute, during 20 seconds, until it get synchronised. Minute or ½ minute slave clocks must be set to the time of time distribution network. Remark : See the chapter “Technician Menu”... -
Page 27: Configuration Menu
V - CONFIGURATION MENU This menu enables you to select the different modes : 12 /24 hr, Eco, type of display, summer- winter time zone and time difference. To program your Opalys clock, select the display option below, then go to the “advanced functions”... - Page 28 The display menu appears. This menu determines the information which will be displayed . Choose between the different options with [+] : Alternative display of the number of the week and of the time : - Display of the hour : (the current hour is displayed).
- Page 29 Summer to Winter time = first Sunday of November at 2am local time. Central USA Zone “mode_usac” (Chicago). Winter to summer time = second Sunday of March at 2am local time. Summer to Winter time = first Sunday of November at 2am local time. Mountain USA Zone “mode_usam”...
-
Page 30: Principle Of Time Setting
for the day of the week (from 1 to 5 according to the months) (order “5” always denotes the last week). The value “F” gives the choice of a fixed date. 3) Having determined the Order, press [SEL] : the “number of the day” flashes. -
Page 31: Dhf Clock
Caution: if the current time of the master clock is modified after the synchronisation of the slave clocks, the correction will be achieved the next hour. 2. If the synchronisation is not correct after 20 seconds, a new time code search is made the following minute. -
Page 32: Dcf Radio-Synchronised Clock
6.4 DCF radio-synchronised clock 1. On the initial powering up, the time is initialised at 00h00mn00ss on 01/01/2000. Radio reception is made on each clock setting in operation and each time the user sets the time manually. It is carried out automatically every night at 3am local time. 2. -
Page 33: Technician Menu
VII - TECHNICIAN MENU Access to the technician menu is via the two push buttons [SELECT] and [+] located on the back of the clock. The [SELECT] button is above the [+] button. Proceed in two stages. 1. Press the [SELECT] button, and while holding it down, press [+] for more than 3 seconds to go initially to Configuration menu : 2. - Page 34 If the clock is in mode COD, the time displayed is the time received from master clock. If the clock is in mode LOC, the time displayed depends on the offset selected in the Time mode menu (Seasonal change and offset change).
-
Page 35: Technical Features
VIII - TECHNICAL FEATURES The Opalys 7 clock complies with electromagnetic compatibility directive 89/336/EEC. This product is suitable for installation in a residential, commercial or light industrial environment. It complies with the European standards in force. Power supply: mains 230 V +/- 10% 50 Hz, class II, 24V DC 12W output, integrated protection against overload and short-circuit. -
Page 36: What To Do If
IX - WHAT TO DO IF...? ...CHECK. WHAT TO DO IF...? … CHECK. ■ The clock does not display the ■ The clock is programmed in week number or day number day of the week but a number. display mode (reread the note on page 28, § 4 ). ■...
Need help?
Do you have a question about the Opalys 7 and is the answer not in the manual?
Questions and answers