Table of Contents
Advertisement
Quick Links
INSTALLATION AND OPERATION MANUAL
MATRIX
(OB02022 Model)
NEW ZEALAND
38 Harris Road, East Tamaki, Auckland
Ph: 09 274 8265
Email:
sales@glendimplex.co.nz
www.glendimplex.com.au
This manual is available for free download on the manufacturer's web site. It is a copyrighted
document. Re-sale is strictly prohibited. The manufacturer may update this manual from time to
time and cannot be responsible for problems, injuries, or damages arising out of the use of
information contained in any manual obtained from unauthorized sources.
Printed in Canada
Distributed by
Glen Dimplex Australasia
Fax 09 274 8472
READ AND KEEP THIS MANUAL FOR REFERENCE
AUSTRALIA
Unit 1, 21 Lionel Road
Mount Waverley, Victoria 3149
Ph: 1 300 554 155 Fax 8787 3570
Email:
sales@glendimplex.com.au
www.glendimplex.com.au
45641A
25-08-2015
Advertisement
Table of Contents

Subscribe to Our Youtube Channel
Related Manuals for Osburn MATRIX OB02022


Summary of Contents for Osburn MATRIX OB02022
- Page 1 INSTALLATION AND OPERATION MANUAL MATRIX (OB02022 Model) Distributed by Glen Dimplex Australasia NEW ZEALAND AUSTRALIA 38 Harris Road, East Tamaki, Auckland Unit 1, 21 Lionel Road Ph: 09 274 8265 Fax 09 274 8472 Mount Waverley, Victoria 3149 Email: sales@glendimplex.co.nz Ph: 1 300 554 155 Fax 8787 3570 www.glendimplex.com.au Email:...
- Page 2 Osburn Matrix Installation and Operation Manual THANK YOU FOR CHOOSING THIS WOOD FIRE We want to congratulate you on your purchase and wish to help you get maximum satisfaction from your wood fire. In the pages that follow, we will give you advice on wood heating and controlled combustion as well as technical specifications regarding installation, operation and maintenance of the model you have chosen.
-
Page 3: Table Of Contents
Zone Heating and How to Make it Work for You ..............10 The Benefits of Low Emissions and High Efficiency ............. 10 Osburn’s Commitment to You and the Environment ............11 2.4.1 What is Your New Wood fire Made Of? ................11 Fuel .................... - Page 4 Osburn Matrix Installation and Operation Manual 4.4.4 Firing Each New Load Hot ....................21 4.4.5 Turning Down the Air Supply ................... 21 4.4.6 Building Different Fires for Different Needs ..............22 Maintaining Your Wood Heating System ........24 Wood fire Maintenance....................... 24 5.1.1...
- Page 5 Osburn Matrix Installation and Operation Manual Appendix 1: Reversing the Door Opening and Adjusting the Handle ..42 Appendix 2: Installing the Optional Decorative Panels ......44 Appendix 3: Installing the Optional Fresh Air Intake Kit ....... 47 Appendix 4: Installing the Optional Fire Screen (AC01315) ....48 Appendix 5: Installation and Use of the Blower and Thermodisc ..
-
Page 6: Part A - Operation And Maintenance
Osburn Matrix Installation and Operation Manual PART A - OPERATION AND MAINTENANCE Please see Part B for installation instructions. 1 SAFETY INFORMATION 1.1 SUMMARY OF OPERATION AND MAINTENANCE CAUTIONS AND WARNINGS HOT WHILE IN OPERATION, KEEP CHILDREN, CLOTHING AND FURNITURE AWAY. CONTACT •... -
Page 7: General Information
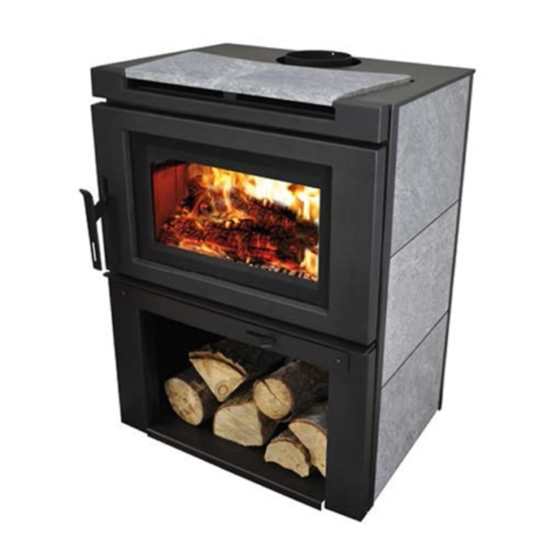
Osburn Matrix Installation and Operation Manual GENERAL INFORMATION 2.1 OSBURN MATRIX SPECIFICATIONS Combustible: Wood Heating capacity* 195 m Maximum average heat output – hardwood (Australia): 11.1 kW Average efficiency – hardwood (Australia): 68 % Average emissions – hardwood (Australia): 1.9 g/kg... - Page 8 Osburn Matrix Installation and Operation Manual 8 _______________________________________________________________________________...
- Page 9 Osburn Matrix Installation and Operation Manual _______________________________________________________________________________ 9...
-
Page 10: Zone Heating And How To Make It Work For You
2.2 ZONE HEATING AND HOW TO MAKE IT WORK FOR YOU Your new Osburn Matrix wood fire is a space heater, which means it is intended to heat the area it is installed in, as well as spaces that connect to that area, although to a lower temperature. This is called zone heating and it is an increasingly popular way to heat homes or spaces within homes. -
Page 11: Osburn's Commitment To You And The Environment
2.4 OSBURN’S COMMITMENT TO YOU AND THE ENVIRONMENT The Osburn team is committed to protecting the environment, so we do everything we can to use only materials in our products that will have no lasting negative impact on the environment. -
Page 12: Fuel
Osburn Matrix Installation and Operation Manual 3 FUEL 3.1 MATERIALS THAT SHOULD NOT BE BURNED GARBAGE OF ANY KIND, • COAL OR CHARCOAL, • TREATED, PAINTED OR COATED WOOD, • PLYWOOD OR PARTICLE BOARD, • FINE PAPER, COLORED PAPER OR CARDBOARD, •... -
Page 13: Log Length
Osburn Matrix Installation and Operation Manual 3.2.3 LOG LENGTH Logs should be cut about 25 mm (1”) shorter than the firebox so they fit in easily. Pieces that are slightly too long make loading the wood fire very difficult. The most common standard length of firewood is 400 mm (16”). -
Page 14: How To Dry Firewood
Osburn Matrix Installation and Operation Manual 3.2.5 HOW TO DRY FIREWOOD Firewood that is not dry enough to burn is the cause of most complaints about wood fires. The complaints usually involve a lack of heat and dirty door glass. -
Page 15: Where To Store Wood
Osburn Matrix Installation and Operation Manual 3.2.6 WHERE TO STORE WOOD This wood fire has been certified to store logs in the pedestal provided that the following requirements are met: • The logs must not exceed the inside edge (A) of the pedestal. -
Page 16: Manufactured Logs
Osburn Matrix Installation and Operation Manual 3.3 MANUFACTURED LOGS Do not burn manufactured logs made of wax impregnated sawdust or logs with any chemical additives. Manufactured logs made of 100% compressed sawdust can be burned, but use caution in the number of these logs burned at one time. Start with one manufactured log and see how the wood fire reacts. -
Page 17: Operating Your Wood Fire
Osburn Matrix Installation and Operation Manual 4 OPERATING YOUR WOOD FIRE NEVER OVERFIRE YOUR WOOD FIRE. IF ANY PART OF THE WOOD FIRE STARTS TO GLOW • RED, OVER FIRING IS HAPPENING. READJUST THE AIR INTAKE CONTROL AT A LOWER SETTING. -
Page 18: Lighting Fires
Osburn Matrix Installation and Operation Manual 4.3 LIGHTING FIRES Each person who heats with wood develops their own favorite way to light fires. Whatever method you choose, your goal should be to get a hot fire burning quickly. A fire that starts fast produces less smoke and deposits less creosote in the flue system. -
Page 19: Two Parallel Logs
Osburn Matrix Installation and Operation Manual The fire is topped with about 5 sheets of newspaper. You can just bunch them up and stuff them in between the kindling and the underside of the baffle. Or you can make newspaper knots by rolling up single sheets corner to corner and tying a knot in them. -
Page 20: Ash Removal
Osburn Matrix Installation and Operation Manual When you burn in cycles, you rarely need to open the wood fire’s loading door while the wood is flaming. This is an advantage because there is more chance that smoke will leak from the wood fire when the door is opened as a full fire is burning. -
Page 21: Firing Each New Load Hot
Osburn Matrix Installation and Operation Manual 4.4.4 FIRING EACH NEW LOAD HOT Place the new load of wood on and behind the charcoal and not too close to the glass. Close the door and open the air control fully. Leave the air control fully open until the firebox is full of flames, the wood has charred to black and its edges are glowing red. -
Page 22: Building Different Fires For Different Needs
Osburn Matrix Installation and Operation Manual 4.4.6 BUILDING DIFFERENT FIRES FOR DIFFERENT NEEDS Using the air control is not the only way to match the wood fire’s heat output to the heat demand. Your house will need far less heat in April than in July to be kept at a comfortable temperature. If you fill the firebox full in fall weather, you will either overheat the space or turn the wood fire down so much that the fire will be smoky and inefficient. - Page 23 Osburn Matrix Installation and Operation Manual 4.4.6.3 High Output Fires for Cold Weather When the heat demand is high during cold weather, you’ll need a fire that burns steadily and brightly. This is the time to use your biggest pieces of hardwood fuel if you have it. Put the biggest pieces at the back of the firebox and place the rest of the pieces compactly.
-
Page 24: Maintaining Your Wood Heating System
Osburn Matrix Installation and Operation Manual 5 MAINTAINING YOUR WOOD HEATING SYSTEM 5.1 WOOD FIRE MAINTENANCE Your new wood fire will give many years of reliable service if you use and maintain it correctly. Some of the internal components of the firebox, such as firebricks, baffles and air tubes, will wear over time under intense heat. -
Page 25: Door Adjustment
Osburn Matrix Installation and Operation Manual 5.1.2 DOOR ADJUSTMENT In order for your wood fire to burn at its best efficiency, the door must provide a perfect seal with the firebox. Therefore, the gasket should be inspected periodically making sure to obtain an air tight fit. -
Page 26: Replacing The Door Gasket
Osburn Matrix Installation and Operation Manual 5.1.3 REPLACING THE DOOR GASKET It is important to maintain the gasket in good condition. After a year or more of use, the door gasket will compress and become hard, which may allow air to leak past it. You can test the condition of the door gasket by closing and latching the door on a strip of paper. -
Page 27: Cleaning And Painting The Wood Fire
Osburn Matrix Installation and Operation Manual The gasket must be centred on the edge of the glass. To do this easily, peel back a section of the paper covering the adhesive and place the gasket on a table with the adhesive side up. Stick the end of the gasket to the middle of one edge, then press the edge of the glass down onto the gasket, taking care that it is perfectly centred on the gasket. -
Page 28: Flue And Flue System Maintenance
Osburn Matrix Installation and Operation Manual 5.2 FLUE AND FLUE SYSTEM MAINTENANCE 5.2.1 WHY FLUE SYSTEM CLEANING IS NECESSARY Wood smoke can condense inside the flue and flue system, forming a combustible deposit called creosote. If creosote is allowed to build up in the flue system it can ignite when a hot fire is burned in the wood fire and a very hot fire can progress to the top of the flue system. -
Page 29: Part B - Installation
Osburn Matrix Installation and Operation Manual PART B – INSTALLATION It is very important to position the wood fire as close as possible to the flue system, and in an area that will favour the most efficient heat distribution possible throughout the house. The wood fire must therefore be installed in the room where the most time is spent, and in the most spacious room possible. -
Page 30: Regulations Covering Wood Fire Installation
Osburn Matrix Installation and Operation Manual 6.2 REGULATIONS COVERING WOOD FIRE INSTALLATION IT IS RECOMMENDED THAT THE INSTALLATION OF YOUR OSBURN WOOD FIRE BE CARRIED OUT BY A QUALIFIED SPECIALIST INSTALLER. IF ANY ELECTRICAL WORK IS REQUIRED, IT MUST BE CARRIED OUT BY A LICENSED ELECTRICIAN. -
Page 31: Clearances To Heat-Sensitive Materials
Osburn Matrix Installation and Operation Manual 7 CLEARANCES TO HEAT-SENSITIVE MATERIALS It is of outmost importance that the clearances to heat-sensitive materials be carefully maintained upon installation of the wood fire you have selected. Refer to the tables below. No part of the wood fire or flue may be located closer to combustibles than the minimum clearance figures given. -
Page 32: Floor Protector
Osburn Matrix Installation and Operation Manual Clearances to heat-sensitive materials and floor protection 7.3 FLOOR PROTECTOR If the wood fire is to be installed on top of a combustible floor, it must be guarded by a non combustible material as shown on the dotted line area of the above figures. Install a 845 mm (W) x 870 mm (D) floor protection of 6 mm of thickness with thermal conductivity of 0.8 m... -
Page 33: Reducing Wall And Ceiling Clearances Safely
Osburn Matrix Installation and Operation Manual 7.4 REDUCING WALL AND CEILING CLEARANCES SAFELY You may decrease the minimum clearances to heat-sensitive materials by installing heat radiation shields between the walls or the ceiling and the wood fire. These heat radiation... - Page 34 Osburn Matrix Installation and Operation Manual CONSTRUCTIONS AND CLEARANCES FACTORS FOR APPLIANCES HEAT SHIELDS WHICH ARE MORE THAN 45 OFF THE VERTICAL Minimum air gap HEAT SHIELD CONSTRUCTIONS Clearances factor dimensions (mm) Single layer of continuous material 0.80 Single layer of continuous material 0.60...
-
Page 35: The Flue System
Osburn Matrix Installation and Operation Manual 8 THE FLUE SYSTEM 8.1 GENERAL The flue system, made up of the flue system and the flue between the wood fire and the flue system, acts as the engine that drives your wood heating system. Even the best wood fire will not function safely and efficiently as intended if it is not connected to a suitable flue system. -
Page 36: Masonry Flue Systems
Osburn Matrix Installation and Operation Manual 8.2.2 MASONRY FLUE SYSTEMS The wood fire may also be connected to a masonry flue system, provided the flue system complies with AS/NZS 2918 or with the construction rules found in the building code enforced locally. -
Page 37: Minimum Flue System Height
Osburn Matrix Installation and Operation Manual 8.3 MINIMUM FLUE SYSTEM HEIGHT Flue heights and lengths from AS/NZS 2918:2001 The top of the flue system should be tall enough to be above the air turbulence caused when wind blows against the house and its roof. -
Page 38: The Relationship Between The Flue System And The House
Osburn Matrix Installation and Operation Manual 8.4 THE RELATIONSHIP BETWEEN THE FLUE SYSTEM AND THE HOUSE Because the flue system is the engine that drives the wood heating system, it must have the right characteristics. The signs of bad system design are cold downdraught when there is no fire in the wood fire, slow kindling of new fires, and smoke roll-out when the door is opened for loading. -
Page 39: Why The Flue System Should Penetrate The Highest Heated Space
Osburn Matrix Installation and Operation Manual 8.4.2 WHY THE FLUE SYSTEM SHOULD PENETRATE THE HIGHEST HEATED SPACE When it is cold outside, the warm air in the house is buoyant so it tends to rise. This tendency of warm air to rise creates a slight pressure difference in the house. Called ‘stack effect’, it produces a slightly negative pressure low in the house (relative to outside) and a slightly positive pressure zone high in the house. -
Page 40: Installing The Flue Connector
Osburn Matrix Installation and Operation Manual 8.5 INSTALLING THE FLUE CONNECTOR The flue has been called ‘the weak link’ in the safety of wood heating systems because failure to install the flue connector properly (which has been common in the past) can result in house fires. - Page 41 Osburn Matrix Installation and Operation Manual The rules below are based on those found in the AS/NZS 2918:2001 installation code. Please carefully follow these installation instruction rules, or those enforced where you live. Maximum overall length of straight flue system: not less than 4.6 m above the top of the floor •...
-
Page 42: Appendix 1: Reversing The Door Opening And Adjusting The Handle
Osburn Matrix Installation and Operation Manual APPENDIX 1: REVERSING THE DOOR OPENING AND ADJUSTING THE HANDLE The Matrix is equipped with a reversible door in case you prefer a door opening on the other side. Follow the steps below if you wish to avail yourself of this feature: •... - Page 43 Osburn Matrix Installation and Operation Manual • Remove the latch (M) and reinstall the screws (L) that were securing the assembly into the holes. Note: To avoid dropping the door due to its weight, get help from another person to perform the following steps.
-
Page 44: Appendix 2: Installing The Optional Decorative Panels
Osburn Matrix Installation and Operation Manual APPENDIX 2: INSTALLING THE OPTIONAL DECORATIVE PANELS install the decorative panels follow the steps below: • Remove the top decorative stones or tinted glass (A). Then the decorative top (B) by lifting the side of the flue and sliding it towards the back to release it from the front linkage. - Page 45 Osburn Matrix Installation and Operation Manual • For the installation of steel panels, insert the bottom decorative trim (F) then complete the assembly by alternating panels (G) and decorative trim (H) by sliding them into the spaces (K) and (L).
- Page 46 Osburn Matrix Installation and Operation Manual • Tighten screws (C) in order to secure the panels assembly. • Reinstall the decorative top and decorative stones or tinted glass. 46 ______________________________________________________________________________...
-
Page 47: Appendix 3: Installing The Optional Fresh Air Intake Kit
(A) – 49030, COLLAR 4 1/2" A 6 1/2". (2x) (B) – AC02090, INSULATED FRESH AIR INTAKE PIPE (4' LENGTH / 5'' DIAMETER). (1x) (C) – 49028, 5" WHITE INTAKE CAP. (1x) You can purchase the above parts through your Osburn dealer. ______________________________________________________________________________ 47... -
Page 48: Appendix 4: Installing The Optional Fire Screen (Ac01315)
Osburn Matrix Installation and Operation Manual APPENDIX 4: INSTALLING THE OPTIONAL FIRE SCREEN (AC01315) Open the door. Hold the fire screen by the two handles and bring it close to the door opening. Lean the upper part of the fire screen... -
Page 49: Appendix 5: Installation And Use Of The Blower And Thermodisc
APPENDIX 5: INSTALLATION AND USE OF THE BLOWER AND THERMODISC Your Osburn wood fire comes with a blower assembly and a thermodisc kit. The blower assembly is secured to the back of the wood fire using 4 screws (screws #10 x ½’’ type ‘’a’’ pan quadrex black. - Page 50 Osburn Matrix Installation and Operation Manual 4. Connect the blower to the power outlet of the quick connect thermodisc and connect the power cord of the thermodisc to a power outlet in your residence. When using the blower without the thermodisc, allow the wood fire to reach operating temperature (approximately one hour), before turning it on.
-
Page 51: Appendix 6: Installation Of Secondary Air Tubes And Baffle
Osburn Matrix Installation and Operation Manual APPENDIX 6: INSTALLATION OF SECONDARY AIR TUBES AND BAFFLE 1- Starting with the rear tube, lean and insert the right end of the secondary air tube into the rear right channel hole. Then lift and insert the left end of the tube into the rear left channel. - Page 52 Osburn Matrix Installation and Operation Manual Note that secondary air tubes (B) can be replaced without removing the baffle board (A). Important Notes: The air tubes are identified for placement as follows: Model Type of tube Matrix wood fire Front ► 30 holes of 3.75mm Middle front ►...
-
Page 53: Appendix 7: Exploded Diagram And Parts List
Osburn Matrix Installation and Operation Manual APPENDIX 7: EXPLODED DIAGRAM AND PARTS LIST ______________________________________________________________________________ 53... - Page 54 Osburn Matrix Installation and Operation Manual IMPORTANT: THIS IS DATED INFORMATION. When requesting service or replacement parts for your wood fire, please provide the model number and the serial number. We reserve the right to change parts due to technology upgrade or availability. Contact an authorized dealer to obtain any of these parts.
- Page 55 Osburn Matrix Installation and Operation Manual Item Description 30187 ZINC WASHER ID 17/64" x OD 1/2" PL65667 LATCH ACCESS PLATE 30131 BLACK METAL SCREW #10 X 1/2" TYPE "A" PAN QUADREX SE65659 LEFT DECORATIVE PANEL ATTACHMENT FRAME 99999 BUILD TO ORDER...
- Page 56 Osburn Matrix Installation and Operation Manual Manufactured by: STOVE BUILDER INTERNATIONAL INC. 250, de Copenhague, Saint-Augustin-de-Desmaures (Quebec), Canada G3A 2H3 After-sale service: 418-908-8002 E-mail: tech@sbi-international.com www.osburn-australia.com Distributed by Glen Dimplex Australasia NEW ZEALAND AUSTRALIA 38 Harris Road, East Tamaki, Auckland...
Need help?
Do you have a question about the MATRIX OB02022 and is the answer not in the manual?
Questions and answers