Advertisement
Quick Links
English
---------------------------------
Deutsch
---------------------------------
Français
---------------------------------
Español
---------------------------------
Italiano
---------------------------------
Website:
www.huanuoav.com
Monitor Wall Mount
Instruction Manual
Model: HNWSS4
Thank you for choosing this HUANUO product! At HUANUO we strive
to provide you with the best quality products and services in the
industry. Please share your experience of our product with others at
www.huanuoav.com/reviews if you are satisfied. Should you have any
issues, please don't hesitate to contact us.
Technical Support:
1-800-556-0533 Mon-Fri 10am - 5pm (PST) (USA) (CAN)
Other Info: support@huanuoav.com (US/CA)
support_eu@huanuoav.com(DE/UK/FR/IT/ES/NL/SE/AU)
V3.0
01-11
12-22
23-33
34-44
45-55
Advertisement

Related Manuals for HUANUO HNWSS4


Summary of Contents for HUANUO HNWSS4
- Page 1 Italiano --------------------------------- 45-55 Thank you for choosing this HUANUO product! At HUANUO we strive to provide you with the best quality products and services in the industry. Please share your experience of our product with others at www.huanuoav.com/reviews if you are satisfied. Should you have any issues, please don't hesitate to contact us.
- Page 2 Important Safty Information Please carefully read all manual before use the product. If you do not under- stand the manual or have any concerns or questions about the safety of the use, please contact our Technical Support line at 1-800-556-0533 or cus- tomer service at support@huanuoav.com.
- Page 3 TENSION ADJUSTMENT SHOULD BE DONE ONLY AFTER MOUNT INSTALLATION Do not adjust tension without monitor. 1. Ensure monitor has been attached to the mount. 2. Read your monitor box or manual to find out monitor net weight. 3. Ensure the net weight of monitor (including accessories) is between 6.6~26.4 Ibs (3-12 kg).
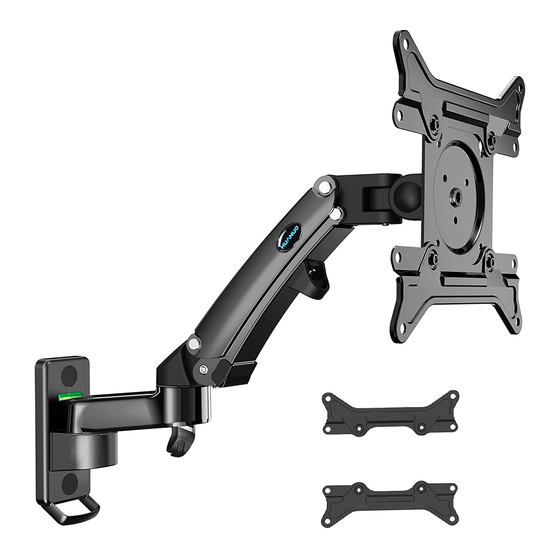
- Page 4 Parts and Hardware List Arm Assembly [01] Monitor Bracket [02] M6x6mm M4x25mm M5x25mm M6x25mm Bolt D (x4) Bolt A (x4) Bolt B (x4) Bolt C (x4) φ16xφ6.2xφ1.5 φ15xφ8.2x10 10-12mm M6x60mm Washer E (x2) Spacer F (x4) Sleeve G (x1) Lag Screw H (x2) 10-50 Wall Anchor I (x2) Allen Key J (x1)
- Page 5 1a. Wood Stud Option 1a-1 Position the arm assembly [01] at your desired height, level the arm assembly [01] and mark the pilot hole locations [01] ø2 23/64 in. (60mm) ø5/32 in. (4mm) (Not Included) 1a-2 Drill 2 pilot holes using a 5/32 in. (4mm) diameter drill bit. Make sure the depth is not less than 2 23/64 in.
- Page 6 1b. Solid Concrete or Concrete Block Option 1b-1 Position the arm assembly [01] at your desired height, level the arm assembly [01] and mark the pilot hole locations. [01] 2 9/16 in.(65mm) ø3/8 in.(10mm) (Not Included) Drill 2 pilot holes using a 3/8 in.(10mm) diameter drill bit. Make sure the depth is not 1b-2 less than 2 9/16 in.(65mm).
- Page 7 2. Attach the Decorative Covers [K] to Arm Assembly [01] [01] 3. Secure the Monitor Brackets [02] to Monitor Select Monitor Bolts Only one bolt size fits your monitor. Bolt length: Verify adequate thread engagement with bolts or bolts/spacers combination. We recommend thread engagement by at least 5 turns. -Too short will not hold the Monitor.
- Page 8 Option A: No Need to Attach Monitor Brackets [02] to Monitor 3A-1 Secure two pcs bolts into the top VESA holes on the back of the monitor manually. 3 in. (75mm)x3 in. (75mm) A/B/C 4 in.(100mm)x4 in.(100mm) Screwdriver 3A-2 0.2 in.(5mm) spacing left Please keep about 0.2 in.( 5mm) spacing left for the two bolts.
- Page 9 Option B:Need to Attach Monitor Brackets [02] to Monitor 3B-1 [02] Secure monitor brackets [02] to monitor using 4 pcs bolts(A/B/C) manually. If necessary, the spacers [F] can be used. 8in.(200mm)x4 in.(100mm) 8 in.(200mm)x8 in.(200mm) Screwdriver 3B-2 Thread 2 pcs bolts [D] to the holes in the 0.1in.
- Page 10 4. Adjust Gas Spring Tension 1. If the monitor can stay at the desired height by itself, no adjustment needed. 2. If the monitor rises up, press the arm to keep it in horizontal position and then use the 5mm Alley key [J] to turn the bolt clockwise(“-”...
- Page 11 Route Cables along the Arm Loosen the preassembled bolt Then tighten the bolt to secure on the arm, and keep the bolt the cable clip to the arm for the use in next step Pinch the cable clip to make it detach from the arm Put the cables into the cable clip, then pinch the cable clip to make it...
-
Page 12: Tilt Adjustment
Adjustments Tilt Adjustment Swivel Adjustment 1. Loosen the preassemble swivel bolt [S] 1. Loosen the preassembled tilt bolt [T] 2. Adjust your monitor to desire swivel 2. Adjust your monitor to desired tilt angle angle. 3. Tighten the preassembled swivel bolt 3.
Need help?
Do you have a question about the HNWSS4 and is the answer not in the manual?
Questions and answers