Table of Contents
Advertisement
Quick Links
Monitor Table Stand Instruction
Website:
www.huanuoav.com
Manual
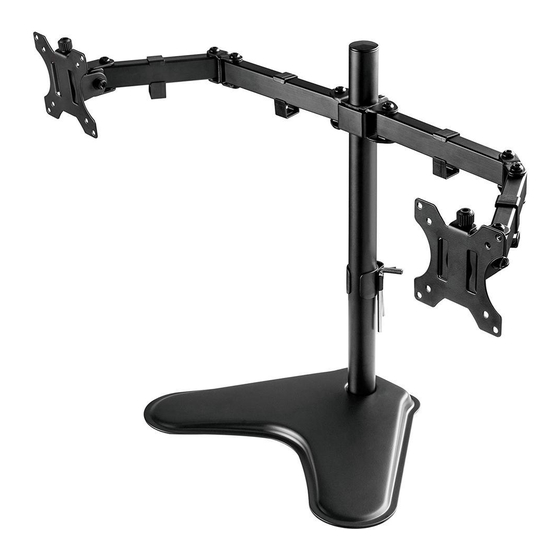
Model: HNCM1
Thank you for choosing this HUANUO product! At HUANUO
we strive to provide you with the best quality products and
services in the industry. Please share your experience of our
product with others at www.huanuoav.com/reviews if you
are satisfied. Should you have any issues, please don't
hesitate to contact us.
Technical Support:
1-800-556-0533 Mon-Fri 10am - 5pm (PST) (USA) (CAN)
Other Info:
support@huanuoav.com (US/CA)
6
Advertisement
Table of Contents

Related Manuals for HUANUO HNCM1


Summary of Contents for HUANUO HNCM1
- Page 1 Monitor Table Stand Instruction Manual Model: HNCM1 Thank you for choosing this HUANUO product! At HUANUO we strive to provide you with the best quality products and services in the industry. Please share your experience of our product with others at www.huanuoav.com/reviews if you are satisfied.
- Page 2 IMPORTANT SAFTY INFORMATION • Please read through these instructions completely before attempting installation. If you do not understand the instructions or have any concerns or questions, please contact customer service at support@huanuoav.com • Check package contents against Supplied Parts and Hardware List to assure that all components were received undamaged.
- Page 3 Bolt Bolt M5x18mm 4mm Allen Key 6mm Allen Key M3x8mm Bolt Bolt Bolt Bolt Spacer M4x12mm M4x16mm M5x12mm M5x16mm Washer M-F X8 M-A X8 M-B X8 M-C X8 M-D X8 M-E X8 Step 1 Connect the Support Pillar Assembly to the Desktop Secure the support pillar [01] to the base [02] using bolts [A] and Step 1-1 Allen key [C]...
- Page 4 Connect Cable Clip [05] and Monitor Connector [03] to the Step 2 Support Pillar [01] Slide the cable clip [05] and monitor connector [03] in sequence to the support Step 2-1 pillar [01]. Attach the cable clips [06] to the monitor connector [03], then secure the Step 2-2 monitor connector [03] to support pillar [01] using Allen key [D] Allen Key [D]...
- Page 5 Step 3 Select Monitor Bolts Only one bolt size fits your monitor. Bolt length: Verify adequate thread engagement with bolts or bolts/spacers combination. We recommend thread engagement by at least 5 turns. -Too short will not hold the monitor. -Too long will damage the monitor. Attach the Monitor Plates [04] to the Monitors Step 4 FLAT BACK MONITOR...
- Page 6 Secure Monitors to the Stand and Secure Using Nuts and Step 5 Bolts [B] Fix Tilt Angle of the Monitors Step 6 Allen Key [D] 15/64 in.(6mm)
- Page 7 Step 7 Manage Cables Step 8 Store Allen Keys into the Cable Clip 15/64 in.(6mm) 5/32 in.(4mm)
- Page 8 Note: Please make sure two arms are aligned and balanced. Features 180° 360° 360° Tilt Tilt Individual VESA plate height adjustment helps monitors to be perfectly aligned.
Need help?
Do you have a question about the HNCM1 and is the answer not in the manual?
Questions and answers