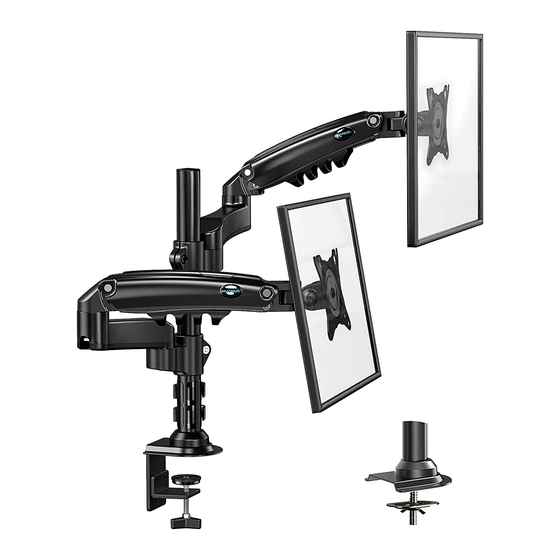
HUANUO HNDS8 Instruction Manual
Desk monitor arm
Hide thumbs
Also See for HNDS8:
- Instruction manual (14 pages) ,
- Installation instructions manual (12 pages)
Advertisement
Quick Links
INSTRUCTION MANUAL
BEDIENUNGSANLEITUNG
MANUEL D'UTILISATION
MANUAL DE INSTRUCCIONES
MANUALE D'ISTRUZIONI
取扱説明書
Rev02(A)
HNDS8
Desk Monitor Arm
EN
DE
Monitorarm für den Schreibtisch
Bras pour Moniteur de Bureau
FR
Brazo de Monitor de Escritorio
ES
Braccio per Monitor da Scrivania
IT
モニターアーム
JP
1-800-556-0533 (US/CA)
44-808-196-3874 (UK)
AMZLAB GmbH
Laubenhof 23,45326 Essen
info@amz-lab.de
THEMIS AR support ltd.
85 Great Portland St, London, United Kingdom.
info@amz-lab.de
Manufacturer: BESTQI INNOVATION (HONG KONG) TECHNOLOGY CO., LIMITED
Address: FLAT/RM 185 G/F HANG WAI IND CENTRE 6 KIN TAI ST TUEN MUN NT
----------------------------------------------
-----------------------------------
------------------------------------
------------------------------------
----------------------------------
------------------------------------------------
support@huanuo.com
02-13
14-25
26-37
38-49
50-61
62-73
www.huanuo.com
WWW.
Advertisement

Related Manuals for HUANUO HNDS8


Summary of Contents for HUANUO HNDS8
- Page 1 INSTRUCTION MANUAL BEDIENUNGSANLEITUNG MANUEL D'UTILISATION MANUAL DE INSTRUCCIONES MANUALE D'ISTRUZIONI 取扱説明書 Rev02(A) HNDS8 Desk Monitor Arm ---------------------------------------------- 02-13 Monitorarm für den Schreibtisch ----------------------------------- 14-25 Bras pour Moniteur de Bureau ------------------------------------ 26-37 Brazo de Monitor de Escritorio ------------------------------------ 38-49 Braccio per Monitor da Scrivania...
- Page 2 Product Features / Produktmerkmale / Caractéristiques du produit / Características del producto / Caratteristiche del prodotto / 製品の特徴 360° 360° 180° +80°/-35° 180° C-Clamp Mounting / Befestigung mit C-Klemme / Desk/Schreibtisch/ Montage par pince en C / Montaje con abrazadera en C / Bureau/Escritorio/ Stringere/デスク...
- Page 3 Tools Needed (NOT lncluded) Before getting started, let's make sure this mount is compatible. Yes – Perfect! Is the VESA pattern of your monitor 75 x 75mm No – This mount is NOT (3 x 3″ ) or 100 x 100mm compatible.
- Page 4 TENSION ADJUSTMENT SHOULD BE DONE ONLY AFTER MONITOR INSTALLATION Attention DO NOT adjust tension without monitor attached. 1. Verify the weight of your monitor (including accessories) is between 4.4-19.8 Ibs (2-9kg) 2. Monitor weight information can be found within its box or manual. 3.
- Page 5 Supplied Parts and Hardware for Step 1 M6 x 12mm C-Clamp Pole Assembly Bolt [C] x 4 M8 x 120mm Butterfly Nut Grommet Bolt Locking Plate [D1] x 1 [D2] x 1 [E] x 1 5/32″ (4mm) Decorative Cover Small Allen Key [F1] x 1 Supplied Parts and Hardware for Step 2 5/32″...
- Page 6 Supplied Hardware for Step 4 and Step 7 3/16″ (5mm) Large Allen Key [F2] x 1 Supplied Parts and Hardware for Step 8 M4 x 6mm Cable Cover Bolt [G] x 4 Step 1 Install the Base For C-Clamp Mounting For Grommet Mounting Skip to Page 06 For desk thickness:...
- Page 7 02-Y 02-Y 02-Y 5/32″ 5/32″ 02-X 5/32″ 02-X (4mm) (4mm) 02-X (4mm) D e s k Option B: For Grommet Mounting CAUTION: Ensure the grommet bolt is screwed securely into the base.
- Page 8 NOTE: If there is no 2″ (50mm) grommet hole on the desk, you will need to drill Electric Drill one. Mark the desired (not included) location at least 2″ Desk (50mm) from the desk edge. Drill the hole using 7/16-7/8″ Drill Bit a 7/16-7/8″...
- Page 9 You may need to grip the plate like a steering wheel to rotate. Step 3 Hang the Monitors on the Mount Hand thread bolts into the threaded inserts on the back of your monitor to determine which bolt (M4 x 12mm or M4 x 30mm) to use. A minimum of 4-5 turns into the threading is required.
- Page 10 With the top bolts attached, hang the monitor onto the VESA plate using the top 100mm slots or 75mm holes. Thread in the bottom bolts, then firmly tighten all bolts to secure the monitor to the mount arm. NOTE: Gas spring tension is preset at 8.8-11 lbs (4-5kg). After hanging the monitor on the mount, release the monitor slowly so that it doesn't suddenly fall.
- Page 11 Step 4 Adjust Gas Spring Tension Hold the upper arm in a horizontal position. In this position, you can access the gas spring tension bolt to increase or decrease tension so the arm stays in position by itself. 3/16″ (5mm) CAUTION: Desk To avoid damage to monitor or mount,...
- Page 12 Step 5 Adjust the Swivel Position of the Monitors Swivel the monitor to your desired position. Correct Incorrect Desk WARNING: Avoid the risk of tipping and falling. Do not position or swivel the monitor beyond the edge of the desktop. Step 6 Adjust the Rotation of the Monitors 360°...
- Page 13 Step 7 Adjust the Tilt Angle of the Monitors Adjust your monitor by gripping the monitor edges (do not press on the screen itself). If it's difficult to adjust, loosen the tilt-lock bolt on the monitor plate connector. Adjust the monitor to the desired angle, and then fully tighten the bolt again to lock the tilt angle.
- Page 14 Step 8 Route Cables Down the Arms Phillips Screwdriver (not included) Desk...
- Page 15 1-800-556-0533 (US/CA) 44-808-196-3874 (UK) support@huanuo.com WWW. www.huanuo.com 860-00083-00 Rev02...
Need help?
Do you have a question about the HNDS8 and is the answer not in the manual?
Questions and answers
Any instructions as to how to disarm or disassemble the monitor from the vesa mount